


Part Four: Installing DUMP1090 to decode ADS-B messages
The preceding blog post detailed the hardware requirements used in this project for tracking commercial aircraft in near real-time.In this blog post I will touch on installing the operating system on the Raspberry Pi (RPI) and the DUMP1090 software used for decoding the ADS-B signals being received by the digital broadcast receiver (also discussed in the previous blog post).
Raspbian
There are a number of choices of operating systems for the RPI. For this project, I selected the RPI Foundation’s official operating system – Raspbian.Rather than repeat verbatim the excellent instructions provided by the RPI Foundation, I would ask that you head over to their website, and follow their guidance.
You will be given the option of installing via the simpler-to-install “New Out Of the Box Software” (NOOBS) image, or as I chose (and prefer), the option which gives more control over your installation.
DUMP1090
The DUMP1090 software acts as a simple Mode S decoder for RTLSDR devices.If these two terms have appeared out of the blue to you, in summary consider Mode S as another name for ADS-B (which we have already covered) and RTLSDR is another name for our USB digital broadcast receiver (which also has many other names including RTL2832U, DVB-T SDR and many others).
The original DUMP1090 software was developed by Salvatore Sanfilippo, and was distributed via Github under the GPL3 licence.
However, as pointed out by Salvatore Sanfilippo, there is now a much more feature rich fork available. This was developed by Malcolm Robb, and it is this that we will be using on our RPI.
As with installing the operating system, Malcolm Robb’s instructions for installing and configuring DUMP1090 are well documented on his Github page.
Auto Starting DUMP1090
Having installed DUMP1090, unless you are intending on manually starting and stopping it each time your RPI is rebooted, you may choose to set it up so it automatically starts as a service.To achieve this, you will need to complete the following:
First, you need to create a script in the /etc/init.d folder. Although this script could take any name, the one used here is called dump1090.sh.
Because this folder is owned by root, and the service we are about to introduce is controlled by root, you will need to either “su -” to root, or as demonstrated below, run the commands using sudo.
Create the dump1090.sh file in /etc/init.d:
sudo vi /etc/init.d/dump1090.sh
Now copy the following into this file, changing PROG_PATH if required:#!/bin/bash
### BEGIN INIT INFO
#
# Provides: dump1090
# Required-Start: $remote_fs
# Required-Stop: $remote_fs
# Default-Start: 2 3 4 5
# Default-Stop: 0 1 6
# Short-Description: dump1090 initscript
#
### END INIT INFO
#
PROG=”dump1090″
# Change the PROG_PATH to reflect where dump1090 is PROG_PATH=”/home/pi/dump1090″
PROG_ARGS=”–interactive –net –net-http-port 8080″
PIDFILE=”/var/run/dump1090.pid”
start() {
if [ -e $PIDFILE ]; then
## Program is running, exit with error.
echo “Error! $PROG is currently running!” 1>&2
exit 1
else
## Change from /dev/null to something like /var/log/$PROG if you want to save output.
cd $PROG_PATH
./$PROG $PROG_ARGS 2>&1 >/dev/null &
echo “$PROG started”
touch $PIDFILE
fi
}
stop() {
if [ -e $PIDFILE ]; then
## Program is running, so stop it
echo “$PROG is running”
killall $PROG
rm -f $PIDFILE
echo “$PROG stopped”
else
## Program is not running, exit with error.
echo “Error! $PROG not started!” 1>&2
exit 1
fi
}
## Check to see if we are running as root first.
if [ “$(id -u)” != “0” ]; then
echo “This script must be run as root” 1>&2
exit 1
fi
case “$1” in
start)
start
exit 0
;;
stop)
stop
exit 0
;;
reload|restart|force-reload)
stop
start
exit 0
;;
**)
echo “Usage: $0 {start|stop|reload}” 1>&2
exit 1
;;
esac
exit 0
Save your file and exit from the vi editor (:wq or equivalent).Make this file executable:
sudo chmod +x /etc/init.d/dump1090.sh
Then create the runlevel shortcuts based on the default settings:
sudo update-rc.d /etc/init.d/dump1090.sh defaults
Next time you reboot the RPI, DUMP1090 should automatically start. Subsequently, you can start and stop DUMP1090 with the following:sudo /etc/init.d/dump1090.sh start
sudo /etc/init.d/dump1090.sh stopDUMP1090 Parameters
As can be observed in the dump1090.sh script above, we have provided the –interactive, –net and –net-http-port parameters (arguments).These should be sufficient for our project. However, if you want to experiment with other options, run the –help option:
./dump1090 --helpDepending on the version of DUMP1090 that you have downloaded, you should see something similar to the following:
-------------------------------------------------------
|  dump1090 ModeS Receiver         Ver : 1.10.3010.14 |
-------------------------------------------------------
--device-index    Select RTL device (default: 0)
--gain               Set gain (default: max gain. Use -10 for auto-gain)
--enable-agc             Enable the Automatic Gain Control (default: off)
--freq               Set frequency (default: 1090 Mhz)
--ifile        Read data from file (use '-' for stdin)
--interactive            Interactive mode refreshing data on screen
--interactive-rows  Max number of rows in interactive mode (default: 15)
--interactive-ttl   Remove from list if idle for  (default: 60)
--interactive-rtl1090    Display flight table in RTL1090 format
--raw                    Show only messages hex values
--net                    Enable networking
--modeac                 Enable decoding of SSR Modes 3/A & 3/C
--net-beast              TCP raw output in Beast binary format
--net-only               Enable just networking, no RTL device or file used
--net-bind-address   IP address to bind to (default: Any; Use 127.0.0.1 for private)
--net-http-port    HTTP server port (default: 8080)
--net-ri-port      TCP raw input listen port  (default: 30001)
--net-ro-port      TCP raw output listen port (default: 30002)
--net-sbs-port     TCP BaseStation output listen port (default: 30003)
--net-bi-port      TCP Beast input listen port  (default: 30004)
--net-bo-port      TCP Beast output listen port (default: 30005)
--net-ro-size      TCP raw output minimum size (default: 0)
--net-ro-rate      TCP raw output memory flush rate (default: 0)
--net-heartbeat    TCP heartbeat rate in seconds (default: 60 sec; 0 to disable)
--net-buffer          TCP buffer size 64Kb * (2^n) (default: n=0, 64Kb)
--lat          Reference/receiver latitude for surface posn (opt)
--lon         Reference/receiver longitude for surface posn (opt)
--fix                    Enable single-bits error correction using CRC
--no-fix                 Disable single-bits error correction using CRC
--no-crc-check           Disable messages with broken CRC (discouraged)
--phase-enhance          Enable phase enhancement
--aggressive             More CPU for more messages (two bits fixes, ...)
--mlat                   display raw messages in Beast ascii mode
--stats                  With --ifile print stats at exit. No other output
--stats-every   Show and reset stats every  seconds
--onlyaddr               Show only ICAO addresses (testing purposes)
--metric                 Use metric units (meters, km/h, ...)
--snip            Strip IQ file removing samples < level
--debug           Debug mode (verbose), see README for details
--quiet                  Disable output to stdout. Use for daemon applications
--ppm             Set receiver error in parts per million (default 0)
--help                   Show this help
Debug mode flags: d = Log frames decoded with errors
D = Log frames decoded with zero errors
c = Log frames with bad CRC
C = Log frames with good CRC
p = Log frames with bad preamble
n = Log network debugging info
j = Log frames to frames.js, loadable by debug.html
Confirm DUMP1090 is Working
With DUMP1090 installed and started (running), it is well worth checking it is working before going on to the next task in this project.There are a number of ways we can check whether DUMP1090 is working. We will look at three of these:
- view1090
- TCP 30003 stream
- HTTP display
One of the executables generated when you build the DUMP1090 application is a character-based view1090.
There are a number of parameters (which you can check out by running view1090 –help), but if you have not changed any of the DUMP1090 parameters listed above, should work out-of-the-box.
To verify you are in the directory in which DUMP1090 has been built (or adjust the following command with the full PATH name), run:
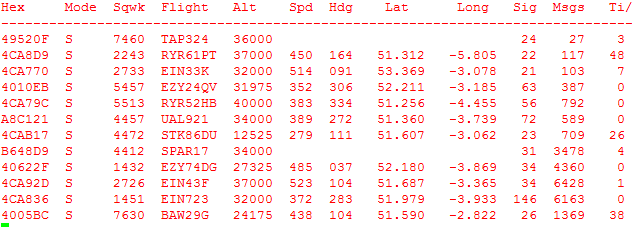
./view1090 This should start to display aircraft details that are being picked up by your receiver, similar to the following:
TCP 30003 Stream
We will be looking in more detail at this option shortly. However, for checking if DUMP1090 is writing its decoded messages to the TCP port 30003 (which we need for our integration with Kafka and then into Vertica), let’s also check this one out.
Run the following from the command line:
nc localhost 30003If DUMP1090 is working correctly, you will immediately see a continuous stream of messages, similar to the following:
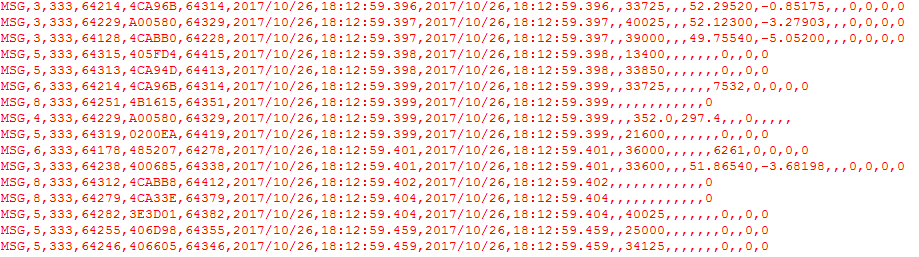
This display will continue endlessly until you terminate it (CTRL-C should do the trick).
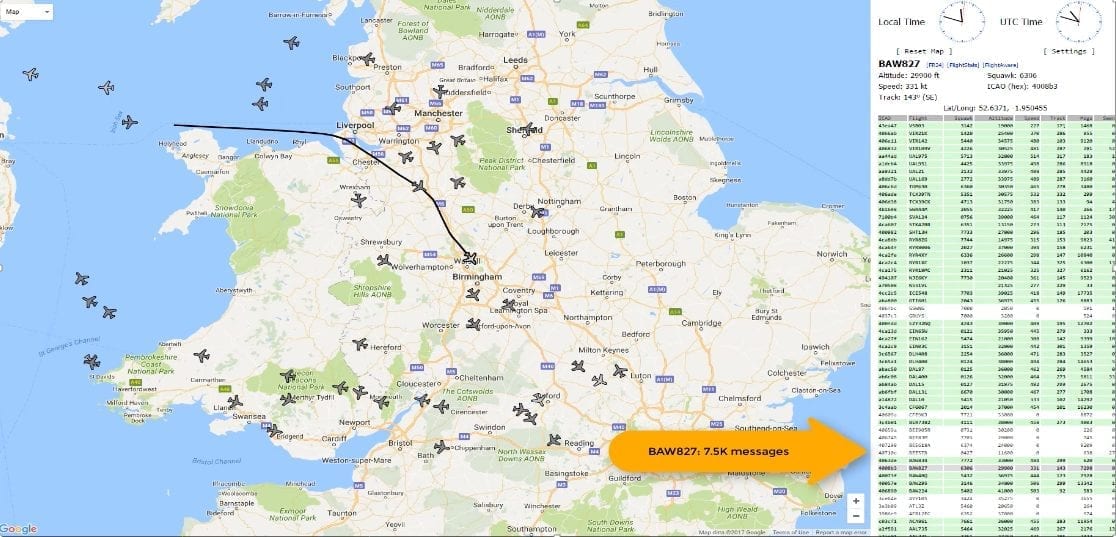
HTTP display
The final test you may wish to perform is whether the HTTP server is displaying the currently detected aircraft on Google Maps.
As this is a Graphical User Interface (GUI) display, PuTTY or a terminal session will not suffice. Your options to run this include firing up the GUI by connecting directly to the Desktop GUI of the RPI, installing VNC on the RPI and then running VNC Viewer on another machine (such as a Windows PC/Laptop), or just connecting to the HHTP server over the network.
If you have not changed the port settings of the DUMP1090 parameters, simply connect to port 8080.
DUMP1090 TCP 30003 Messages
As discussed earlier, one of the outputs of DUMP1090 is that it generates a continuous stream of messages to a predefined port (defaulting to port 30003).Although intended for use by other applications (such as BaseStation), we will be using this data to feed into a series of Kafka topics and on into Vertica tables.
As will be discussed in the blog post covering the Extract Transform and Load (ETL) application, DUMP1090 reports these messages on a predefined TCP port (30003).
As demonstrated above, it is possible to display these using the nc Linux command.
Presuming you have not changed the TCP port that DUMP1090 is writing to, running the following command should display a continuous stream of messages, an example of which is shown below.
nc localhost 30003
MSG, 6, 333, 20492, 406098, 20592, 2016/11/02, 11:23:45.733, 2016/11/02, 11:23:45.733, , 33000, , , , , , 6216, 0, 0, 0, 0
MSG, 6, 333, 20477, 403E52, 20577, 2016/11/02, 11:23:46.648, 2016/11/02, 11:23:46.648, , 4000, , , , , , 3650, 0, 0, 0, 0
MSG, 5, 333, 20477, 403E52, 20577, 2016/11/02, 11:23:48.095, 2016/11/02, 11:23:48.095, , 3900, , , , , , , 0, , 0, 0
MSG, 5, 333, 20477, 403E52, 20577, 2016/11/02, 11:23:48.156, 2016/11/02, 11:23:48.156, , 3900, , , , , , , 0, , 0, 0
MSG, 5, 333, 20477, 403E52, 20577, 2016/11/02, 11:23:51.960, 2016/11/02, 11:23:51.960, , 3900, , , , , , , 0, , 0, 0
MSG, 5, 333, 20477, 403E52, 20577, 2016/11/02, 11:23:54.583, 2016/11/02, 11:23:54.583, , 3900, , , , , , , 0, , 0, 0
MSG, 5, 333, 20477, 403E52, 20577, 2016/11/02, 11:23:55.762, 2016/11/02, 11:23:55.762, , 3800, , , , , , , 0, , 0, 0
AIR, , 333, 20497, 4CA13D, 20597, 2016/11/02, 11:23:56.485, 2016/11/02, 11:23:56.485
MSG, 8, 333, 20497, 4CA13D, 20597, 2016/11/02, 11:23:56.546, 2016/11/02, 11:23:56.546, , , , , , , , , , , , 0
MSG, 5, 333, 20477, 403E52, 20577, 2016/11/02, 11:23:56.548, 2016/11/02, 11:23:56.548, , 3800, , , , , , , 0, , 0, 0
If nothing is reported when running nc, this could be due to a number of reasons, such as DUMP1090 is not running or no aircraft are in range of the antenna.If data is being reported, this will continue until you terminate nc (such as by pressing “CTRL C”).
Message types
As can be seen from the snippet of DUMP1090 messages above, there are a number of different record types. The message types that may be seen are ID, AIR, STA and MSG. As we will later observe when we look closer at the data captured, the majority of data received from the aircraft transponders are of the MSG message type.
In summary, they comprise the following:

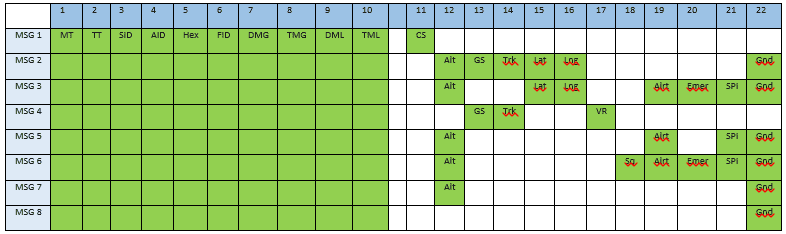
The eight MSG messages types are:
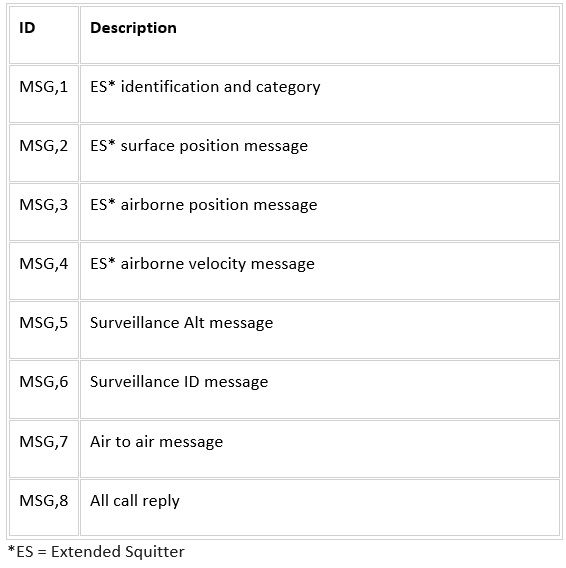
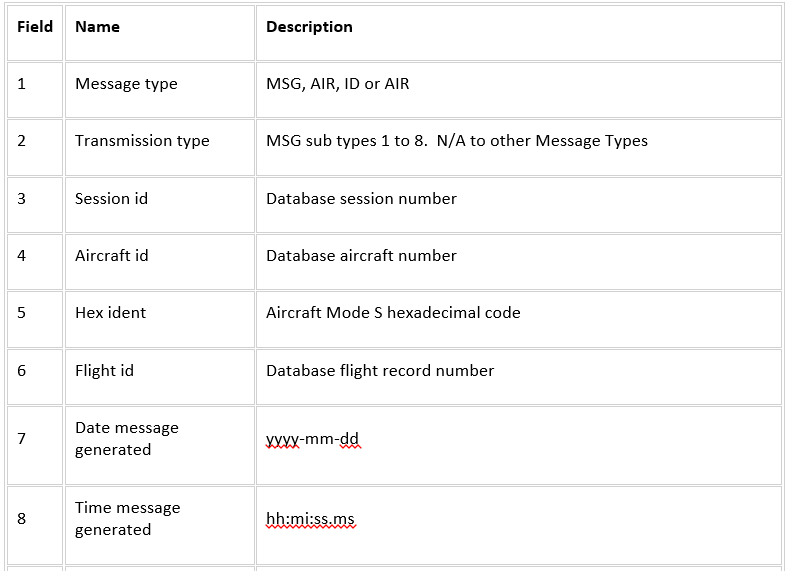
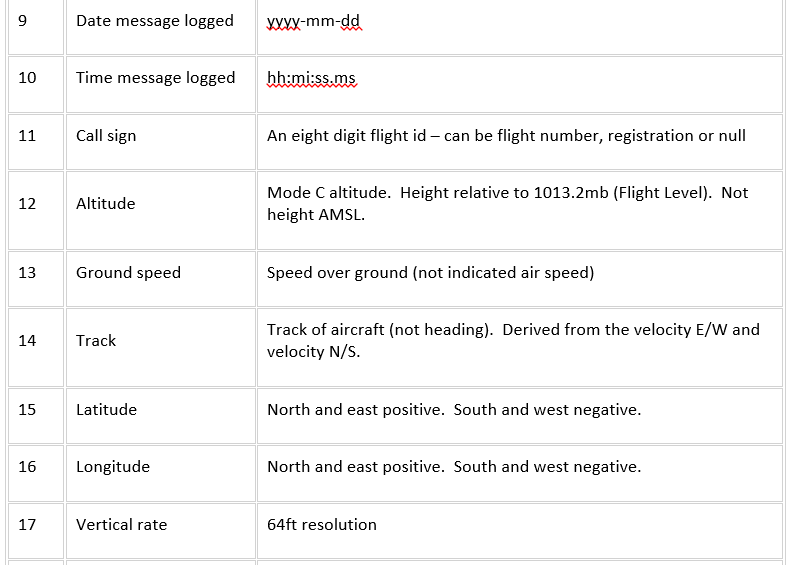
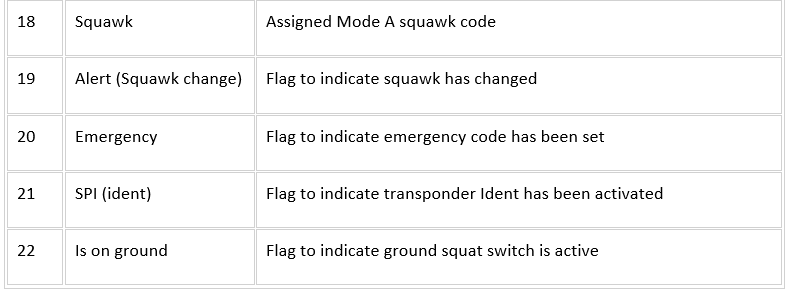
Field Data
Each of the above Message Types contain values for a subset of 22 data fields as described below:
Message Content
The table below provides an indication of which of the 22 data fields will (or at least may) be populated for each of the Message Types.
Note that all Message Types contain placeholders for the 22 data fields. Those which are not applicable to a particular Message Type are reported as NULL.
And be sure to check out the next post in our series here!
Related Links:
In case you missed it, here’s a link to the first post with the overview of the project.Here’s part two in this series.
Here’s the third blog post in this series.
Also, check out this YouTube video of me, Mark Whalley, in an airline pilot’s uniform discussing the project.
Here’s an infographic that summarizes the Flight Tracker project.
And, by the way, this project won first place at the Arkansas University Raspberry Pi Bakeoff!
About the Author
Mark Whalley
Manager, Vertica Education
From the early 1980s, Mark worked with Michael Stonebraker's Ingres RDBMS and then a number of column-store big data analytics technologies.
In 2016, he joined HPE Big Data Platform as a Systems Engineer specialising in Stonebraker’s Vertica.
In September 2017 he followed Vertica as it merged into Micro Focus – one of the world’s largest pure-play software companies.
He is passionate about technology and frequently delivers talks at the London, Cambridge and Munich Big Data & Machine Learning Meetups (of which he is the founder with its 4K+ members), the British Computer Society – Advanced Programming Specialist Group, Vertica Forums, the Institute for Analytics and Data Science at the University of Essex et al.
He is a technical blogger and author.