

This post is authored by Bill Jones and Danny Mickens.
What is Node.js?
Wikipedia defines Node.js as an “open-source, cross-platform, back-end JavaScript runtime environment that runs on the V8 engine and executes JavaScript code outside a web browser, which was designed to build scalable network applications”. Consequently, Node.js represents a “JavaScript everywhere” paradigm, unifying web-application development around a single programming language, rather than different languages for server-side and client-side scripts.
Node.js has an event-driven architecture capable of asynchronous I/O. These design choices aim to optimize throughput and scalability in web applications with many I/O operations, as well as for real-time Web applications like communication programs.
What is vertica-nodejs?
Vertica-nodejs is an open-source driver that works with Vertica. It is based on an open-source driver for postgres called node-postgres. We have preserved the API and use many of the same packages. The goal has been to create a driver custom-tuned for Vertica, which still shares much in common with the driver built for postgres.
This allows developers to write software in pure JavaScript without dependencies on any other tools or drivers. As a result, the JavaScript program may be easily deployed to run in a variety of environments.
How Can You Use vertica-nodejs?
Our goal was to make it as simple as possible for someone to get started writing JavaScript that accesses Vertica. In order to get started you will need to do three things:
- Set up a Vertica Server
- Create a Project Directory
- Install vertica-nodejs
Set Up a Vertica Server
You will need an instance of Vertica to access using the driver. The driver is compatible with every supported version of the Vertica server. If you don’t have one handy a great option is to use the vertica-ce image on dockerhub.
Create a Project Directory
Start by creating an empty directory wherever you want your code. In this example, we create a directory called node-app. We assume in the article that the directory is not in an existing node project. This simply determines whether the node-modules directory that is created when you install vertica-nodejs, gets created in your node-app directory or in a parent directory.
That’s all you need to run all the examples shown in this article, not to mention get started building your application based on Vertica.
Install vertica-nodejs
This article references the readme for vertica-nodejs, which is published here: https://www.npmjs.com/package/vertica-nodejs. It contains everything you need to get started, including a section on Installation.
Since npmjs is all about node, it assumes you already have installed the node, which runs on Linux, MacOS, and Windows. It includes npm, which is the Node Package Manager. Assuming you have that in place, all you need to do to install vertica-nodejs with npm is this:
$ npm install vertica-nodejs
This installs vertica-nodejs and all the packages it depends on in a directory named node_modules. It also generates a package.json file, which defines the dependencies of your project. If you are unfamiliar with node.js, take a closer look at what was just created.
Post Installation Setup
The first thing you will need to do is set some environment variables. This provides default values for vertica-nodejs to use when it connects to a server. It’s not the only way to connect, it is just an easy way to configure an environment to run the samples. There are other usage examples in the vertica-nodejs readme that show other ways to connect.
For the environment variables to be set every time, you should add these as exports (for Linux and MacOS) or environment variables (on Windows) to get set whenever you log in. Here is an example for Linux or MacOS running a bash shell that will connect with the vertica-ce image running on localhost:
# vertica-nodejs variables
export V_HOST=localhost
export V_PORT=5433
export V_DATABASE=VMART
export V_USER=dbadmin
export V_PASSWORD=
You are now all configured and ready to start the fun part, running the code.
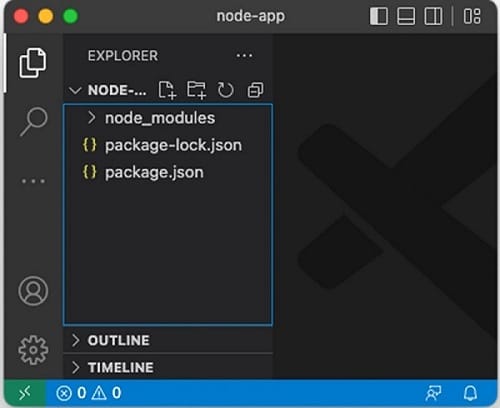
VS Code
You can use Visual Studio Code as an editor. Of course, you can use any editor you wish. If you decide to use VS Code, just open the node-app directory. Here are the files you should see:
Usage Examples
The readme information shown for vertica-nodejs has many usage examples showing how to use all aspects of the API. There are several different ways to establish a connection to your Vertica server. You can create and connect with a single client or a pool of clients, in an asynchronous or synchronous fashion, and using environment variables, default values, configuration objects, or connection strings.
Note that the connection pool examples demonstrate the convenience of the v-pool package which is the ability to run single queries at a time on any available client from the connection pool without having to check it out and release it. For more information on using connection pools to their fullest extent, check out the v-pool package documentation.
We will run through the first usage example, Basic Connection, to give you a sense of how the driver works.
Basic Connection
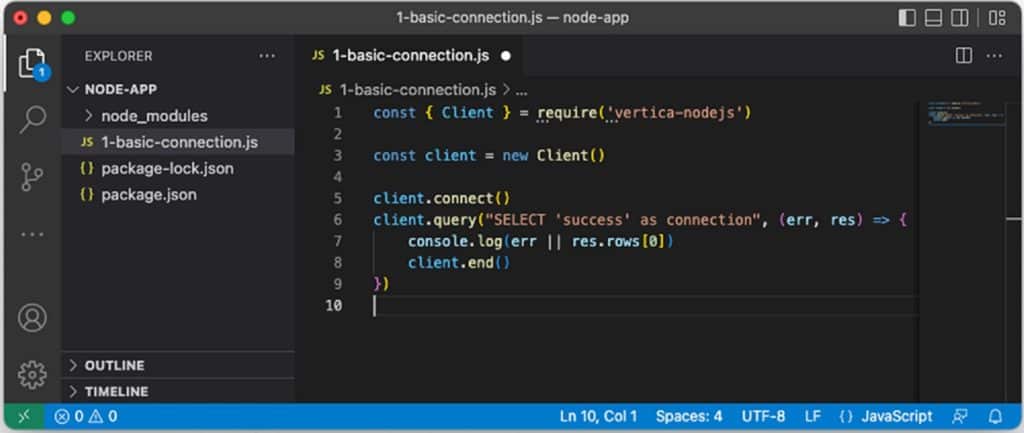
The simplest way to establish a connection is by creating a single Client instance and calling connect(). This will attempt to create a connection based on the environment variables you set earlier.
const { Client } = require('vertica-nodejs')

const client = new Client()

client.connect()
client.query("SELECT 'success' as connection", (err, res) => {
    console.log(err || res.rows[0])
    client.end()
})
Create a file in your node-app folder named 1-basic-connection.js. The easiest way to do that is to use the touch command:
$ touch 1-basic-connection.js
Alternatively, you can right-click on your node-app directory and create a new file. This will cause the
file to appear in your VS Code project, then you can copy and paste the code into the file. When you
are finished you will see this:
Make sure the code is saved, then run this command:
$ node 1-basic-connection.js
{ connection: 'success' }
This just ran the basic connection sample, created a client, connected to your database, ran the query “SELECT ‘success’ as connection”, and printed the row returned to the console.
For more information about how the driver returns results, see Executing Queries and Accessing Results.
Additional Examples
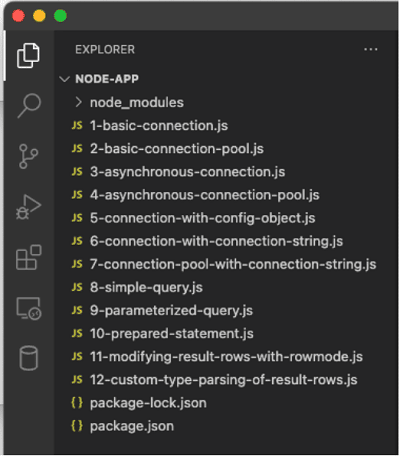
Now that you have gotten started, try the rest of the usage examples shown in the readme for vertica-nodejs. We recommend following the same steps you used for basic connection with the other sample. Each time add a new number to the file name for each example. When you are finished, you will have all 12 examples running. If you are using VS Code, your project will look like this:
We also recommend you try variations for each of the examples. See what happens when you change the code. And if you think our examples could be clearer, discover a bug, or have ideas about enhancements, follow our support instructions to log an issue in our open-source project.
Lastly, if you are inspired by what you see and want to contribute to the project, we would welcome your help. Information on contributing is also in the vertica-nodejs readme, follow the link in the
Contributions section.
About the Author
Amrita Akshay
Information Developer