


Vertica Integration with Tableau: Connection Guide
About Vertica Connection Guides
Vertica connection guides provide basic instructions for connecting a third-party partner product to Vertica. Connection guides are based on our testing with specific versions of Vertica and the partner product.
Vertica and Tableau: Latest Versions Tested
This document is based on our testing using the following versions:
| Software | Version |
|---|---|
| Partner Product |
|
| Vertica Client |
Vertica ODBC Driver 23.3.0 |
| Vertica Server |
Vertica Analytic Database 23.3.0-1 |
Tableau Overview
Tableau Software provides visualization and business intelligence products, including:
- Tableau Desktop: Graphical interface for creating visualizations and interactive dashboards in project files called workbooks.
- Tableau Server: Multi-user environment that enables collaborative access to Tableau workbooks and data.
- Tableau Cloud: Also known as Tableau Online, is a Software as a Service (SaaS) deployment of Tableau Server hosted on cloud and managed by Tableau.
- Tableau Public: Like Tableau Cloud, but without the security and privacy protections.
- Tableau Mobile: Tableau Desktop for mobile devices.
- Tableau Reader: Free desktop application that provides offline access to packaged Tableau workbooks.
How Tableau Works with Vertica
This topic summarizes how Vertica works with different Tableau products. Details are provided later in this document and in Vertica Integration with Tableau: Tips and Techniques.
Vertica and Tableau Desktop
Tableau Desktop runs on Windows and MacOS and connects live to Vertica. The connection uses ODBC.
Vertica and Tableau Server
Tableau Server runs on Windows and Linux and connects live to Vertica. Tableau Server may be deployed on-premises or in the cloud. The connection uses ODBC.
Vertica and Tableau Cloud
Tableau Cloud connects live to Vertica on-premises using Tableau Bridge. The connection uses ODBC.
Tableau Bridge
Tableau Bridge is a client that enables Tableau Cloud to connect to data in Vertica that it cannot access directly. It is required to install Vertica’s ODBC driver on the machine where Tableau Bridge is running. See the following topics in this document for details:
For details about Tableau Bridge, see the Tableau documentation.
Vertica and Tableau Mobile
Tableau Mobile connects live to Vertica through Tableau Server using any of the deployment scenarios described in Vertica and Tableau Cloud.
Vertica and Tableau Reader
Tableau Reader provides offline snapshots of Tableau workbooks, so it does not support connections to Vertica. Tableau Reader opens workbook files that have been packaged with the data.
Installing Tableau Desktop
- Ensure that your system meets the requirements specified in the Tableau documentation.
- From the Tableau website, download the Tableau installation file based on your operating system.
- Launch the executable.
- Follow the prompts for installation.
Note To install Tableau Server and other Tableau products, follow the instructions in the Tableau documentation.
Installing the ODBC Driver
Tableau uses the Vertica ODBC driver to connect to your Vertica database. You must install Vertica’s ODBC driver on the machines hosting Tableau Desktop, Tableau Server, and Tableau Bridge client. Follow these steps to install the ODBC driver:
Windows or MacOS
For Tableau products running on Windows or MacOS
- Navigate to the Vertica Client Drivers page.
- Download the ODBC client package that is compatible with your Vertica server version.
Note For more information about client and server compatibility, see Client Driver and Server Version Compatibility in the Vertica documentation.
- Double-click the installer and follow the prompts to install the ODBC component. The client package includes other drivers such as ADO.NET. You only need to install the ODBC driver.
Note You do not need to create a DSN to connect to Vertica from Tableau.
Linux
For Tableau products running on Linux, follow these steps:
- Navigate to the Vertica Client Drivers page.
- Download the ODBC driver:
- CentOS and Redhat Enterprise Linux: Download the RPM.
- Ubuntu: Download the TAR file.
- Run the following command:
- CentOS and Redhat Enterprise Linux:
sudo rpm --nodeps -ivh <driver_name>.rpm --force
- Ubuntu: Download the TAR file.
sudo tar -C / -xzvf <driver_name>.tar.gz
- CentOS and Redhat Enterprise Linux:
- Append the following section to the /etc/odbcinst.ini file:
[Vertica]
Driver=/opt/vertica/lib64/libverticaodbc.so
- Restart Tableau Server.
Note
You do not need to create a DSN to connect to Vertica from Tableau. The odbc.ini and vertica.ini files are not required. Only the odbcinst.ini file is required in /etc/ with the correct location of the driver.
For installation instructions for your platform, see Installing the ODBC Client Driver.
Connecting Tableau Desktop to Vertica
-
Open Tableau Desktop.
The Connect page opens.
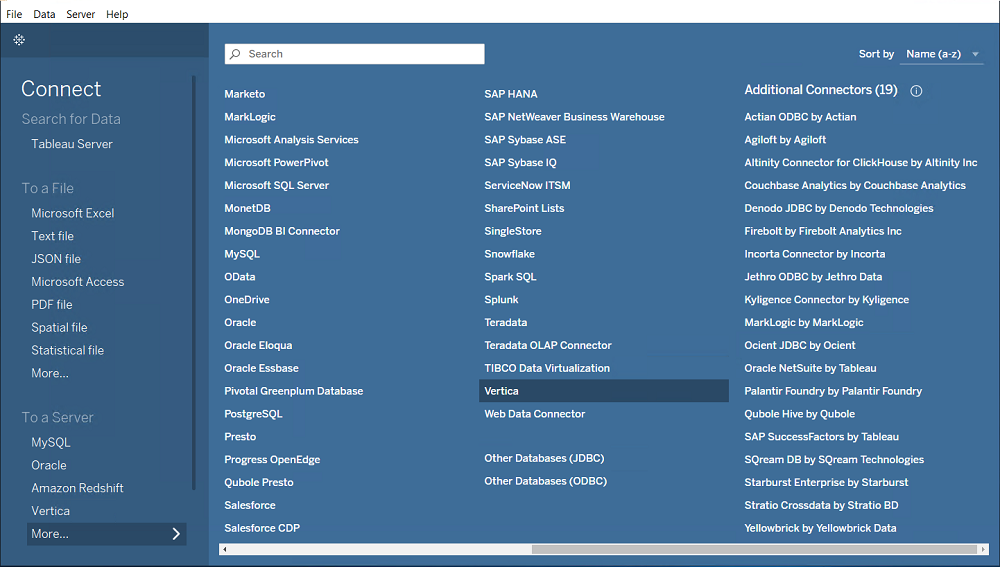
-
In the To a Server list, select More... > Vertica.
-
On the Server Connection page, enter the following connection information: Server, Port, Database, Authentication, Username, and Password.
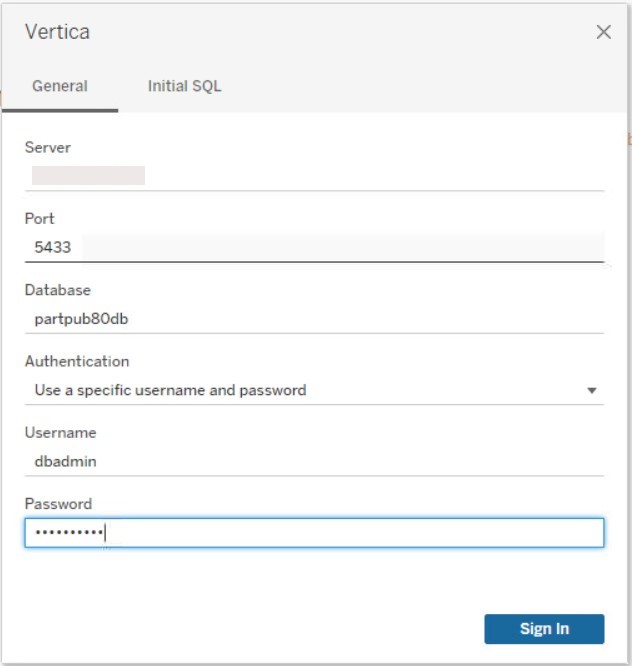
-
Click Sign in to connect.
The Data Source page is displayed.
-
From the Schema drop-down list, select or search the schema you want to work with.
After you select a schema, a list of tables in that schema appears.
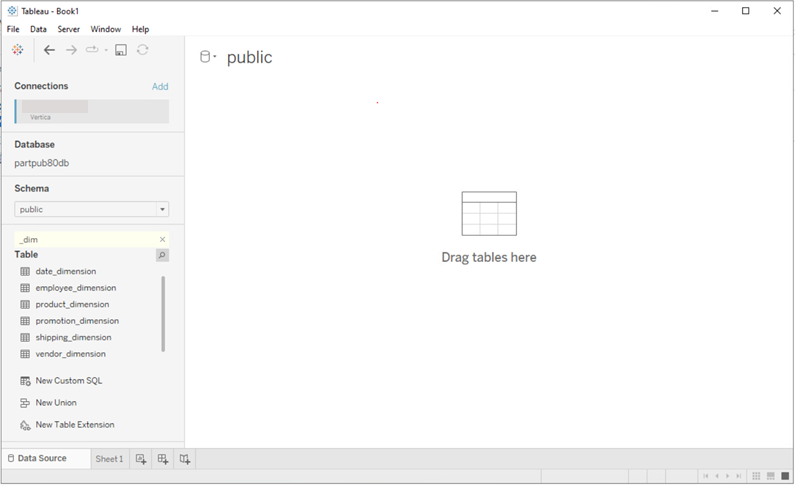
- To define a data source for your visualizations, rag and drop tables to the area Drag tables here.
-
Select the type of connection, Live or Extract. Live is selected by default. A live connection is recommended.
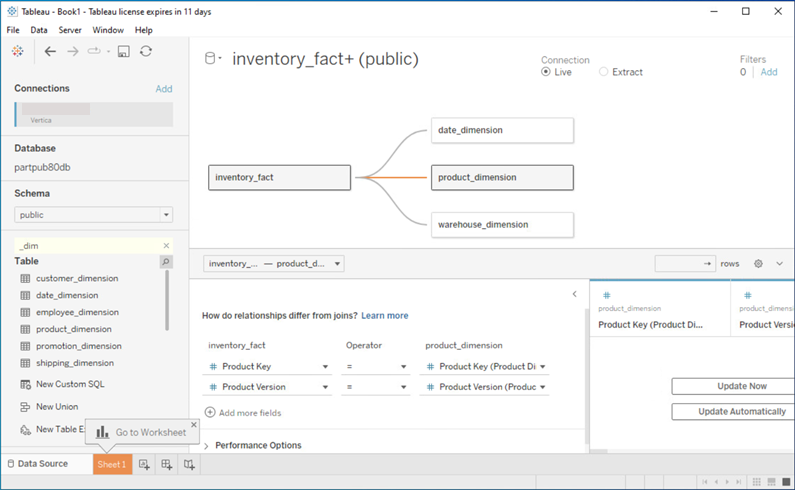
- After you define your data source, click Sheet1 to start designing your visualizations.
Note We recommend creating a data source by dragging tables to Drag tables here. Tableau identifies the joins between the tables and you can edit the relationships as needed.
Connecting Tableau Cloud to Vertica
You can connect Tableau Cloud to Vertica on-premises as described in Vertica and Tableau Cloud in this guide.
Connection Requirements
Before you can connect, you must:
- Install and activate Tableau Bridge, as described in the Tableau documentation.
Note Ensure that Vertica’s ODBC driver is installed in the machine where Tableau Bridge is running.
- Publish a workbook or a data source from Tableau Desktop to Tableau Cloud.
Note Live connection support to Tableau Cloud is available only for data sources that are published separately. Live connection support is not available for data sources that are embedded in published workbooks.
Publishing a Workbook to Tableau Cloud
- Ensure that Tableau Bridge is active.
- Open Tableau Desktop.
- Create a workbook.
- Select Server > Publish Workbook.
- When prompted, connect to Tableau Cloud.
- In the Publish Workbook to Tableau Online dialog box, in the Data Sources section, click Edit.
- In the pop-up screen, in the Publish Type drop-down menu, select Publish Separately.
-
Select Maintain connection to a live data source.
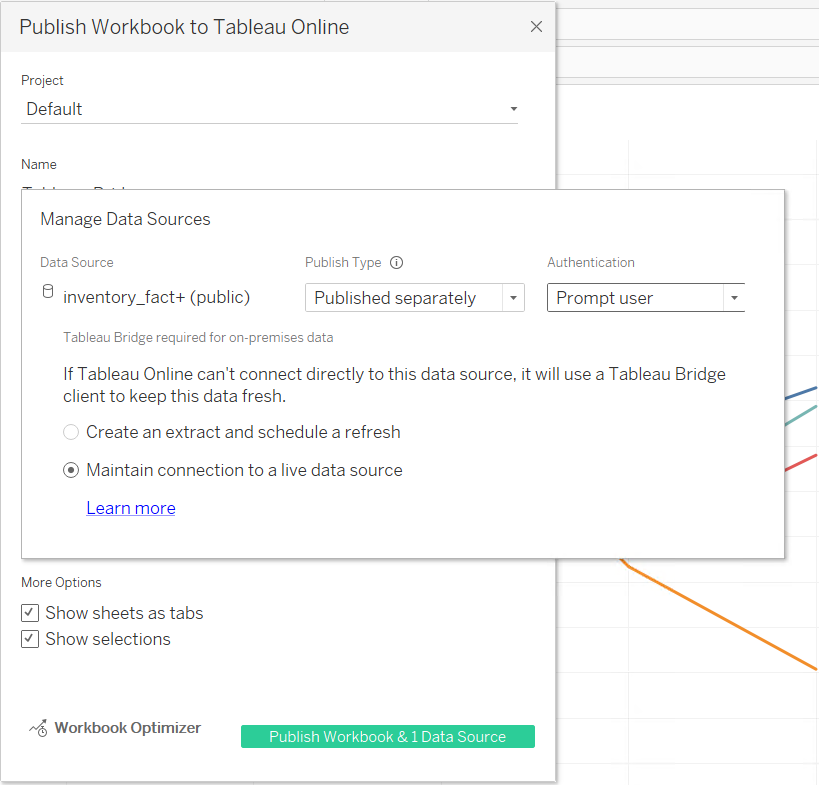
Note The first time you publish the workbook from Tableau Desktop to Tableau Cloud, the Publish Type Embedded in workbook is selected by default. However, this option does not allow a live connection to Vertica and instead publishes the workbook with an extract of the data. You need to change the selection to “Published separately” in the “Publish Type” drop-down to connect live to Vertica.
- Check Show sheets as tabs.
- Click Publish Workbook & 1 Data Source.
- Switch to Tableau Cloud. Click the workbook you just published and select the Data Sources tab.
-
View the Data Source you published with your workbook. It should display a live connection.
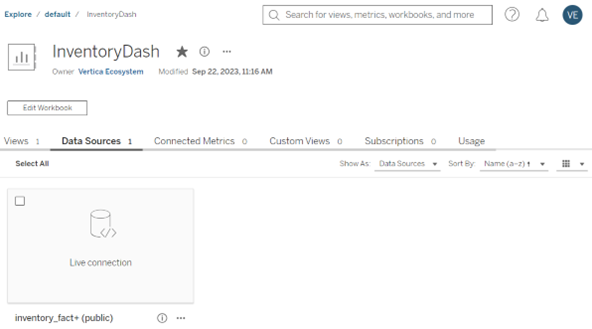
Now you can visualize the worksheets and see queries running live in Vertica.
You can also edit the workbook or create a new one using the published data source and the queries will be executed in Vertica.
Publishing a Data Source to Tableau Cloud
To connect live to Vertica on-premises from Tableau Cloud, the second option is to publish your data source from Tableau Desktop to Tableau Cloud. Follow these steps:
- Ensure that Tableau Bridge is active.
- Open Tableau Desktop.
- Create a workbook.
- Select Server > Publish Data Source. From the pop-up list, select the data source you want to publish.
- If you have not already done so, sign into Tableau Cloud.
- In the Publish Data Source to Tableau Online window, in the Tableau Bridge required for on-premises data section, select Maintain connection to a live data source.
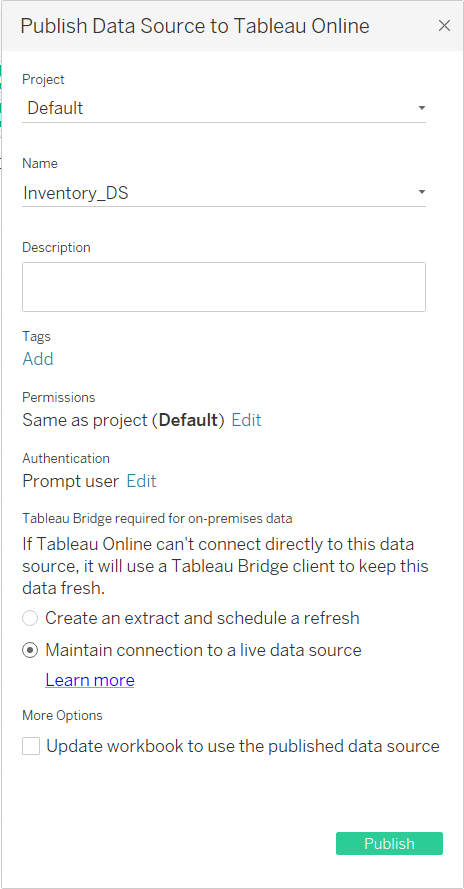
-
Click Publish.
-
Switch to Tableau Cloud, the data source you just published should display a live connection.
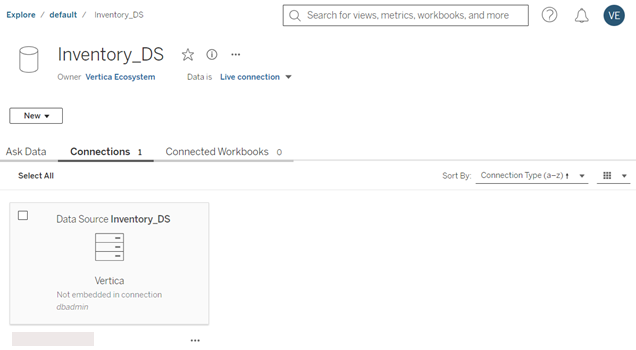
You can now create a new workbook using this data source and see the queries running live in Vertica.
Known Limitations
The following is a list of known data type limitations using Tableau Desktop with the ODBC driver:
- For LONG VARCHAR data types, up to 65000 characters are displayed beyond which the values are truncated.
- For TIMETZ and TIMESTAMPTZ data types, milliseconds and time zone values are not displayed.
- For TIME and TIMETZ data types, format the value to HH:mm:SS. To do this, right-click the field, click Default properties > Date format.
-
For NUMERIC data type, precision up to 15 digits is supported. Digits to the right of the decimal point are truncated.
Troubleshooting
Review the following known issue and workaround when connecting Tableau to the current version of Vertica:
Multiple Active Result Sets Per Session
Issue: The Vertica driver does not support multiple queries sharing the same connection. Vertica can only run one query at time within a connection. If Tableau pushes multiple queries down to the Vertica server at the same time using the same connection, you may see the error:
An error occurred during query preparation: Multiple commands cannot be active on the same connection. Consider increasing ResultBufferSize or fetching all results before initiating another command.
Solution: To work around this restriction, in the TDC file, change the value of the ResultBufferSize connection parameter.
If you are using large result sets in streaming mode, increase the size of your Vertica buffer. Setting the ResultBufferSize to 0 is equivalent to setting the buffer to an unlimited size. The default buffer size is 131072 bytes (128 KB). To increase the size of the buffer, add the following entry to your .tdc file, adjusting the ResultBufferSize according to the needs of your environment.
<customization name='odbc-connect-string-extras' value=' ResultBufferSize=500000' />
For related information, see Data Source Name (DSN) Connections Parameters in the Vertica documentation.
For More Information
See the following resources:

