


Vertica and Attunity Replicate Change Data Capture: Technical Exploration
About this Document
This document provides information about setting up Attunity Replicate Change Data Capture (CDC) to replicate from an Vertica source database to another Vertica target database using the ODBC protocol. CDC is the process used to determine changes made to a source database. Those changes can then be applied to a target database. By allowing you to detect, capture, and deliver changed data, CDC reduces the time required for and resource costs of data warehousing while enabling continuous data integration.
Attunity Replicate does not provide a named connector for Vertica to be used as Source. This document describes how you can capture changed data by using ODBC with CDC to connect to Vertica as Source and a named connector (Vertica) to connect to Vertica as Target.
Attunity Replicate Overview
Attunity Replicate provides automated, real-time and universal data integration across all major data lakes, streaming systems, databases, data warehouses, and mainframe systems on-premises. Attunity Replicate empowers organizations to accelerate data replication, ingest and stream across heterogeneous data sources.
Before You Begin
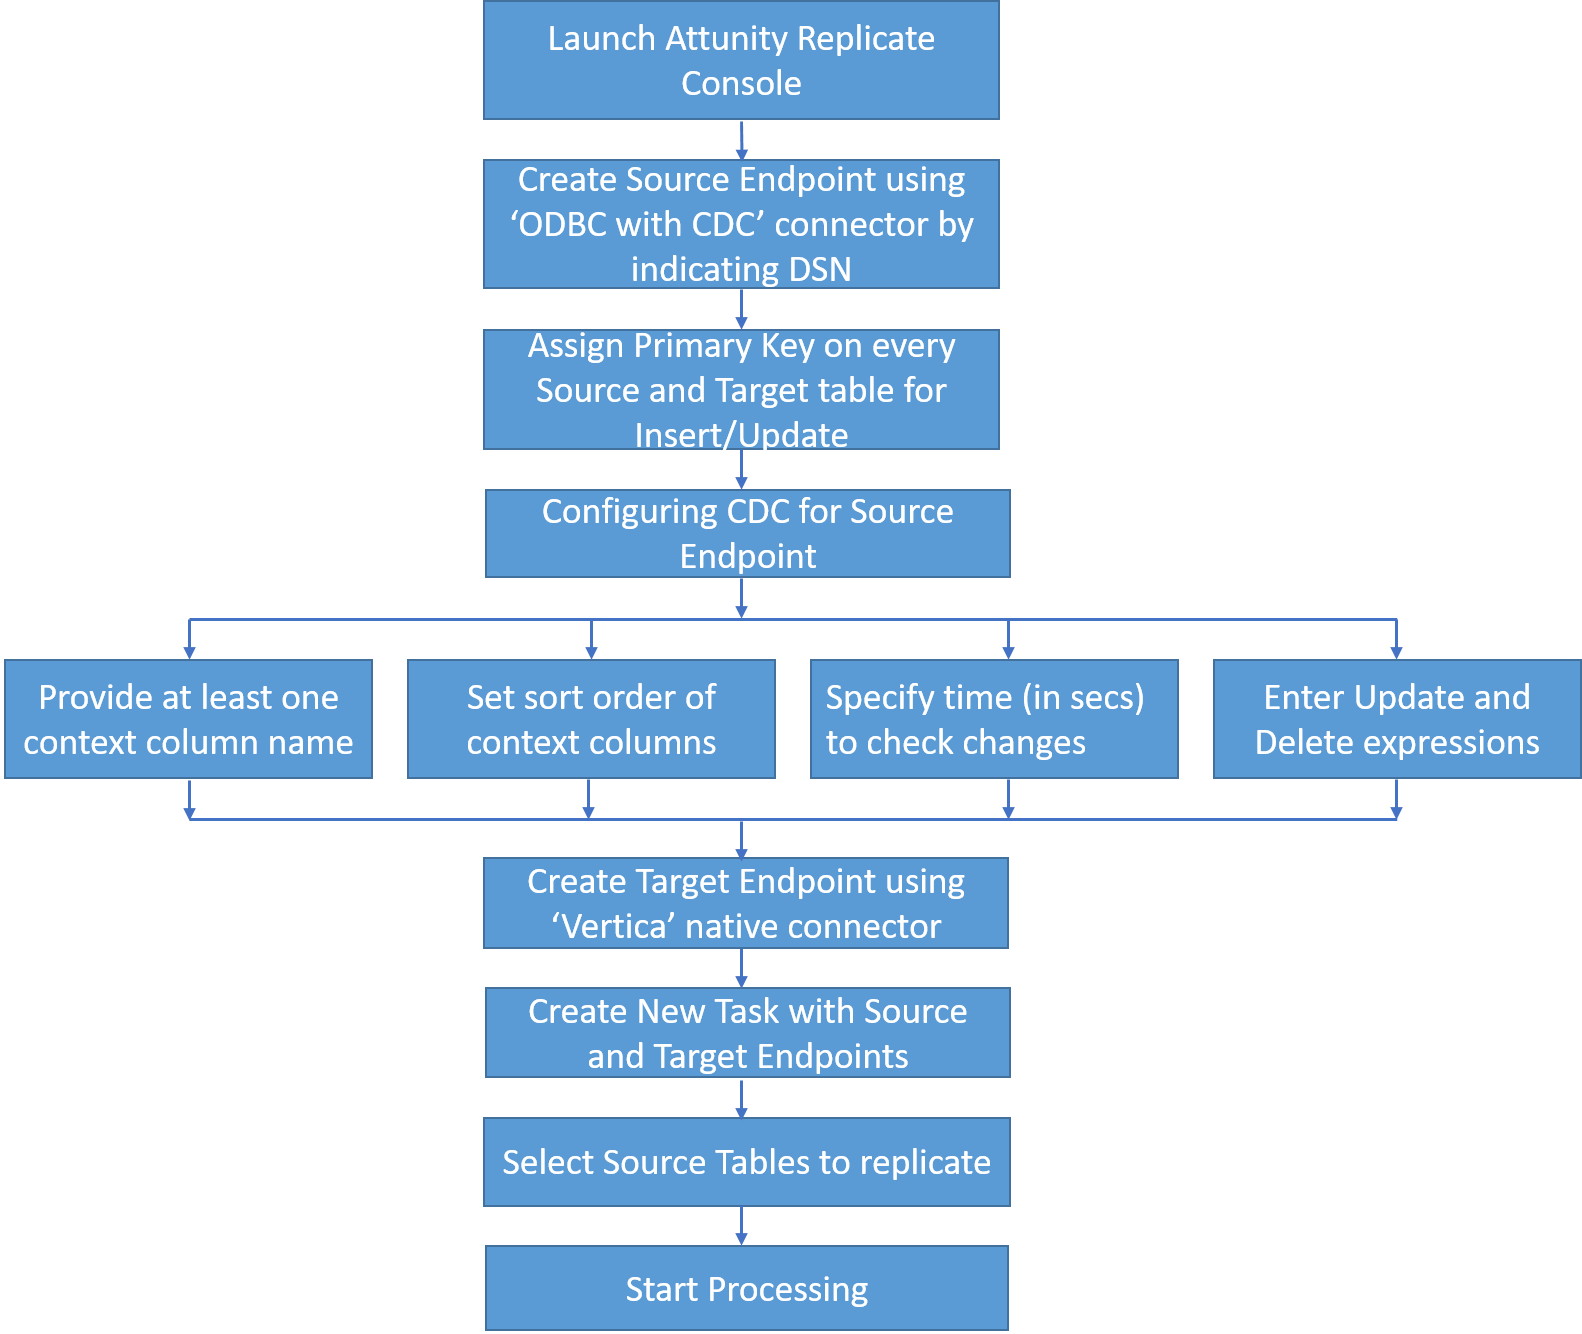
Following is a flow chart that illustrates the high level tasks that you need to perform to replicate data from a Vertica source database to a Vertica target database.
Prerequisites
-
Attunity Replicate is installed on Windows Server 2012 or higher, Red Hat Linux Enterprise Linux 6.2 and above 64-bit server.
-
Vertica Client Driver (ODBC) 64-bit is installed on Windows or Linux environment to connect to the database.
-
To connect an endpoint to Attunity Replicate ensure that a DSN is defined for the ODBC endpoint on the system where Attunity Replicate is installed.
- For Vertica as a source, CDC processing requires Primary key on the tables to insert or update source and target tables.
-
To replicate data from every table in the target database, there must be at least one special "Context" column such as Action_TimeStamp in source database tables with unique values for every record. This enables Attunity Replicate to determine whether data has changed by comparing the current data with the values stored in Attunity Replicate repository.
-
By default, all changes are assumed to be INSERTs. If UPDATE and DELETE operations are also performed on the source tables, you can write an UPDATE and/or DELETE expression in Source Endpoint Change Processing tab based on an additional Column “Oper” added in the Source Tables definition to apply the UPDATE/DELETE operation on Target Tables.
Following is a sample table used for CDC processing with Context Column (Action_Timestamp) and UPDATE/DELETE Expression Column (Oper) added in the source database table:
Create Table source.emp_dimension
( employee_key integer not null,
employee_gender varchar(8),
courtesy_title varchar(8),
employee_first_name varchar(64),
employee_middle_initial varchar(8),
employee_last_name varchar(64),
employee_age integer,
hire_date date,
employee_street_address varchar(256),
employee_city varchar(64),
employee_state char(2),
employee_region char(32),
job_title varchar(64),
reports_to integer,
salaried_flag integer,
annual_salary integer,
hourly_rate float,
vacation_days integer,
Oper char(1),
Action_Timestamp Timestamp
);
Alter Table emp_dimension ADD PRIMARY KEY (employee_key) Enabled;
The sample table in which data will be replicated is created as follows:
Create Table target.emp_dimension
( employee_key integer not null,
employee_gender varchar(8),
courtesy_title varchar(8),
employee_first_name varchar(64),
employee_middle_initial varchar(8),
employee_last_name varchar(64),
employee_age integer,
hire_date date,
employee_street_address varchar(256),
employee_city varchar(64),
employee_state char(2),
employee_region char(32),
job_title varchar(64),
reports_to integer,
salaried_flag integer,
annual_salary integer,
hourly_rate float,
vacation_days integer,
);
Alter Table emp_dimension ADD PRIMARY KEY (employee_key) Enabled;
The last two columns Oper and Action_Timestamp in the source table are not required in the target table.
Connecting Attunity Replicate to Vertica
-
Open a browser and type the following to go to the Attunity Replicate login page. Enter the credentials to log in.
Windows:
- In the Manage Endpoint Connections dialog box, click New Endpoint Connection to create source/target data source.
- Click Test Connection.
- Click Save and Close.
https://<IPAddress or HostName>/attunityreplicate
Linux:
https://<IPAddress or HostName>:<Port_Number>/attunityreplicate
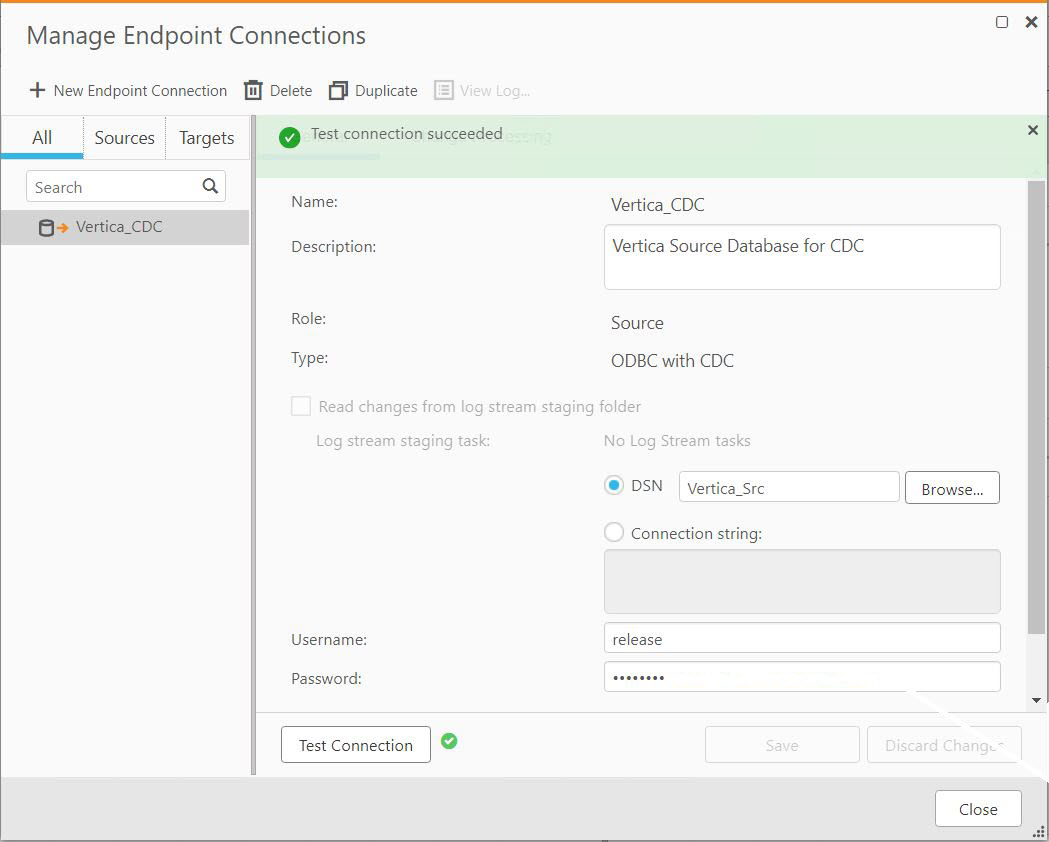
In the General tab type or select the required details:
• Name: Type a name for your ODBC endpoint. This can be any name that will help you identify the endpoint used.
• Description: Optionally, provide the required details about the endpoint.
• Role: Select Source as the endpoint source.
• Type:
For Windows, select ODBC with CDC as the endpoint type and select source DSN by clicking Browse.
For Linux, select Connection string and enter the ODBC connection string.
• Username: Type the database username.
• Password: Type the database password.
Configuring Change Data Capture
Attunity Replicate scans an endpoint’s transaction logs for changes and then applies those changes to the target endpoint. However, this method of change processing is not possible with Vertica as a source since these Vertica endpoints do not generate transaction logs.
The Change Processing tab lets you define change processing settings for ODBC with CDC source.
- Click Change Processing and type or select the required details.
- Click Save and Close.
- Click the Manage Endpoint Connections tab again to open the Manage Endpoints Connections dialog box, and then click New Endpoint Connection:
- Click Test Connection.
- Click Save and Close.
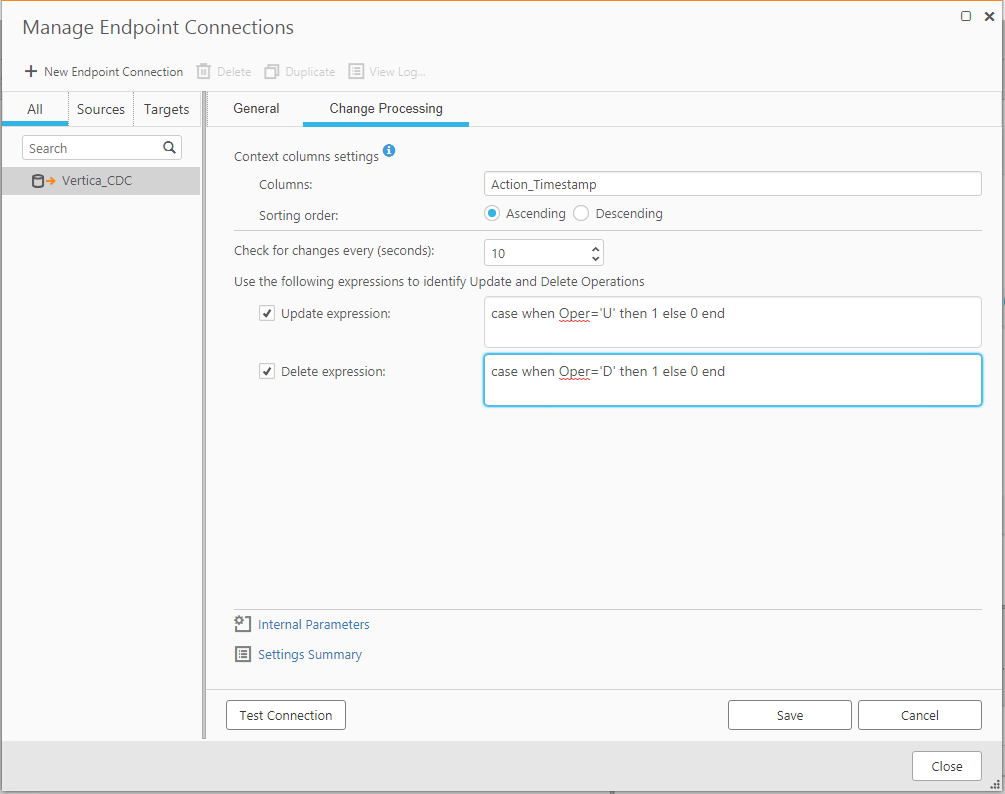
• Context Column Settings: Provide at least one context column name of the source endpoint table. Context column(s) are columns in a table that enable Attunity Replicate to determine if data has changed. Any number of Context columns in a table can be used separated by comma(s) as long as the context column names are the same for all source tables. Each value in the context column must be unique.
• Sorting Order: Select Ascending or Descending sort order of the context column(s).
• Check for changes every (seconds): Specify how often to check for changes.
• Update and Delete Expressions: Enter the expressions. Attunity Replicate uses these expressions to identify update and delete operations.
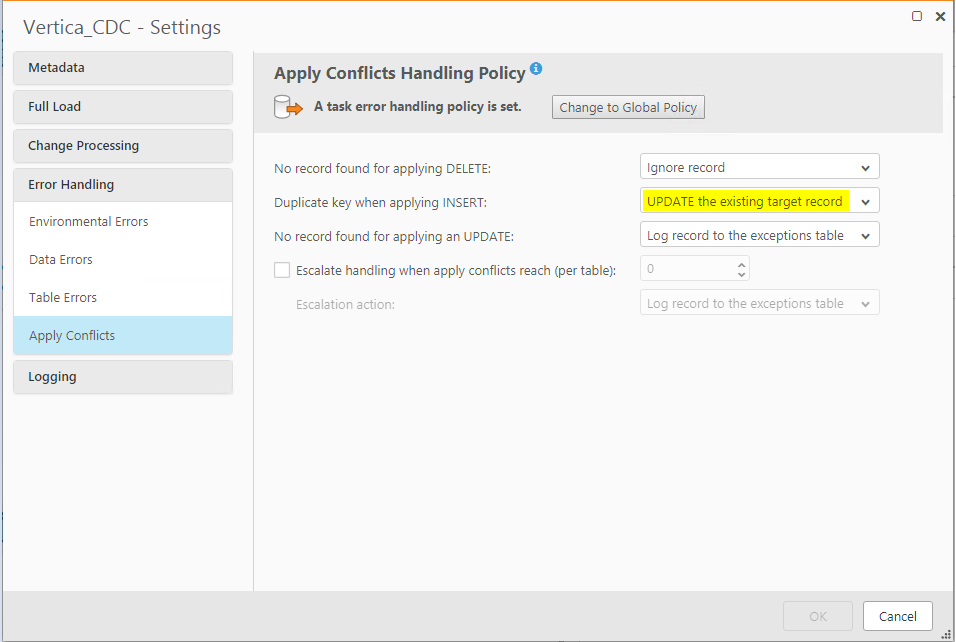
If you do not enter any expression, any row whose context column value is higher or lower than the previous context column value stored in the Attunity repository, will be an INSERT. Alternatively, you can select the UPDATE the existing target record option in the Apply Conflicts tab in Task settings.
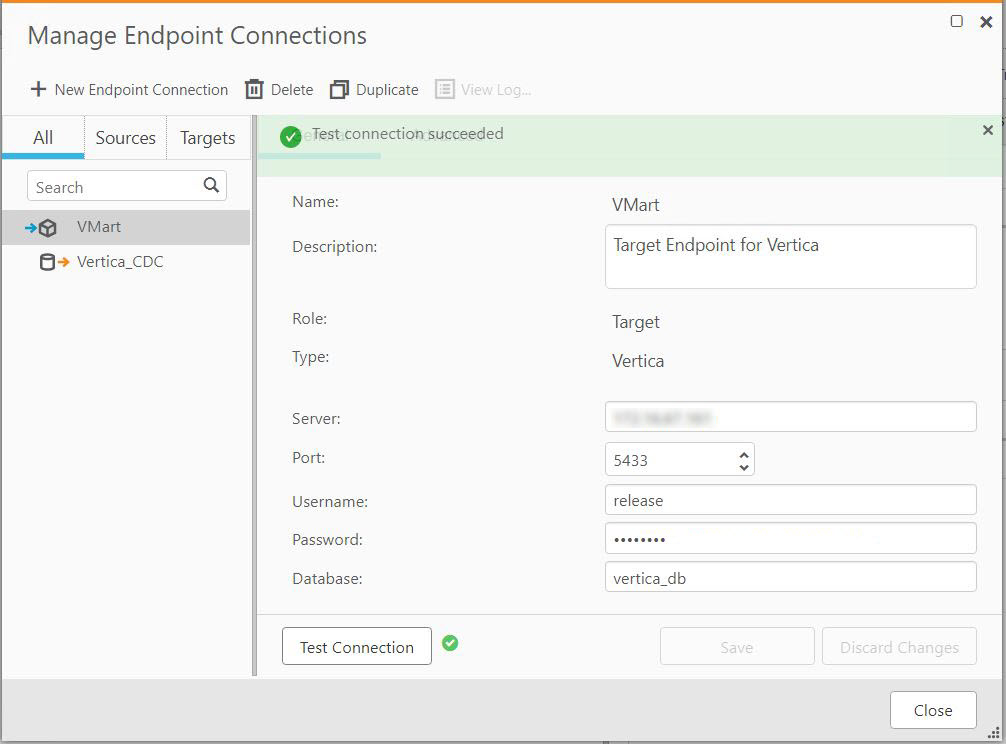
• Name: Type a name for your ODBC endpoint. This can be any name that will help you identify the endpoint used.
• Description: Optionally, provide the required details about the endpoint.
• Role: Select Target as the endpoint role.
• Type: Select Vertica as the endpoint type.
• Server: Type the target database IP.
• Port: Specify the database port.
• Username: Type the database Username.
• Password: Type the database password.
• Database: Type the database name.
Attunity Replicate Task Setup
- Click New Task and provide the required details:
- Click OK.
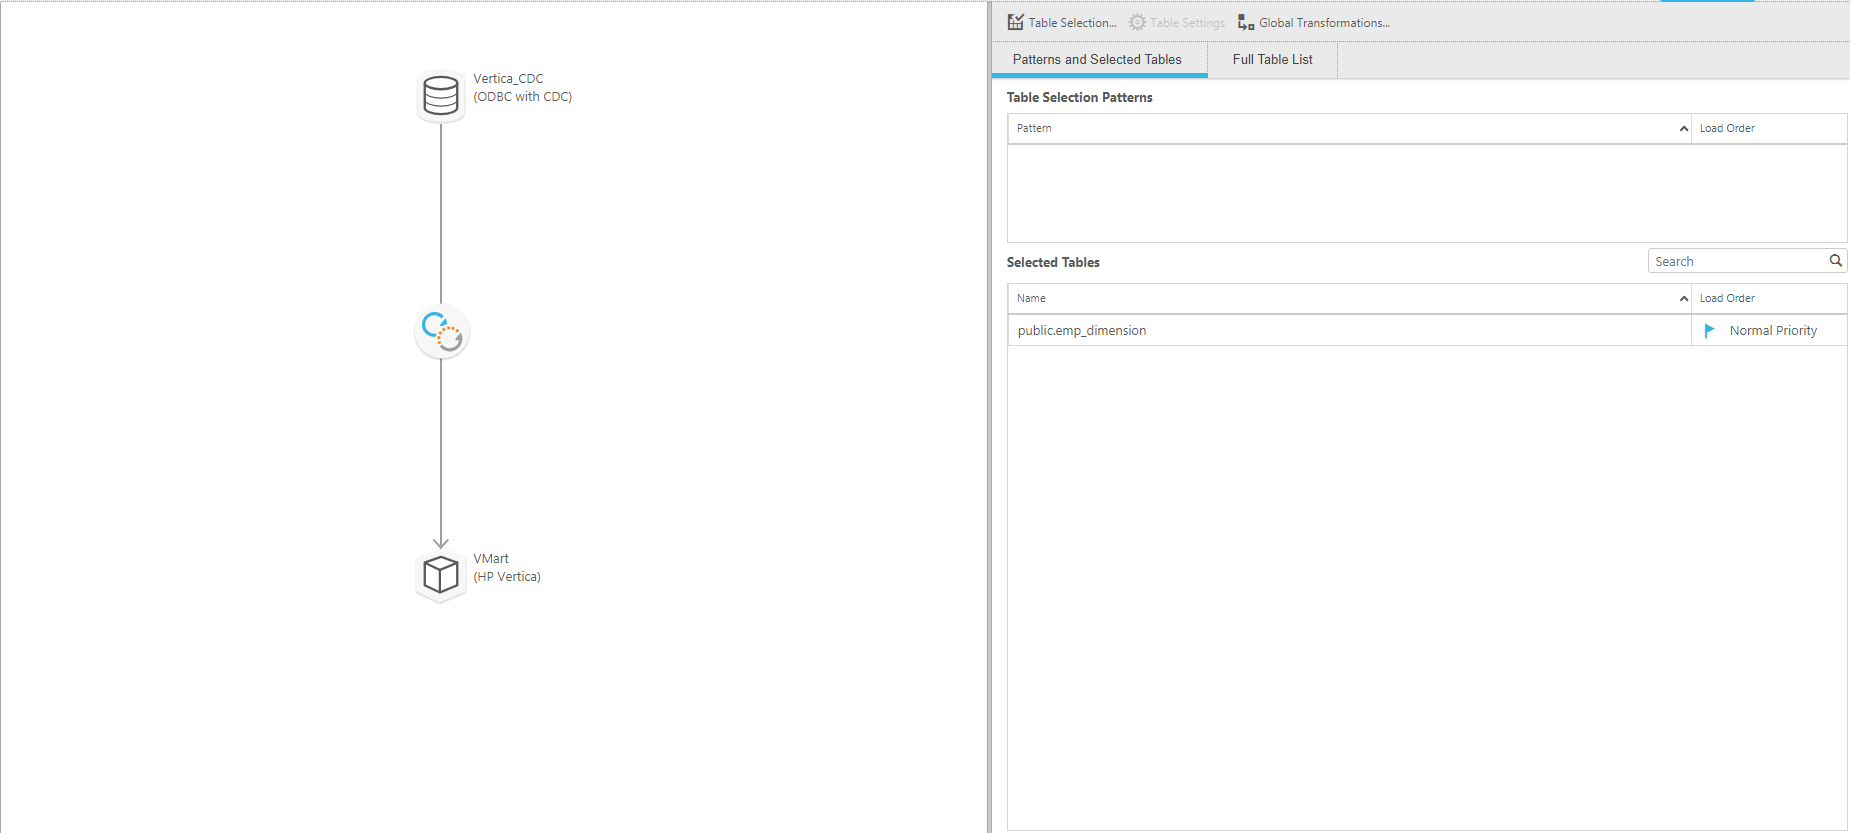
- Drag and drop the Vertica Source and Vertica Target database created above in the required fields and select the source table(s) to be replicated:
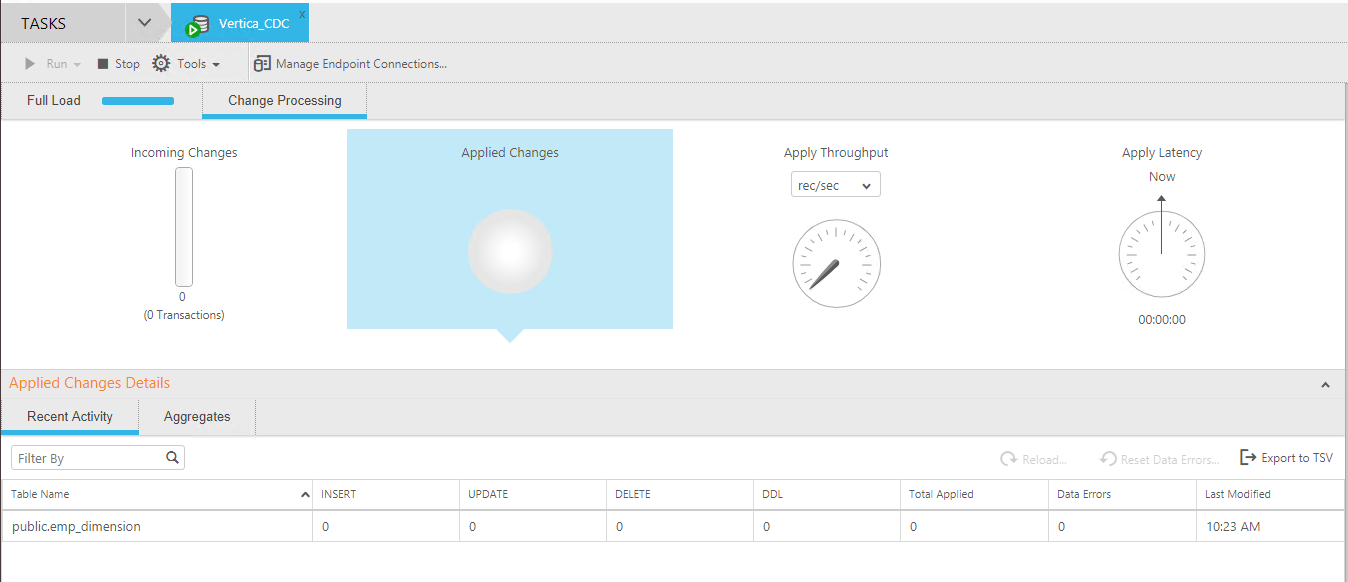
- Start the task to replicate data from source to target. For the first time, the Source table is kept blank to test the Insert, Update and Delete operations.
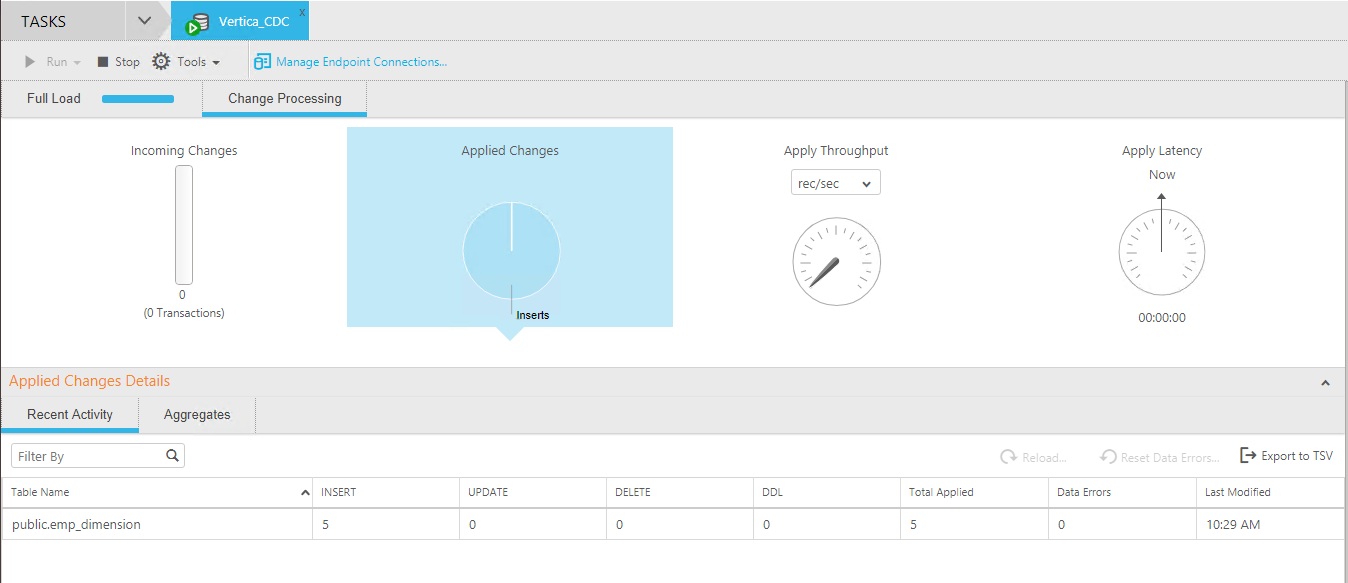
- Data Insert: A couple of rows are inserted in source table to validate the Insert operation replication:
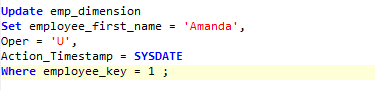
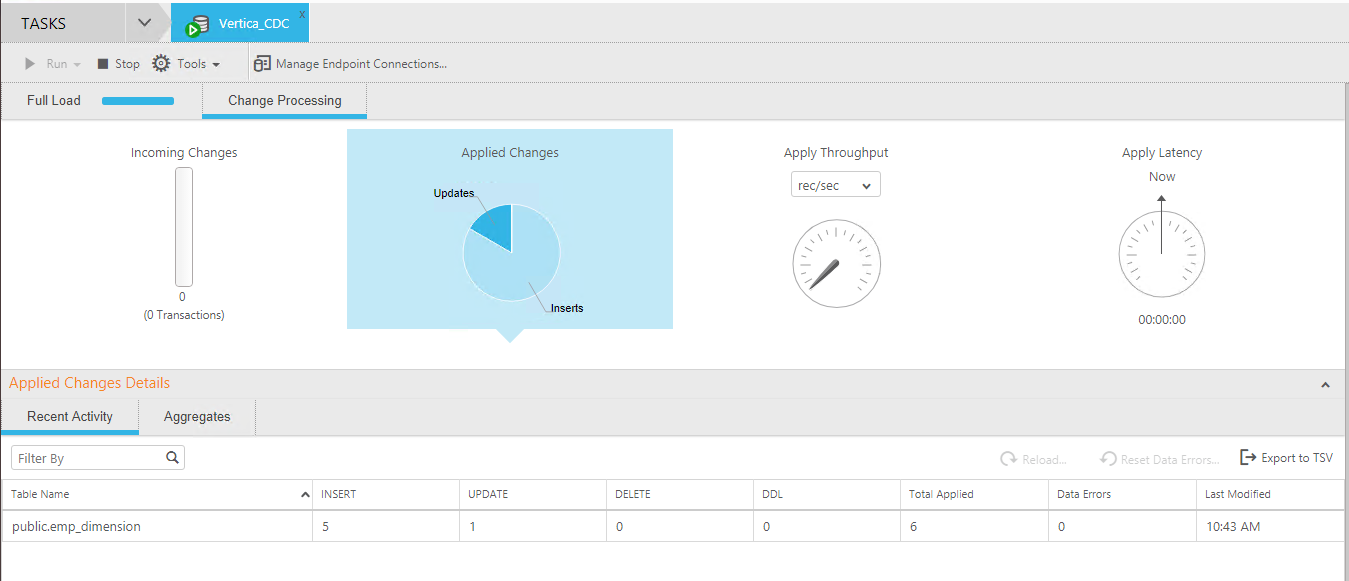
- Data Update: A few values are updated in the source table to validate the Update operation replication. The Context Column(s) (Action_Timestamp) needs to be updated to determine if data has changed. If the source endpoint has an update expression, the value of the Oper column needs to be updated as well for Update operation. Alternately, you can select UPDATE the existing target record in the Apply Conflicts tab in Task settings.
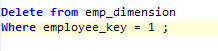
- Data Delete: To delete data from the target table, first update the Context Column(s) (Action_Timestamp) and Oper to ‘D’. Once the specific record’s Context Column and Oper (updated to ‘D’) are updated, the desired record will be deleted from the target table. Following that, the desired record needs to be deleted from the source table as well.
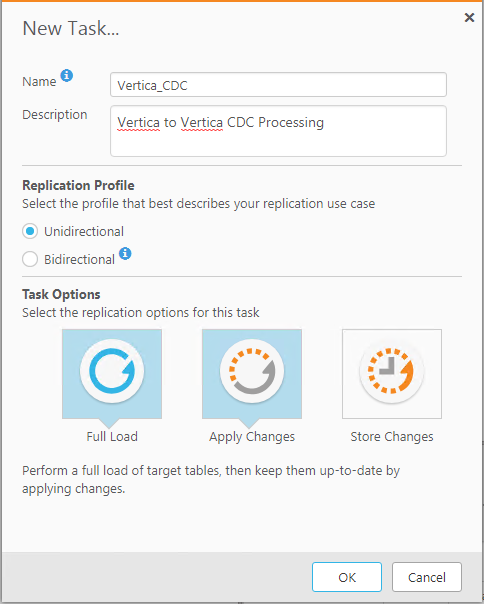
• Name: Type the task name.
• Description: Optionally, provide the required details about the task.
• Replication Profile: Select Unidirectional.
•Task Options: Select Full Load and Apply Changes.

Data is successfully replicated in the target table:

Data is successfully replicated to the target table:

Note DELETE operations should be carried out as "Soft" deletes. This means that the row is not actually deleted from the table, but marked as "deleted".

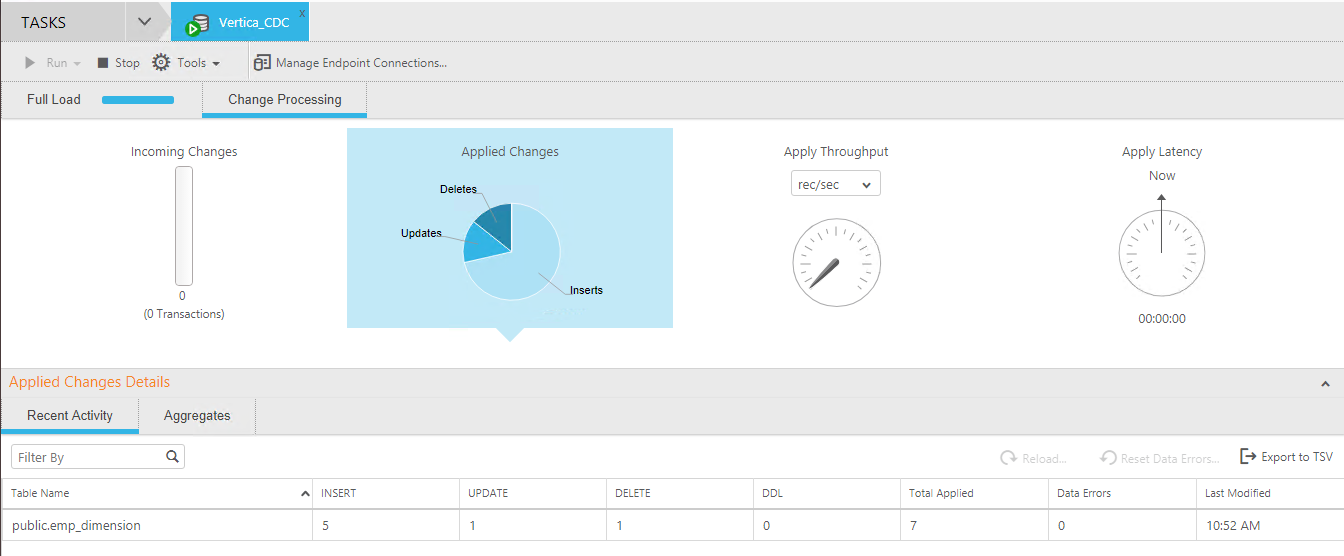
Data is successfully deleted from the target table:

The desired record needs to be deleted from the source table as well.
Troubleshooting
Issue
If you perform an update immediately after performing an insert on the same set of records, the following warning may be displayed:
Source changes that would have had no impact were not applied to
the target database. Refer to the 'attrep_apply_exceptions' table
for details.
Solution
To resolve this issue
- Open the <Task Name> Settings dialog box.
- Select the Error Handling | Apply Conflicts tab.
- Click Change to Task Policy in Apply Conflicts Handling Policy.
- From the No record found for applying an update drop-down list, select INSERT the missing target record.
Known Limitations
• UPDATES to primary key fields are not supported. To update the field, define it as a unique index instead.
• Attunity does not support Vertica LONG VARCHAR - CLOB and LONG VARBINARY - BLOB in Context Column(s).

