Connection load balancing policies help spread the load of servicing client connections by redirecting connections based on the connection's origin. These policies can also help prevent nodes reaching their client connection limits and rejecting new connections by spreading connections among nodes. See Limiting the Number and Length of Client Connections for more information about client connection limits.
A load balancing policy consists of:
- Network addresses that identify particular IP address and port number combinations on a node.
- One or more connection load balancing groups that consists of network addresses that you want to handle client connections. You define load balancing groups using fault groups, subclusters, or a list of network addresses.
-
One or more routing rules that map a range of client IP addresses to a connection load balancing group.
When a client connects to a node in the database with load balancing enabled, the node evaluates all of the routing rules based on the client's IP address to determine if any match. If more than one rule matches the IP address, the node applies the most specific rule (the one that affects the fewest IP addresses).
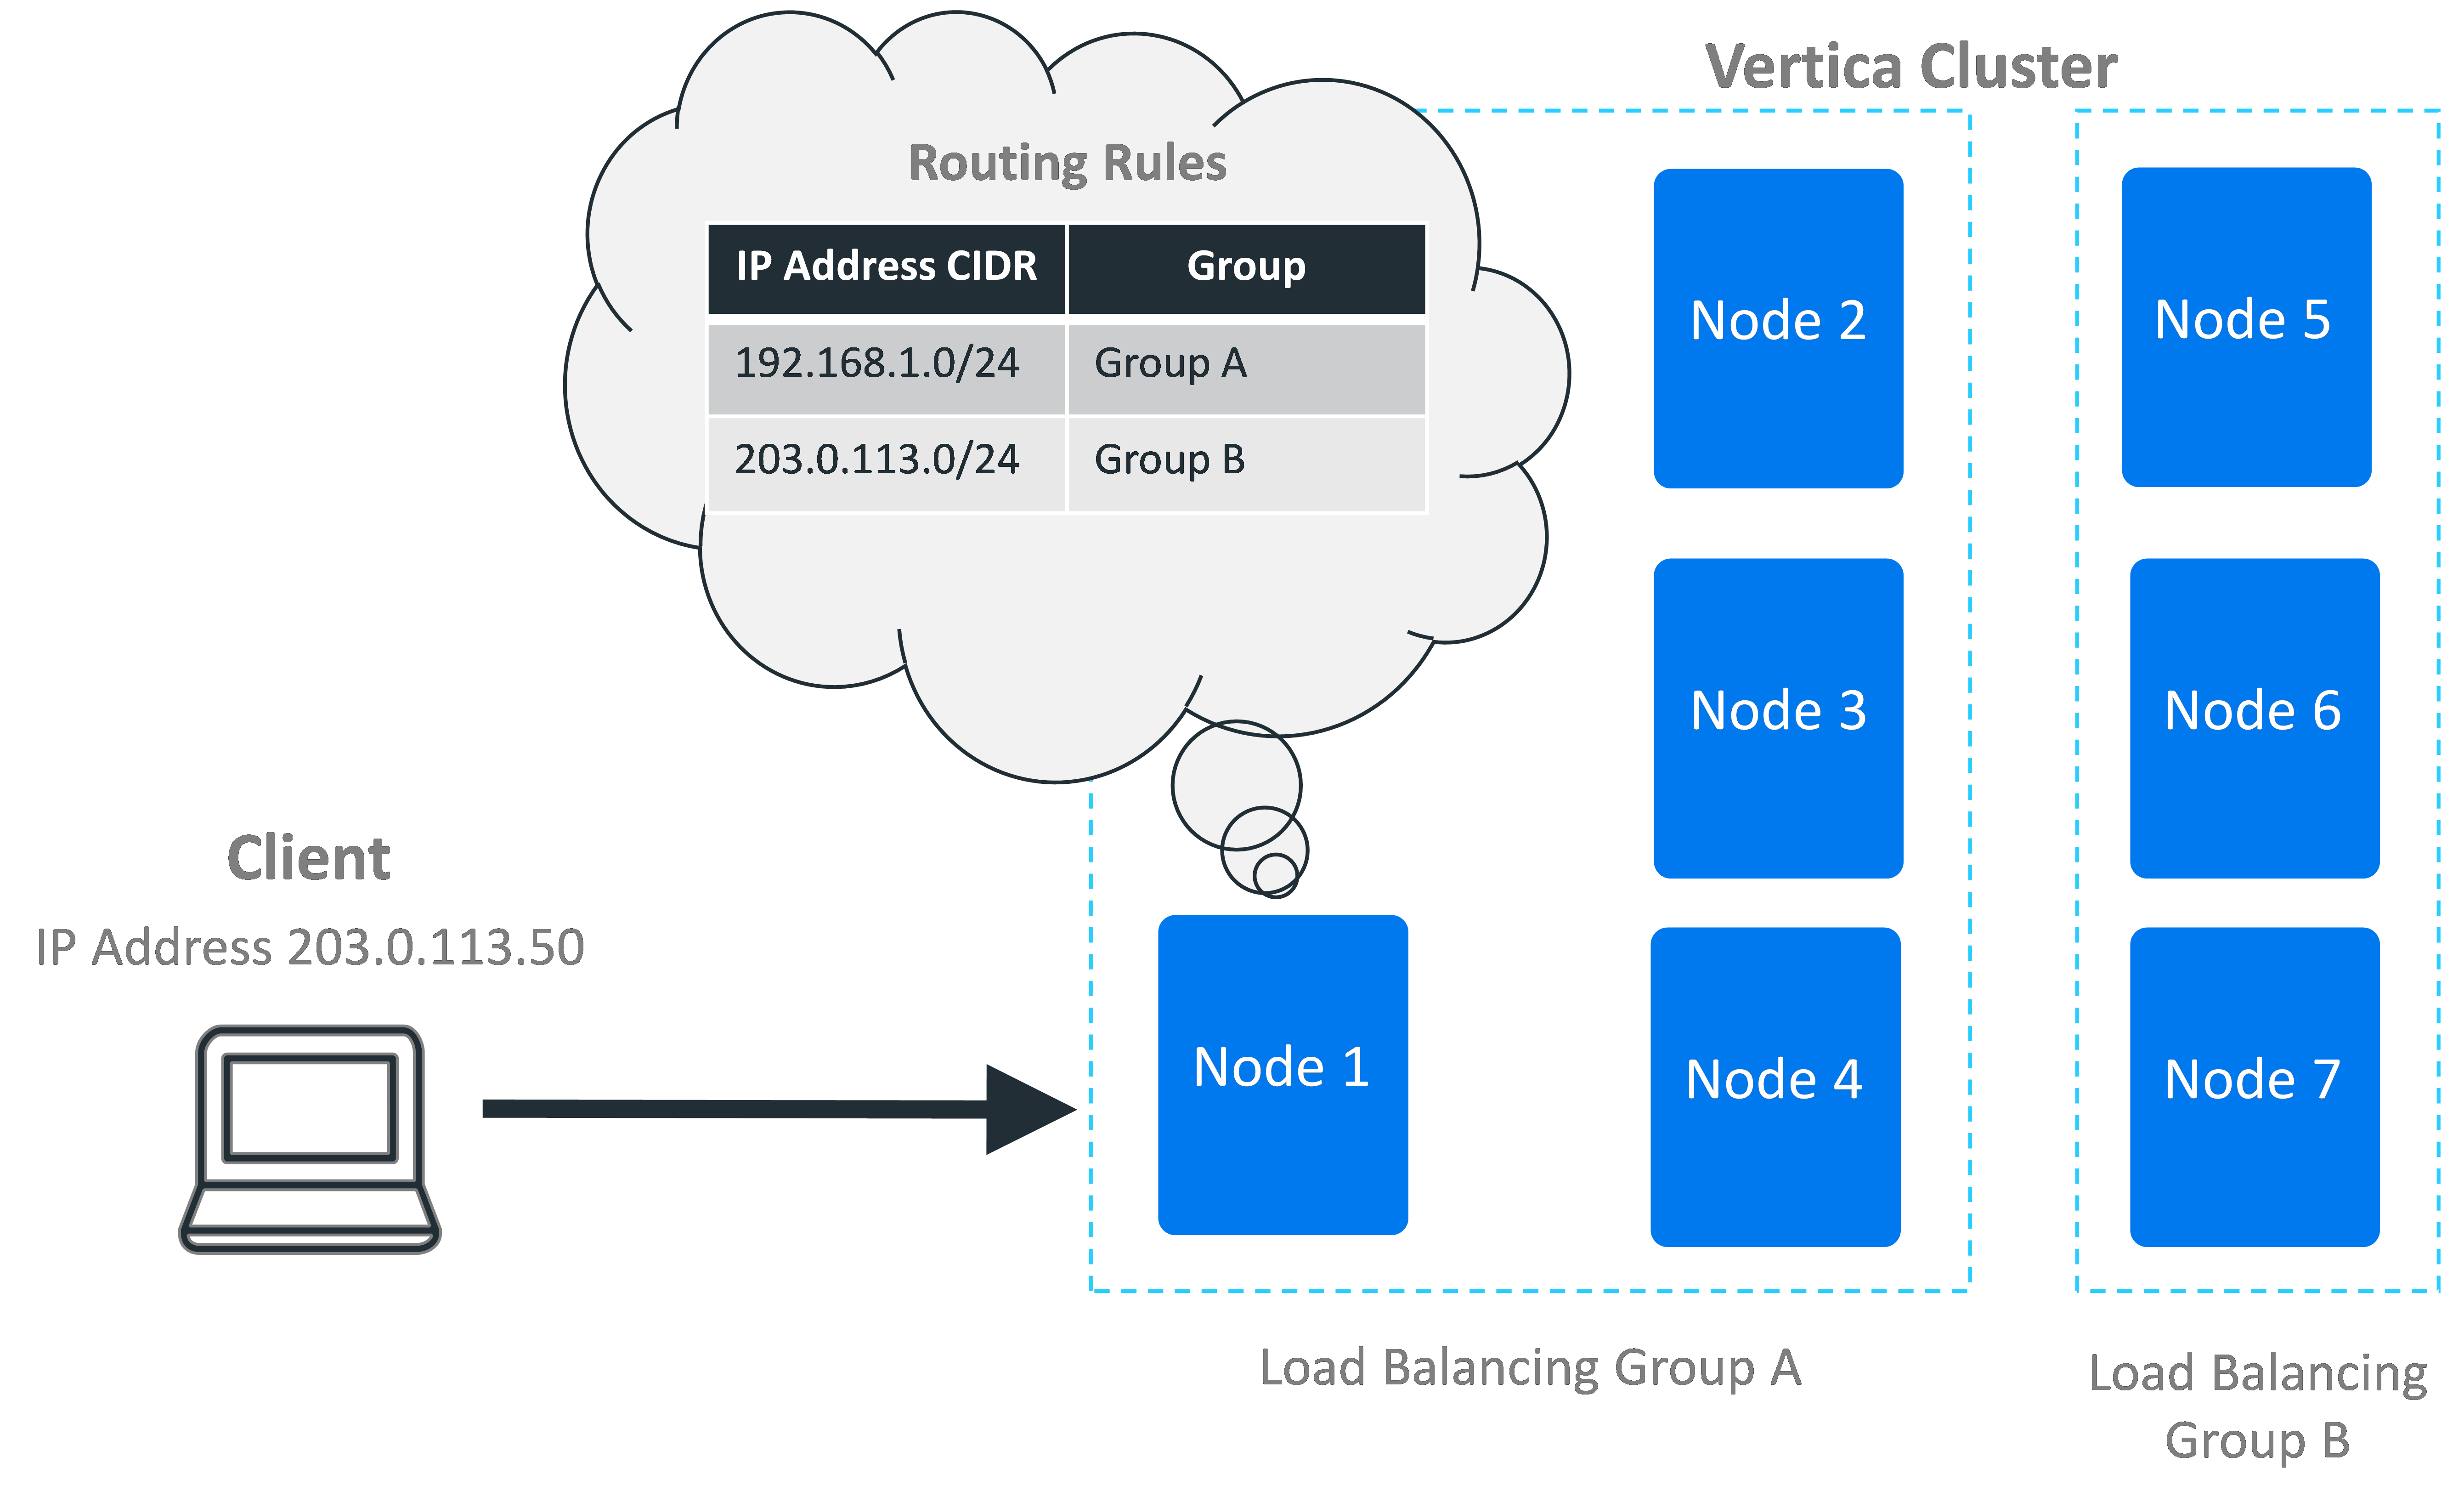
If the node finds a matching rule, it uses the rule to determine the pool of potential nodes to handle the client connection. When evaluating potential target nodes, it always ensures that the nodes are currently up. The initially-contacted node then chooses one of the nodes in the group based on the group's distribution scheme. This scheme can be either choosing a node at random, or choosing a node in a rotating "round-robin" order. For example, in a three-node cluster, the round robin order would be node 1, then node 2, then node 3, and then back to node 1 again.
After it processes the rules, if the node determines that another node should handle the client's connection, it tells the client which node it has chosen. The client disconnects from the initial node and connects to the chosen node to continue with the connection process (either negotiating encryption if the connection has TLS/SSL enabled, or authentication).
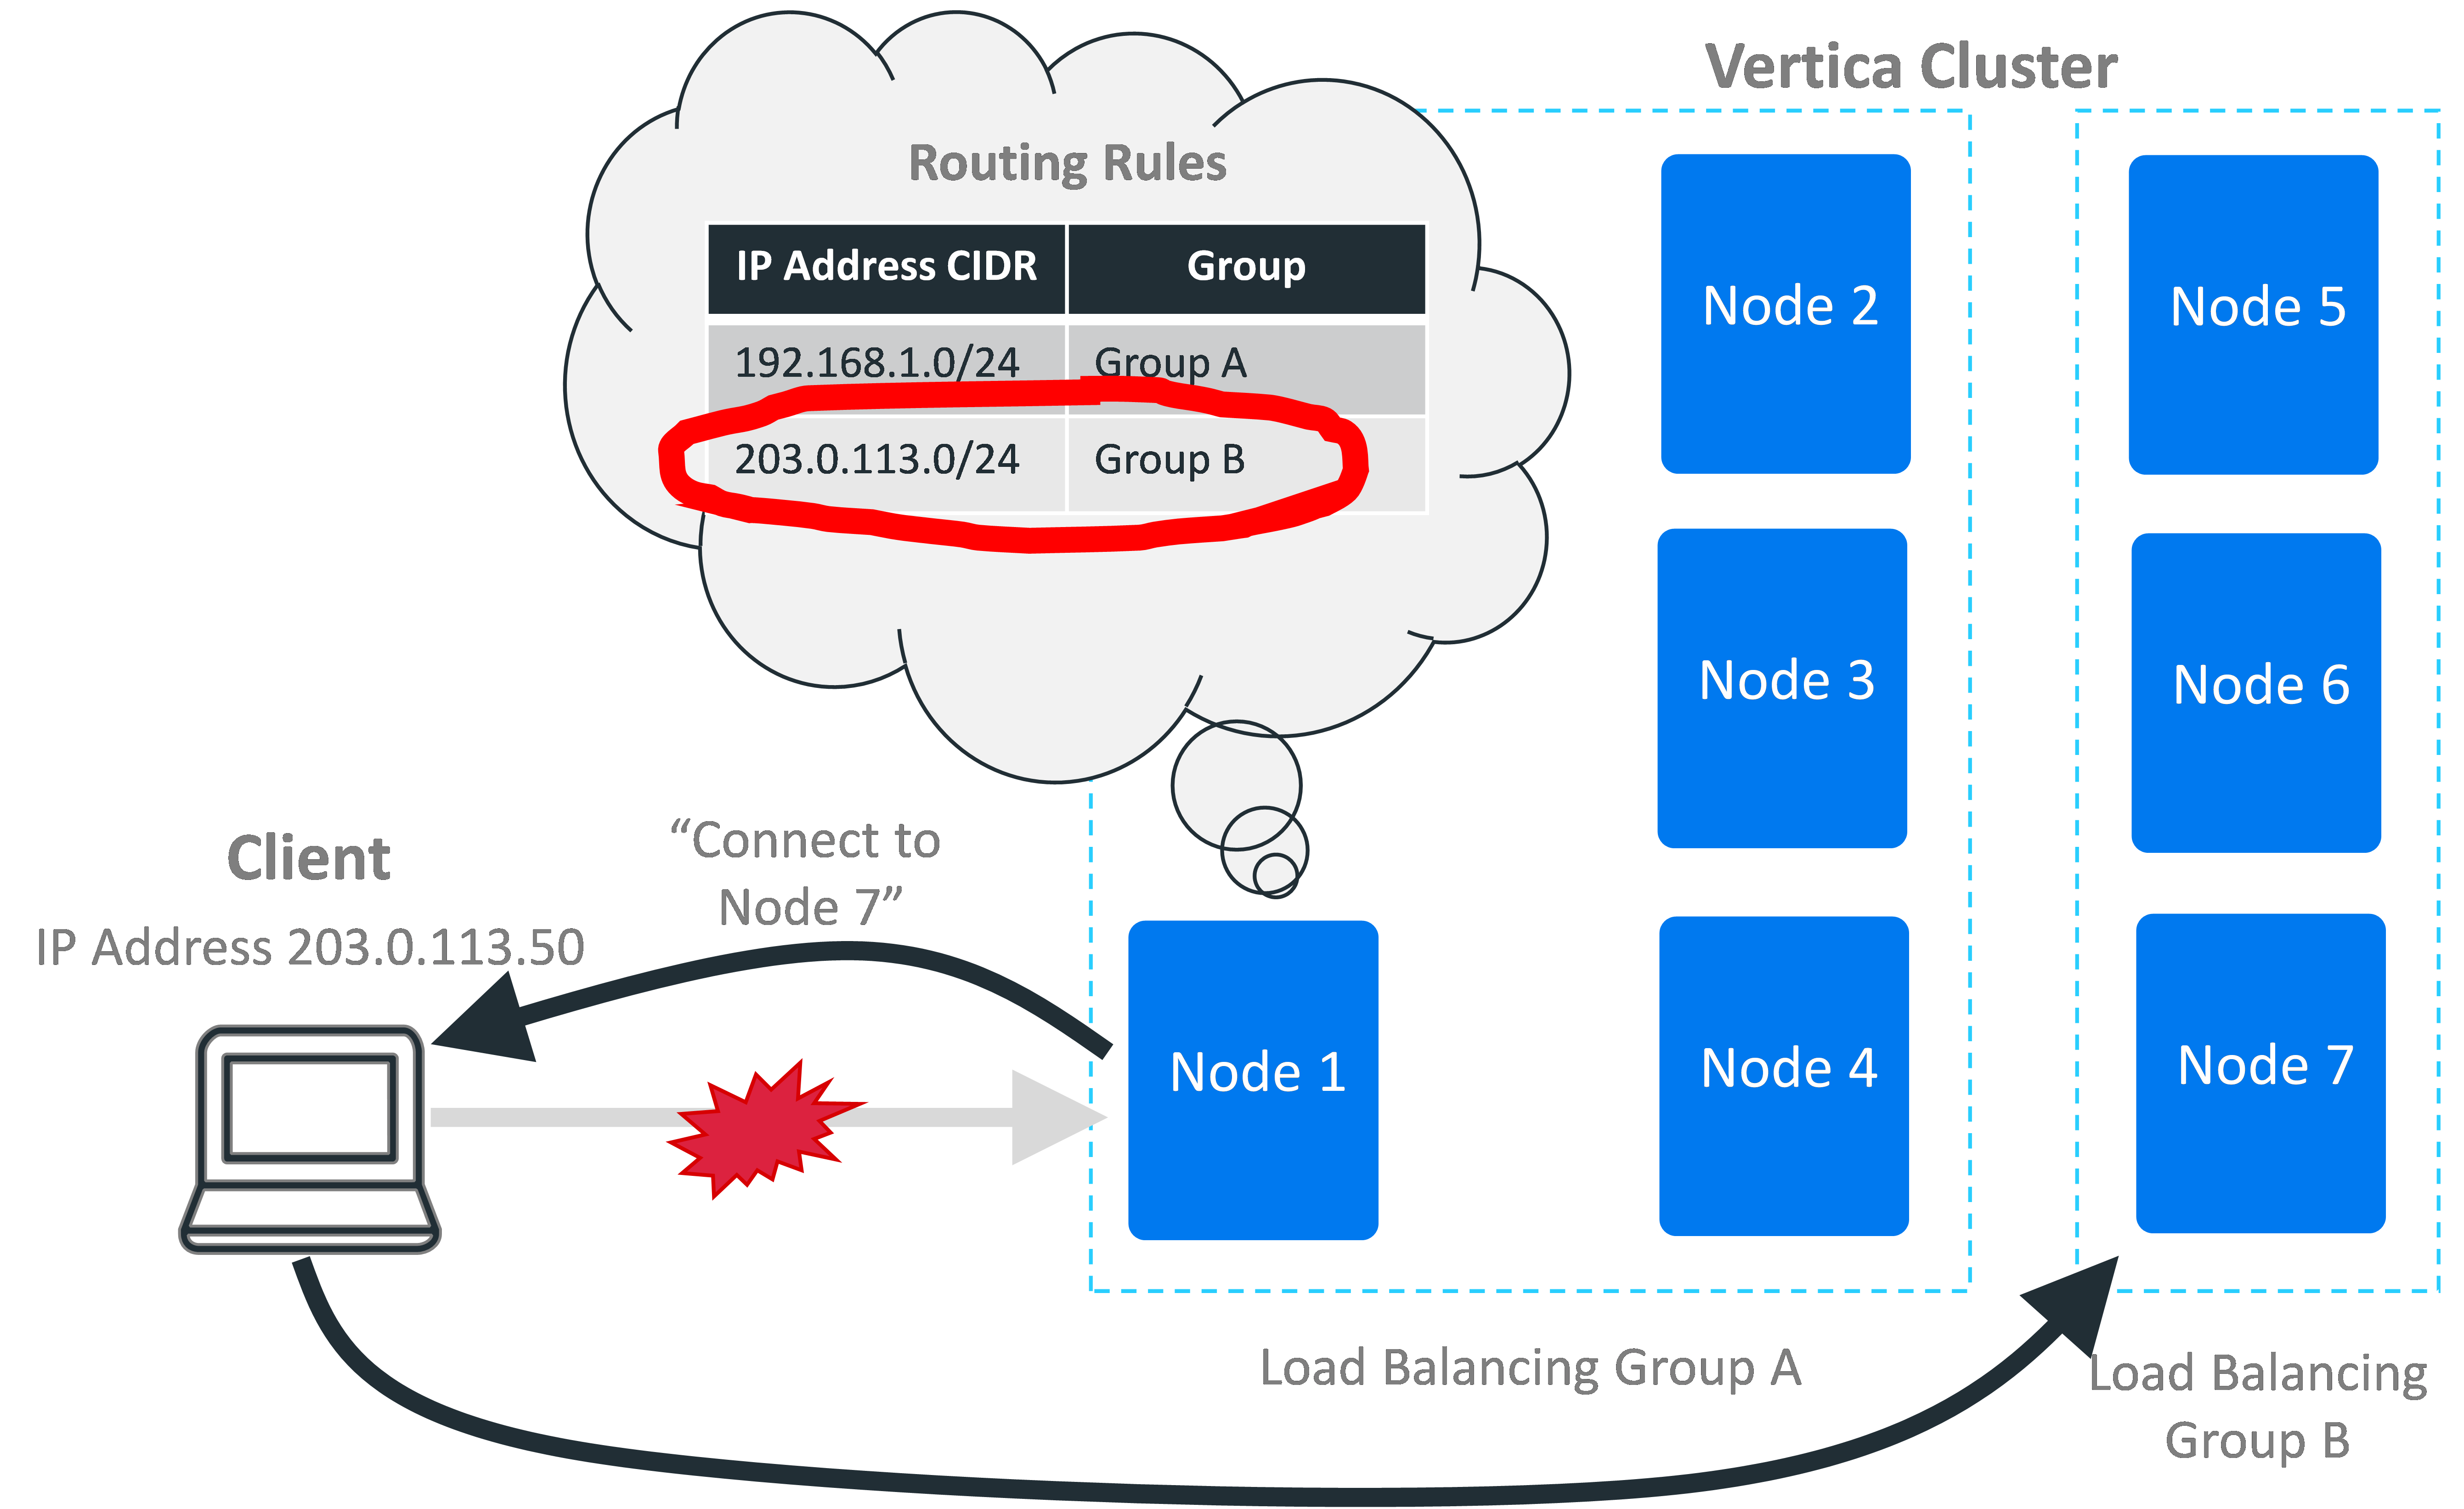
If the initial node chooses itself based on the routing rules, it tells the client to proceed to the next step of the connection process.
If no routing rule matches the incoming IP address, the node checks to see if classic connection load balancing is enabled by both Vertica and the client. If so, it handles the connection according to the classic load balancing policy. See Classic Connection Load Balancing for more information.
Finally, if the database is running in Eon Mode, the node tries to apply a default interior load balancing rule. See Default Subcluster Interior Load Balancing Policy below.
If no routing rule matches the incoming IP address and classic load balancing and the default subcluster interior load balancing rule did not apply, the node handles the connection itself. It also handles the connection itself if it cannot follow the load balancing rule. For example, if all nodes in the load balancing group targeted by the rule are down, then the initially-contacted node handles the client connection itself. In this case, the node does not attempt to apply any other less-restrictive load balancing rules that would apply to the incoming connection. It only attempts to apply a single load balancing rule.
Use Cases
Using load balancing policies you can:
-
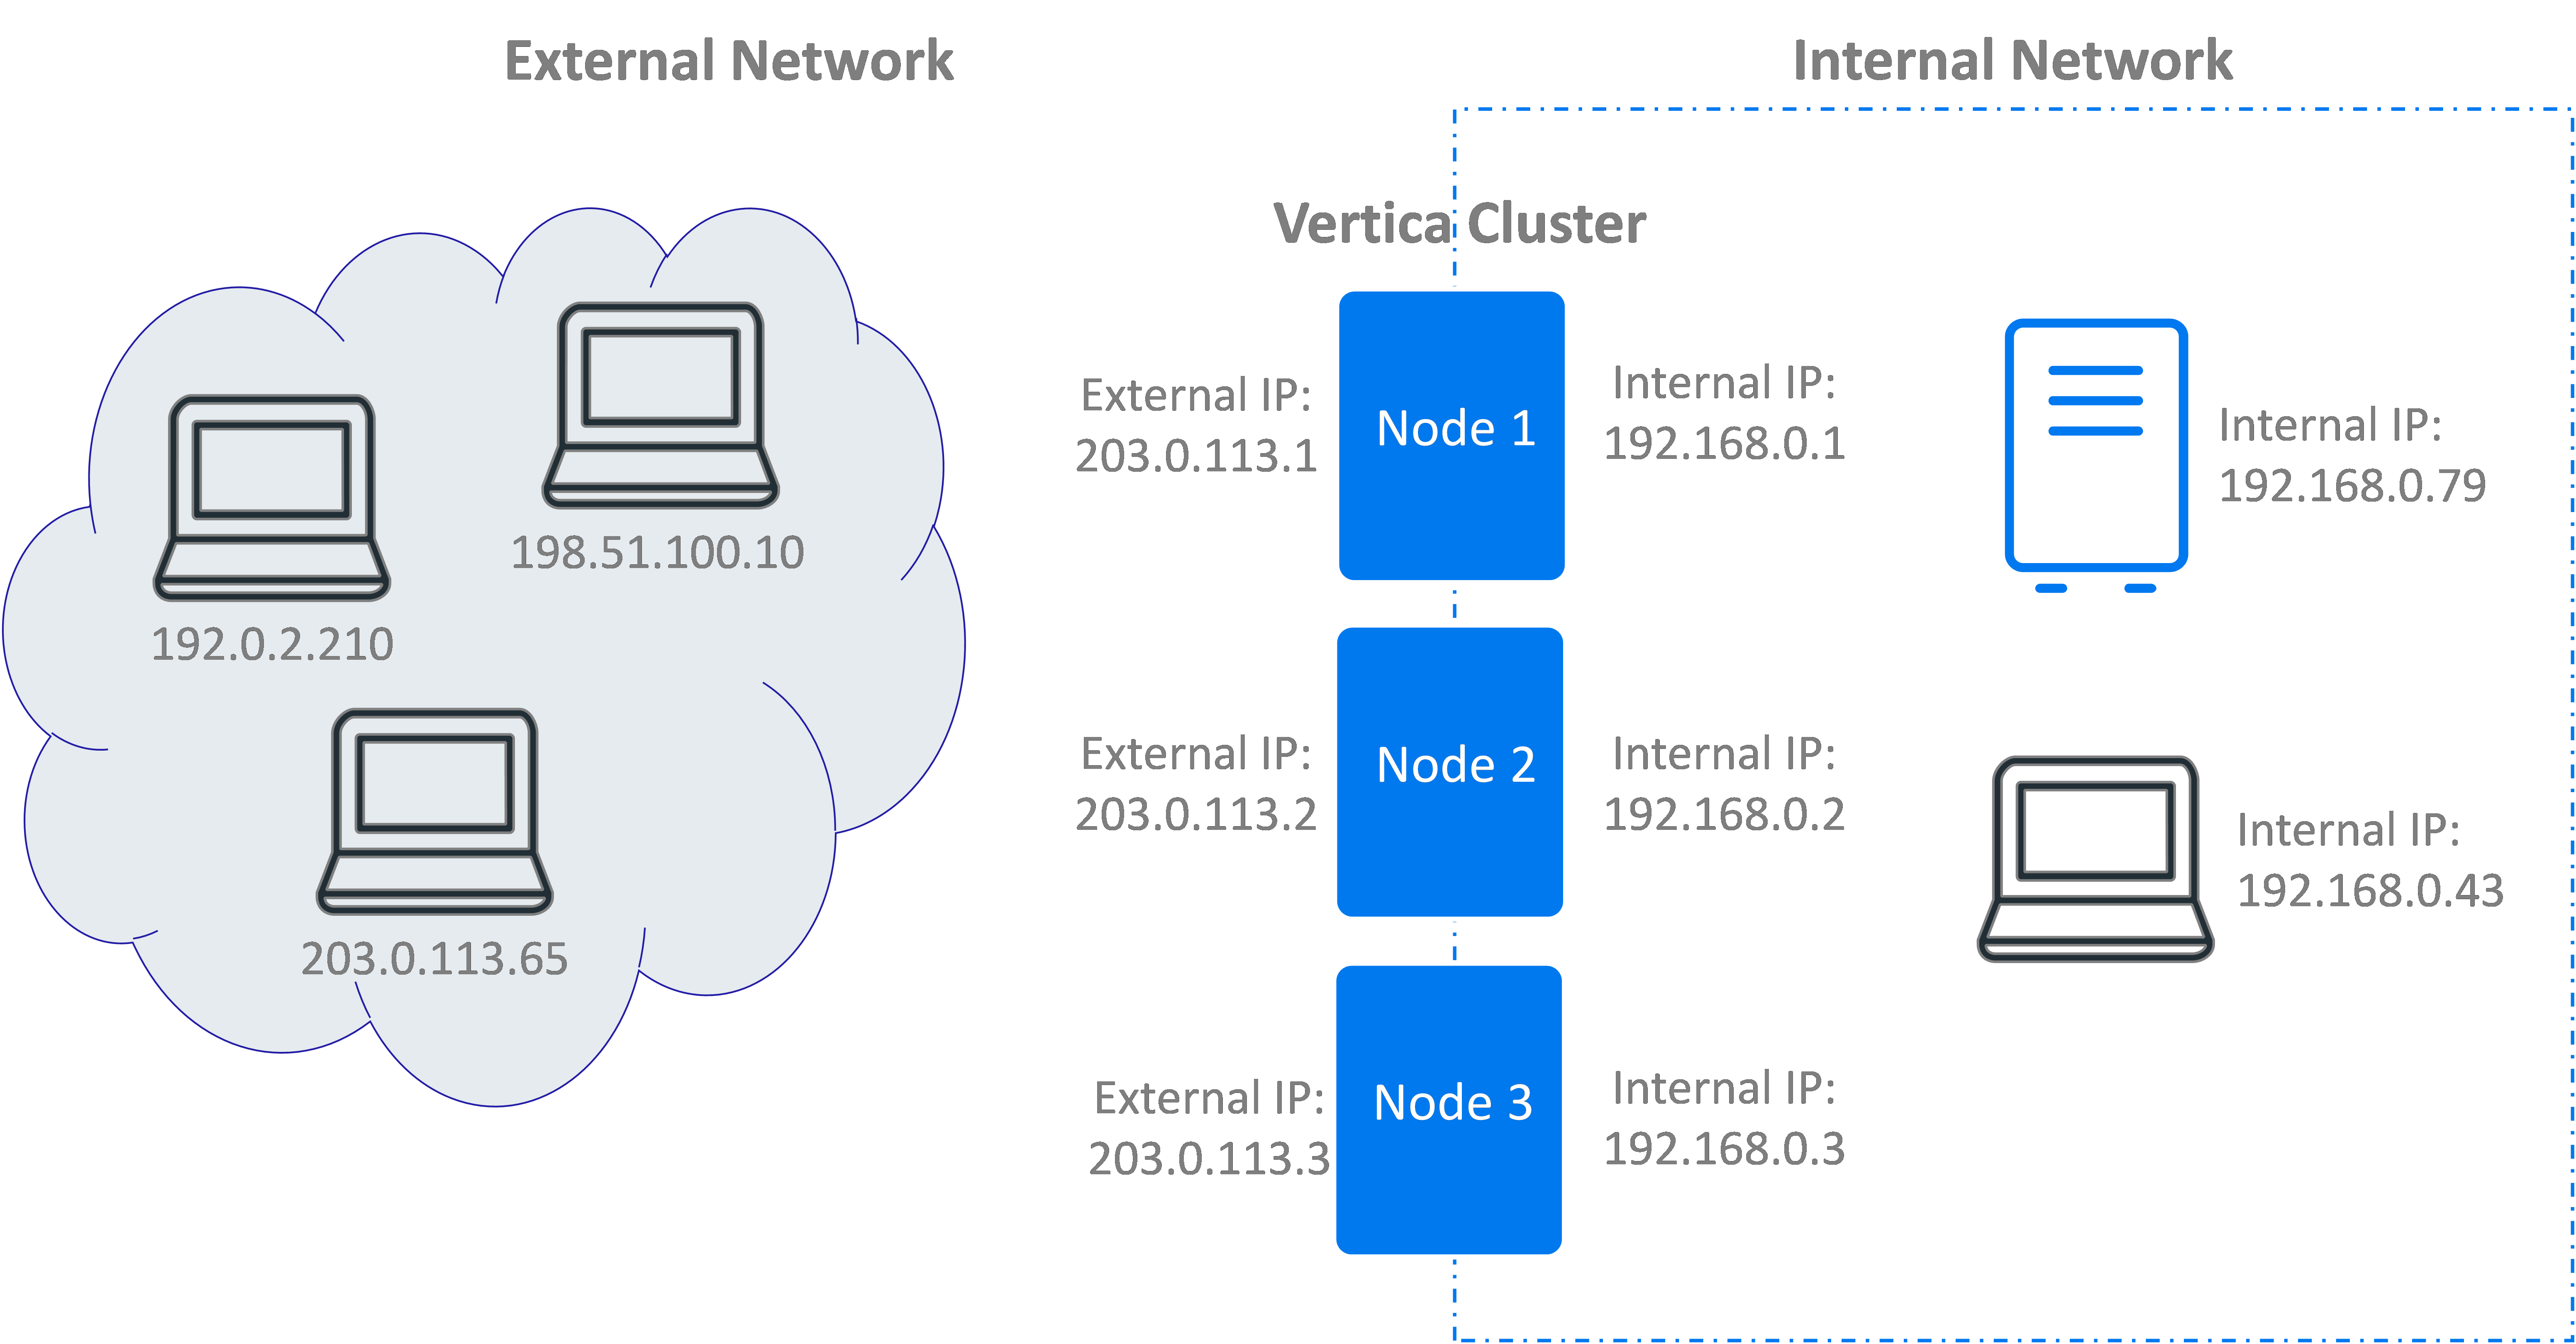
Ensure connections originating from inside or outside of your internal network are directed to a valid IP address for the client. For example, suppose your Vertica nodes have two IP addresses: one for the external network and another for the internal network. These networks are mutually exclusive. You cannot reach the private network from the public, and you cannot reach the public network from the private. Your load balancing rules need to provide the client with an IP address they can actually reach.
-
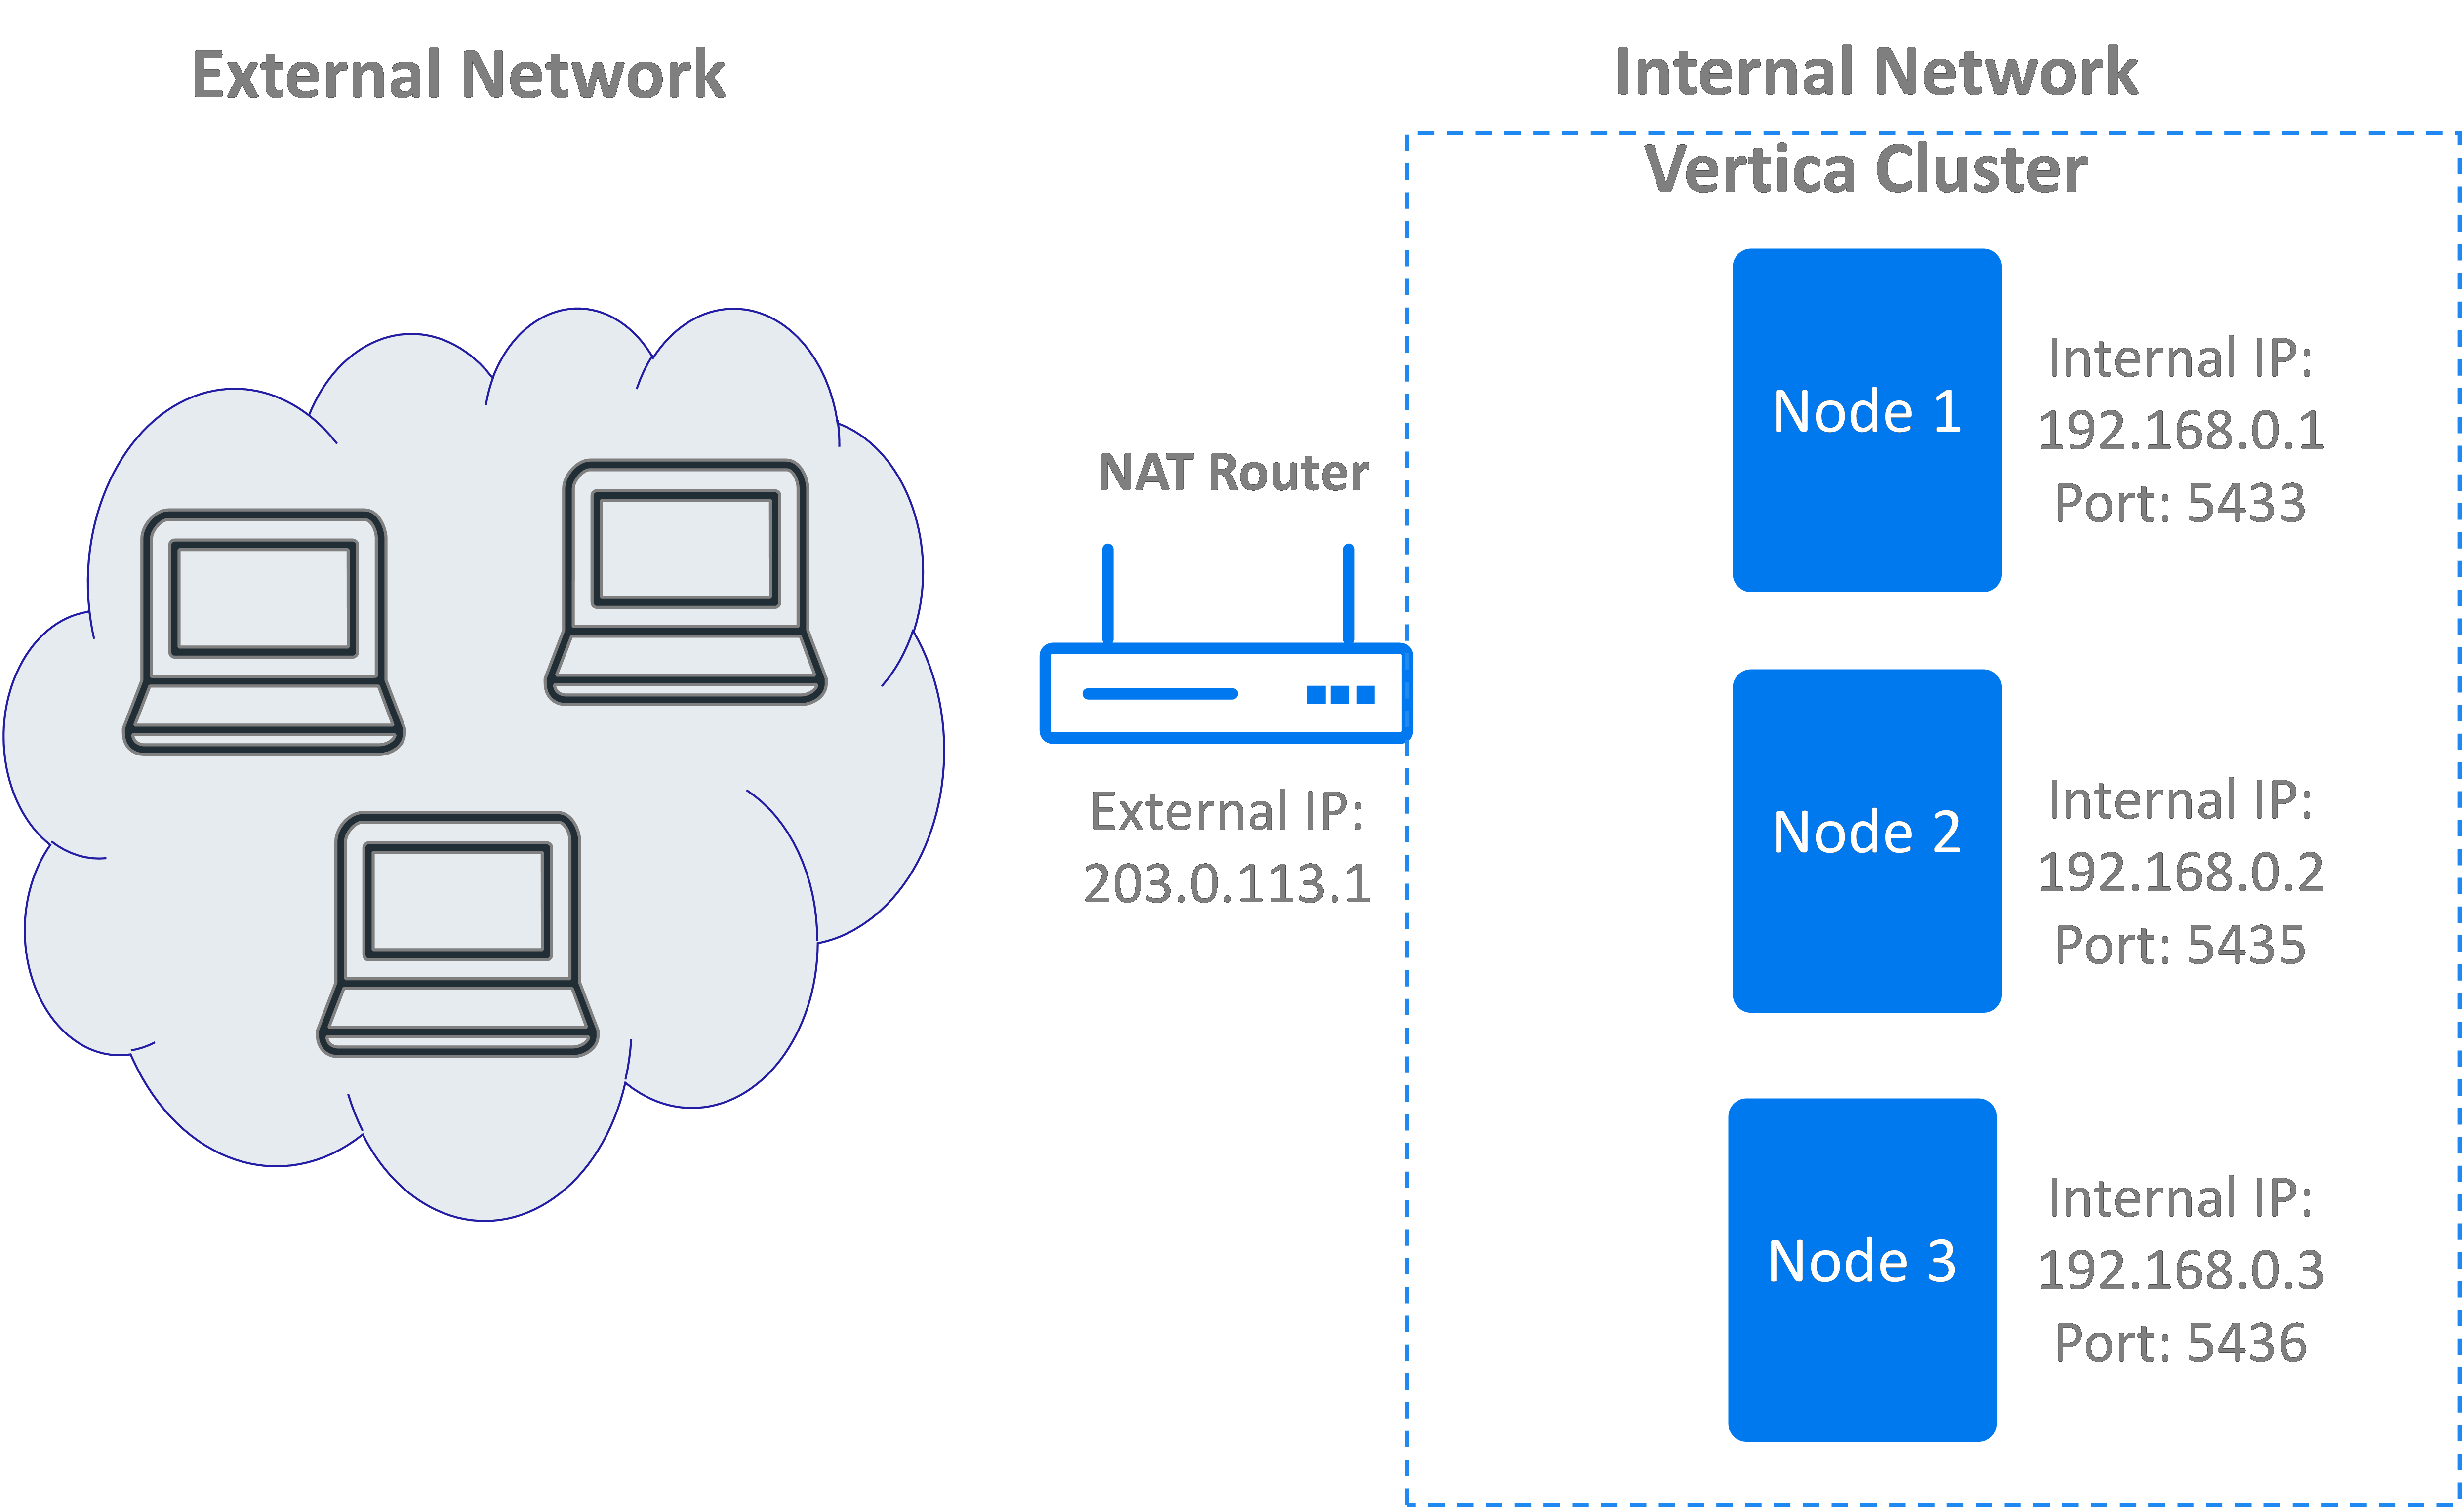
Enable access to multiple nodes of a Vertica cluster that are behind a NAT router. A NAT router is accessible from the outside network via a single IP address. Systems within the NAT router's private network can be accessed on this single IP address using different port numbers. You can create a load balancing policy that redirects a client connection to the NAT's IP address but with a different port number.
-
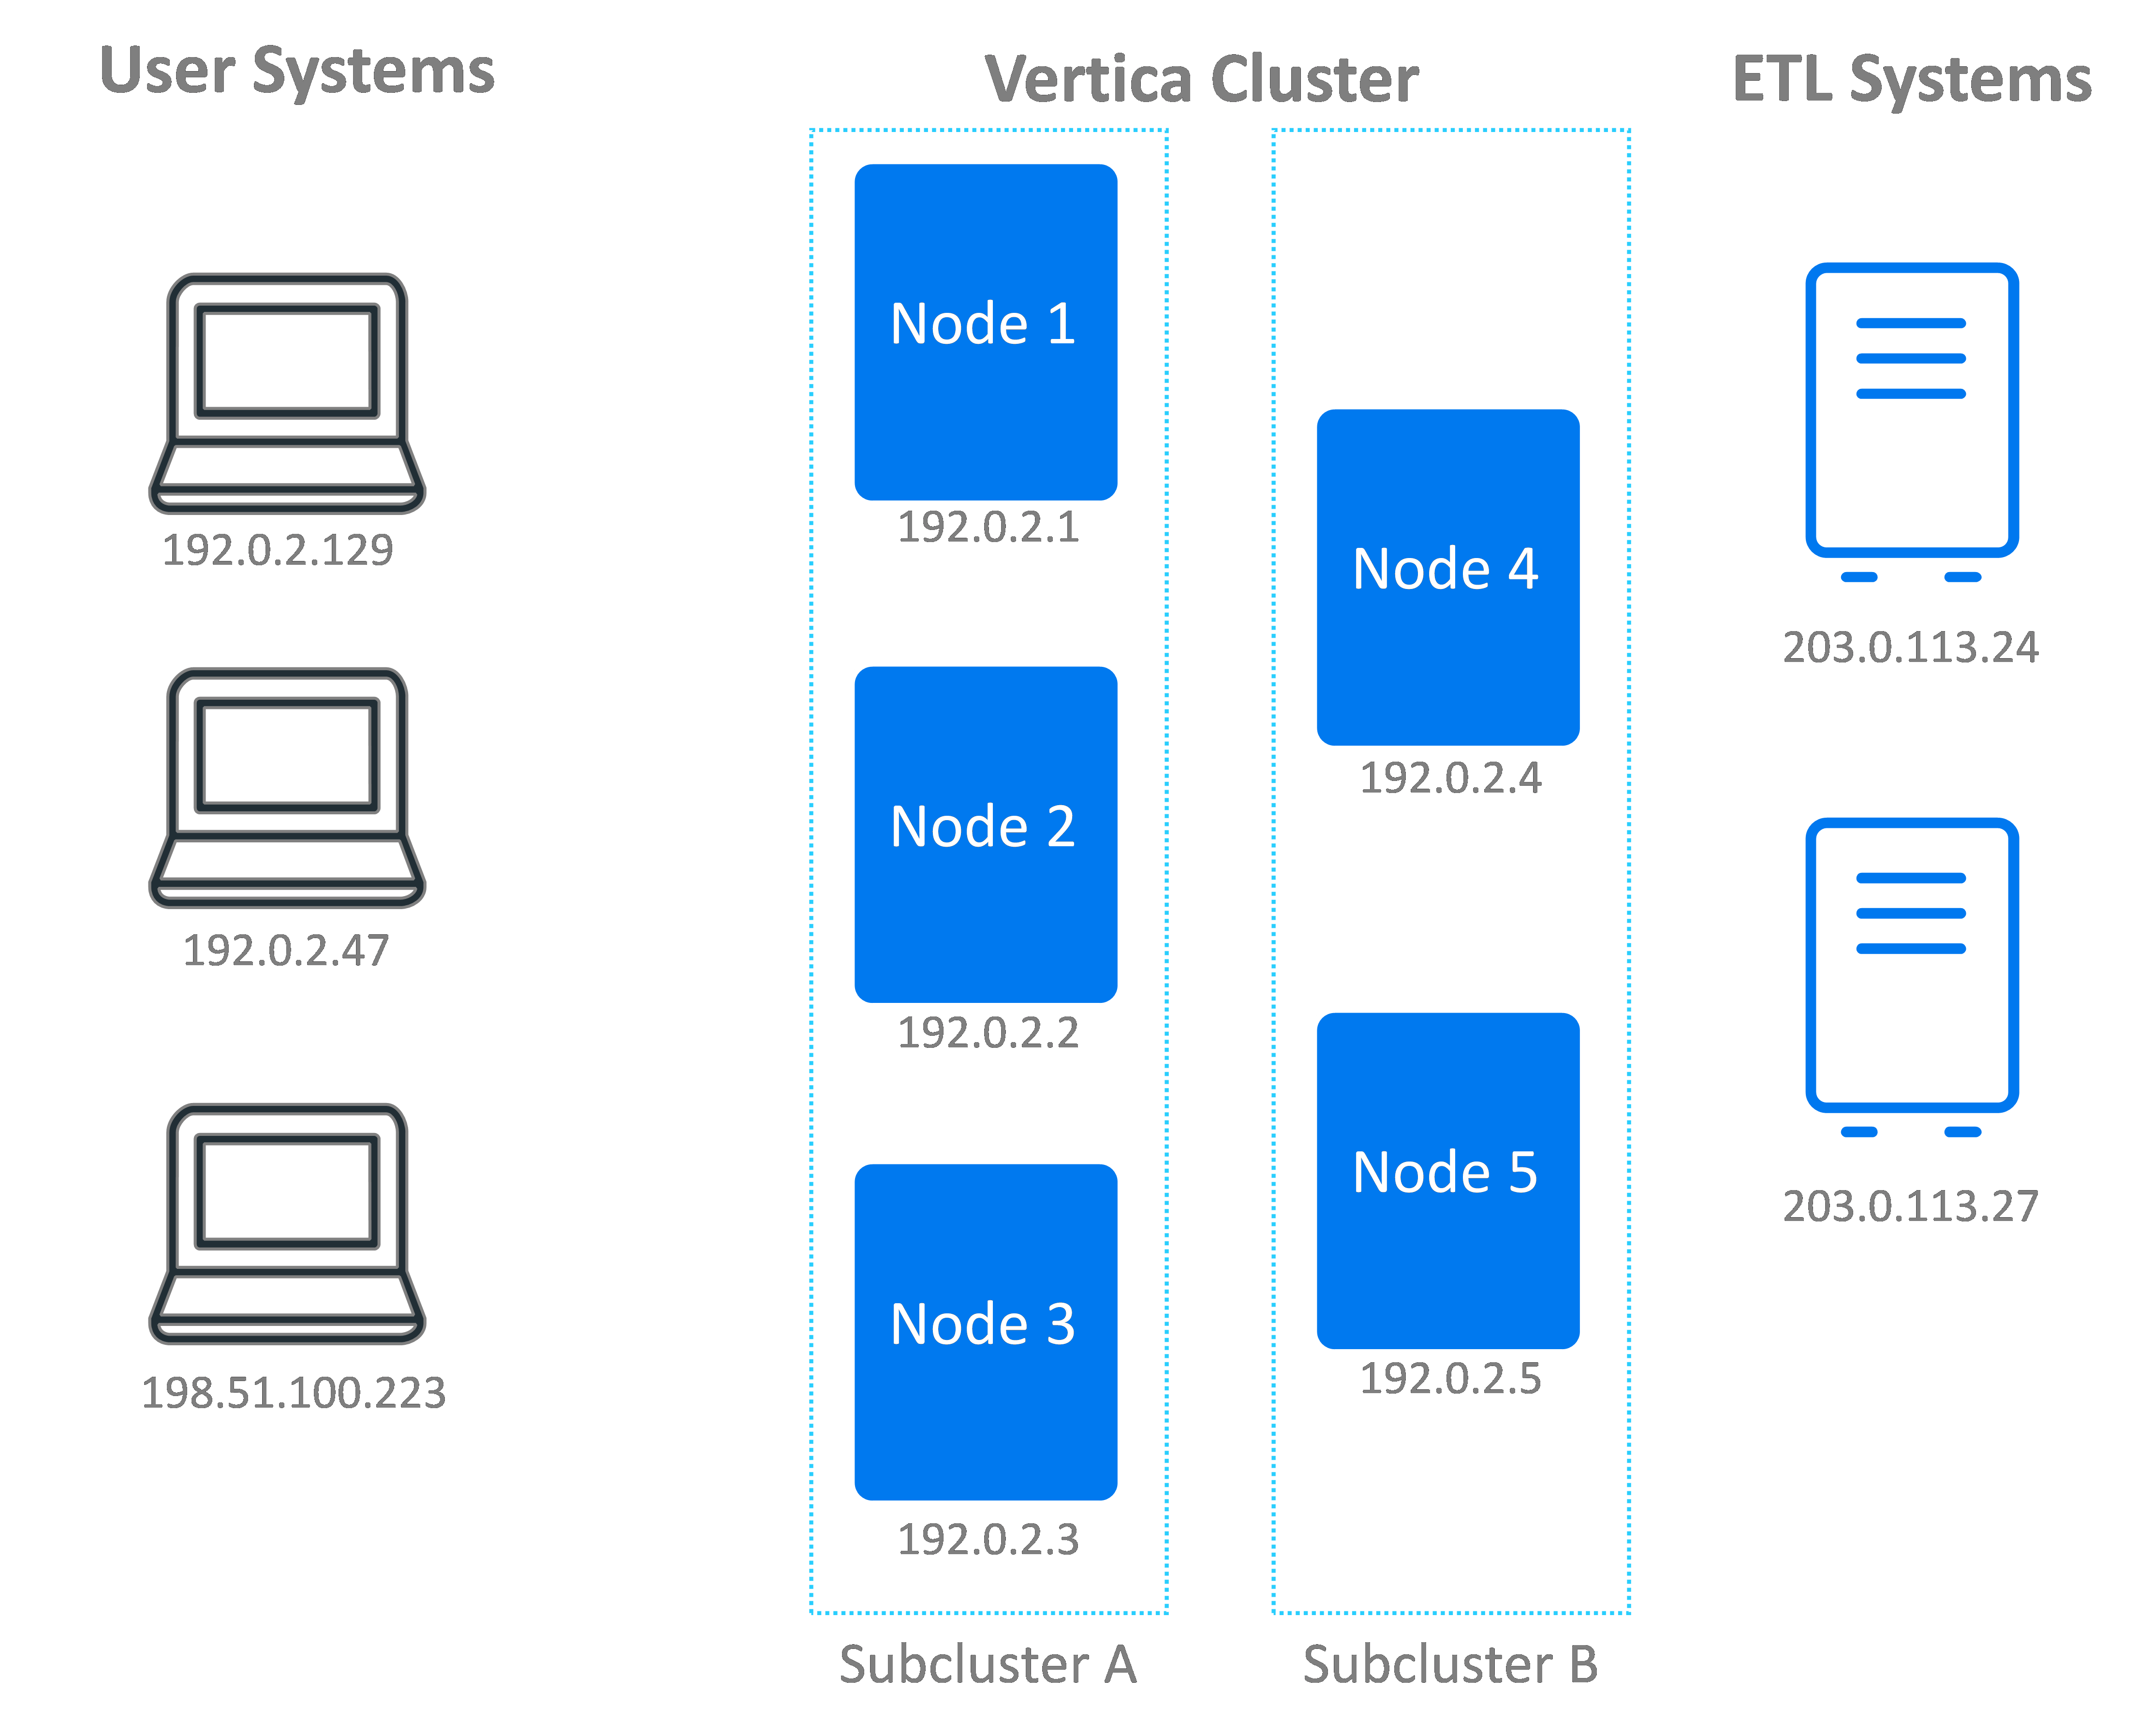
Designate sets of nodes to service client connections from an IP address range. For example, if your ETL systems have a set range of IP addresses, you could limit their client connections to an arbitrary set of Vertica nodes, a subcluster, or a fault group. This technique lets you isolate the overhead of servicing client connections to a few nodes. It is useful when you are using subclusters in an Eon Mode database to isolate workloads (see Subclusters for more information).
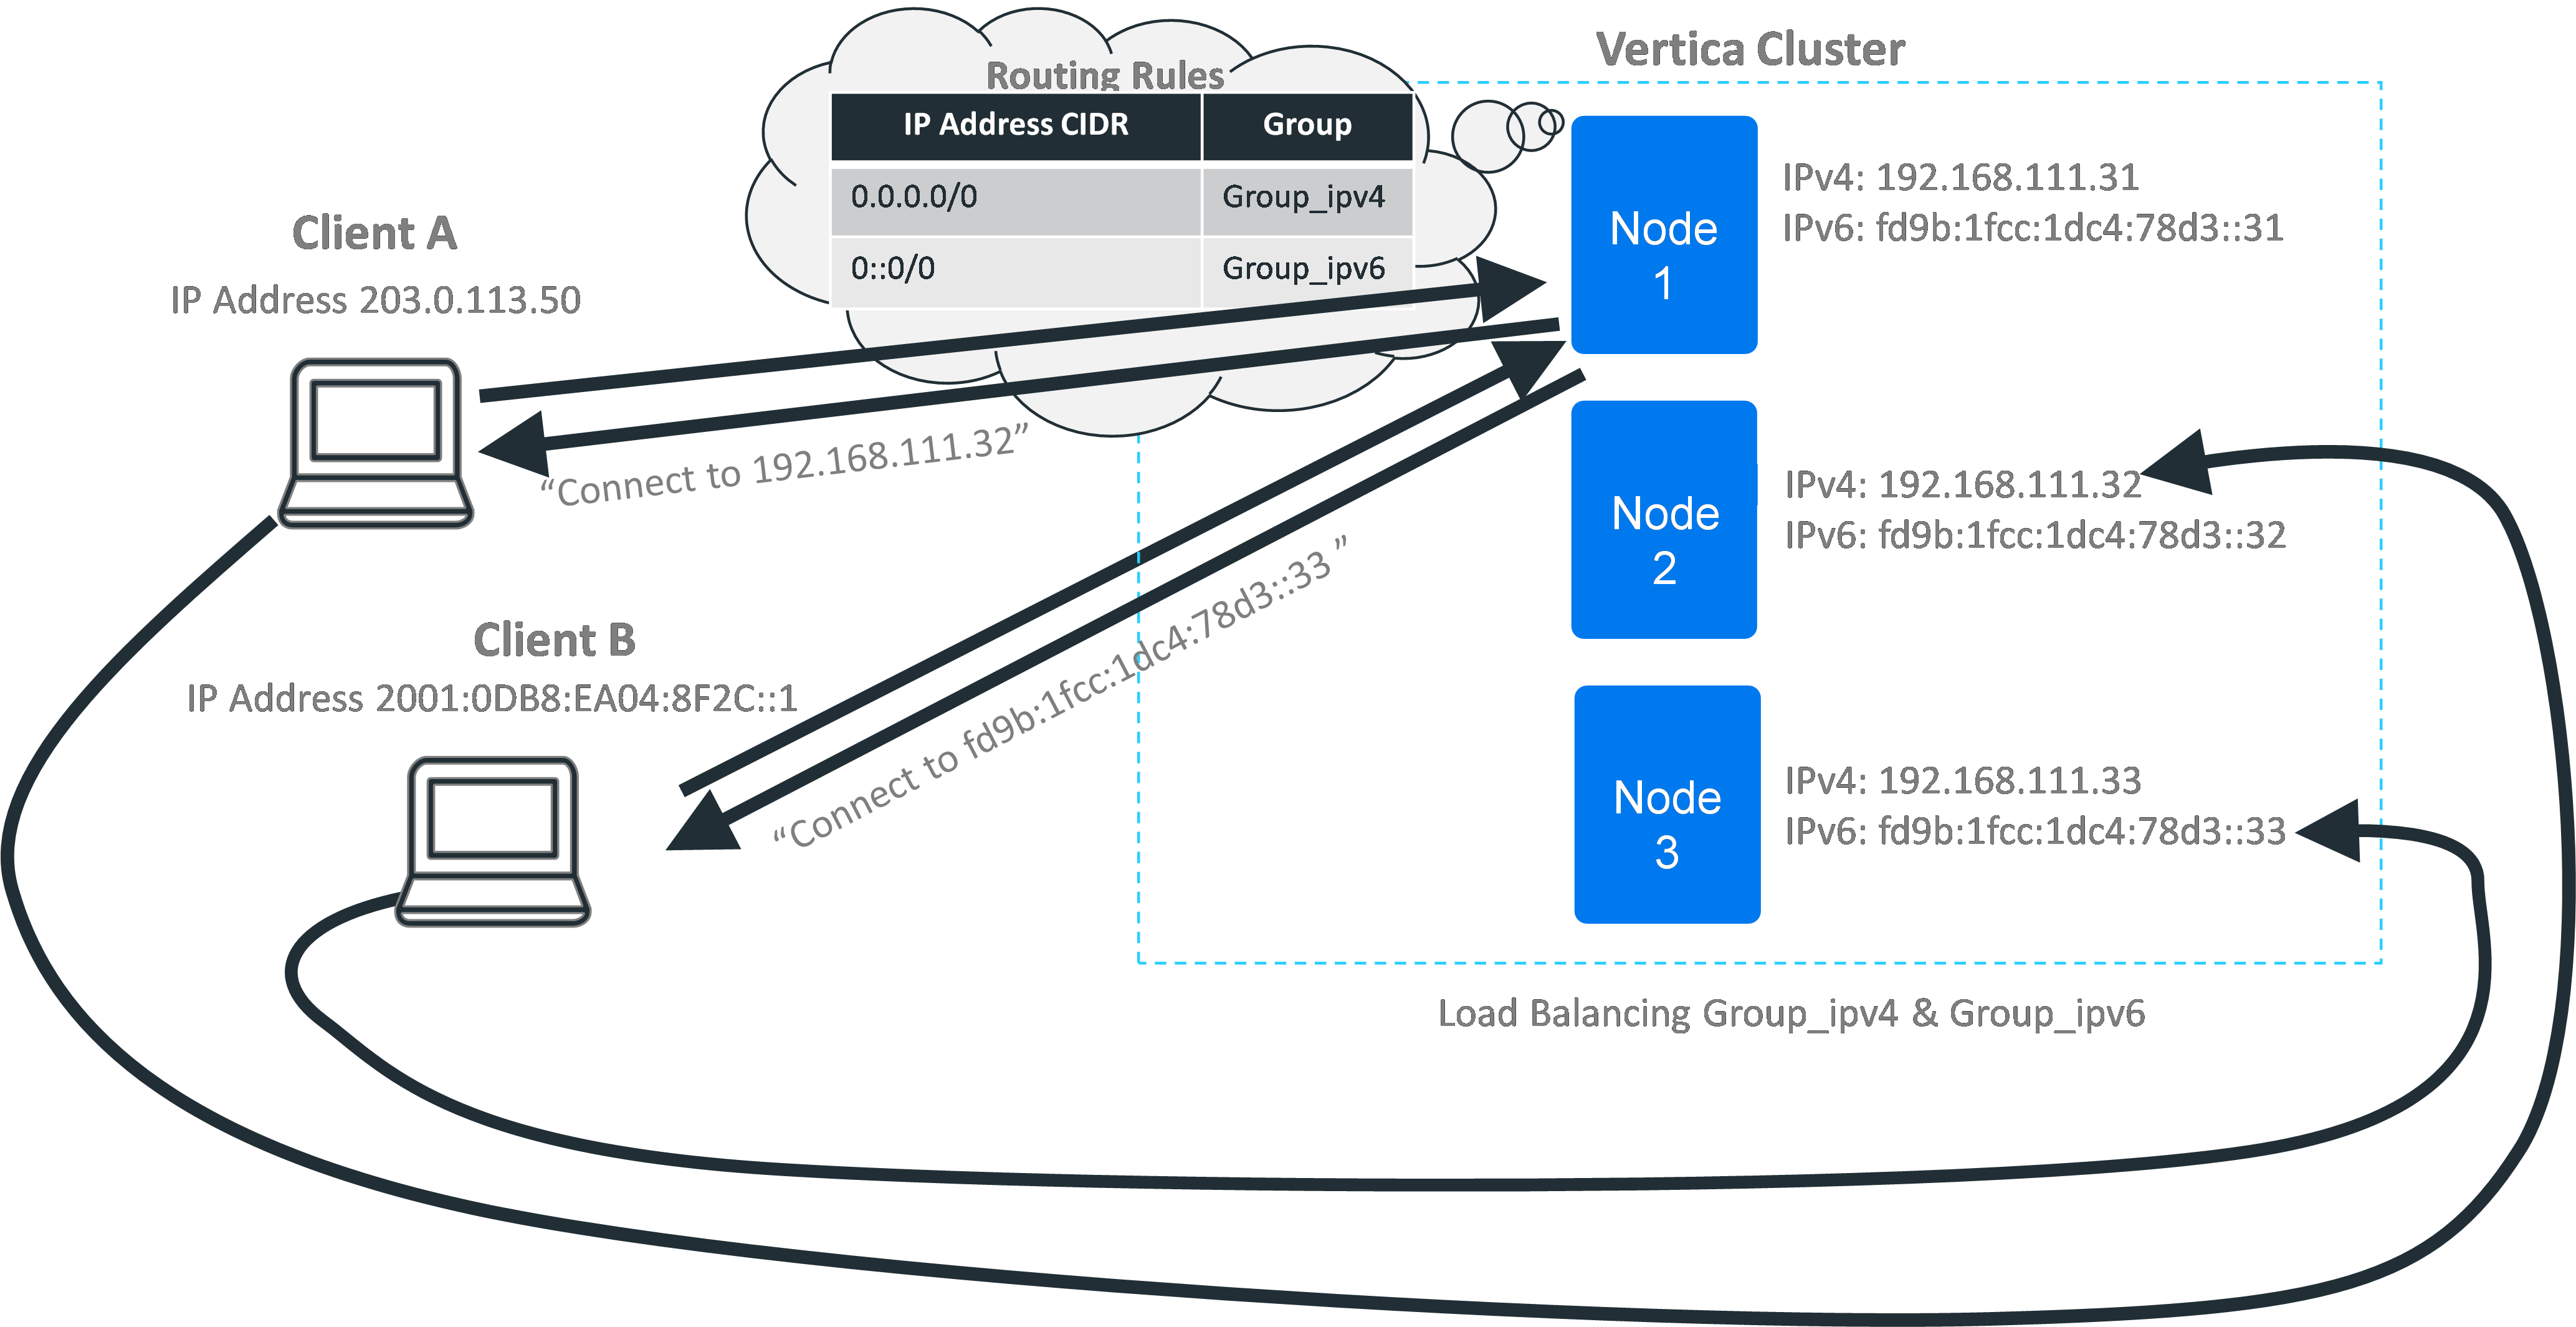
Using Connection Load Balancing Policies With IPv4 and IPv6
Connection load balancing policies work with both IPv4 and IPv6. As far as the load balancing policies are concerned, the two address families represent separate networks. If you want your load balancing policy to handle both IPv4 and IPv6 addresses, you must create separate sets of network addresses, load balancing groups, and rules for each protocol. When a client opens a connection to a node in the cluster, the addressing protocol it uses determines which set of rules Vertica consults when deciding whether and how to balance the connection.
Default Subcluster Interior Load Balancing Policy
Databases running in Eon Mode have a default connection load balancing policy that helps spread the load of handling client connections among the nodes in a subcluster. When a client connects to a node while opting into connection load balancing, the node checks for load balancing policies that apply to the client's IP address. If it does not find any applicable load balancing rule, and classic load balancing is not enabled, the node falls back to the default interior load balancing rule. This rule distributes connections among the nodes in the same subcluster as the initially-contacted node.
As with other connection load balancing policies, the nodes in the subcluster must have a network address defined for them to be eligible to handle the client connection. If no nodes in the subcluster have a network address, the node does not apply the default subcluster interior load balancing rule, and the connection is not load balanced.
This default rule is convenient when you are primarily interested in load balancing connections within each subcluster. You just create network addresses for the nodes in your subcluster. You do not need to create load balancing groups or rules. Clients that opt-in to load balancing are then automatically balanced among the nodes in the subcluster.
Interior Load Balancing Policy with Multiple Network Addresses
If your nodes have multiple network addresses, the default subcluster interior load balancing rule chooses the address that was created first as the target of load balancing rule. For example, suppose you create a network address on a node for the private IP address 192.168.1.10. Then you create another network address for the node for the public IP address 233.252.0.1. The default subcluster interior connection load balancing rule always selects 192.168.1.10 as the target of the rule.
If you want the default interior load balancing rule to choose a different network address as its target, drop the other network addresses on the node and then recreate them. Deleting and recreating other addresses makes the address you want the rule to select the oldest address. For example, suppose you want the rule to use a public address (233.252.0.1) that was created after a private address (192.168.1.10). In this case, you can drop the address for 192.168.1.10 and then recreate it. The rule then defaults to the older public 233.252.0.1 address.
If you intend to create multiple network addresses for the nodes in your subcluster, create the network addresses you want to use with the default subcluster interior load balancing first. For example, suppose you want to use the default interior load balancing subcluster rule to load balance most client connections. However, you also want to create a connection load balancing policy to manage connections coming in from a group of ETL systems. In this case, create the network addresses you want to use for the default interior load balancing rule first, then create the network addresses for the ETL systems.
Load Balancing Policies vs. Classic Load Balancing
There are several differences between the classic load balancing feature and the load balancing policy feature:
- In classic connection load balancing, you just enable the load balancing option on both client and server, and load balancing is enabled. There are more steps to implement load balancing policies: you have to create addresses, groups, and rules and then enable load balancing on the client.
- Classic connection load balancing only supports a single, cluster-wide policy for redirecting connections. With connection load balancing policies, you get to choose which nodes handle client connections based on the connection's origin. This gives you more flexibility to handle complex situations. Examples include routing connections through a NAT-based router or having nodes that are accessible via multiple IP addresses on different networks.
- In classic connection load balancing, each node in the cluster can only be reached via a single IP address. This address is set in the EXPORT_ADDRESS column of the NODES system table. With connection load balancing policies, you can create a network address for each IP address associated with a node. Then you create rules that redirect to those addresses.
Steps to Create a Load Balancing Policy
There are three steps you must follow to create a load balancing policy:
- Create one or more network addresses for each node that you want to participate in the connection load balancing policies.
- Create one or more load balancing groups to be the target of the routing rules. Load balancing groups can target a collection of specific network addresses. Alternatively, you can create a group from a fault group or subcluster. You can limit the members of the load balance group to a subset of the fault group or subcluster using an IP address filter.
- Create one or more routing rules.
While not absolutely necessary, it is always a good idea to idea to test your load balancing policy to ensure it works the way you expect it to.
After following these steps, Vertica will apply the load balancing policies to client connections that opt into connection load balancing. See Load Balancing in ADO.NET, Load Balancing in JDBC, and Load Balancing in ODBC, for information on enabling load balancing on the client. For vsql, use the -C command-line option to enable load balancing.
These steps are explained in the other topics in this section.
In This Section
See Also
- ALTER LOAD BALANCE GROUP
- ALTER NETWORK ADDRESS
- ALTER ROUTING RULE
- Connection Load Balancing Policies
- CREATE LOAD BALANCE GROUP
- CREATE NETWORK ADDRESS
- CREATE ROUTING RULE
- DESCRIBE_LOAD_BALANCE_DECISION
- DROP LOAD BALANCE GROUP
- DROP NETWORK ADDRESS
- DROP ROUTING RULE
- LOAD_BALANCE_GROUPS
- NETWORK_ADDRESSES