Creating a Database
Use the procedures below to create either an Enterprise Mode or Eon Mode database with admintools. To create a database with an in-browser wizard in Management Console, see Creating a Database using MC.
Create an Enterprise Mode Database
- On the Configuration Menu, click Create Database. Click OK.
- Select Enterprise Mode as your database mode.
- Enter the name of the database and an optional comment. Click OK.
-
Enter a password. See Creating a Database Name and Password for rules.
If you do not enter a password, you are prompted to confirm: Yes to enter a superuser password, No to create a database without one.
If you do not enter a password at this point, superuser password is set to empty. Unless the database is for evaluation or academic purposes, Vertica strongly recommends that you enter a superuser password.
- If you entered a password, enter the password again.
-
Select the hosts to include in the database. The hosts in this list are the ones that were specified at installation time (
install_vertica -s).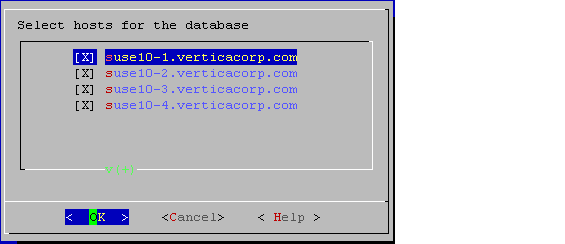
-
Specify the directories in which to store the catalog and data files.
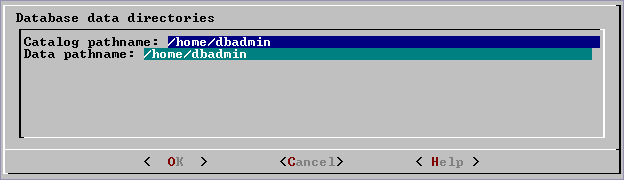
Catalog and data paths must contain only alphanumeric characters and cannot have leading space characters. Failure to comply with these restrictions could result in database creation failure.
Do not use a shared directory for more than one node. Data and catalog directories must be distinct for each node. Multiple nodes must not be allowed to write to the same data or catalog directory.
-
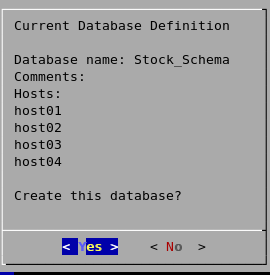
Check the current database definition for correctness. Click Yes to proceed.
- A message indicates that you have successfully created a database. Click OK.
Create an Eon Mode Database
Currently, the admintools menu interface does not support creating an Eon Mode database on Google Cloud Platform. Use the MC or the admintools command line to create an Eon Mode database instead.
- On the Configuration Menu, click Create Database. Click OK.
- Select Eon Mode as your database mode.
- Enter the name of the database and an optional comment. Click OK.
-
Enter a password. See Creating a Database Name and Password for rules.
AWS only: If you do not enter a password, you are prompted to confirm: Yes to enter a superuser password, No to create a database without one.
If you do not enter a password at this point, superuser password is set to empty. Unless the database is for evaluation or academic purposes, Vertica strongly recommends that you enter a superuser password.
- If you entered a password, enter the password again.
-
Select the hosts to include in the database. The hosts in this list are those specified at installation time (
install_vertica -s). -
Specify the directories in which to store the catalog and depot, depot size, communal storage location, and number of shards.
- Depot Size: Use an integer followed by %, K, G, or T. Default is 60% of the disk total disk space of the filesystem storing the depot.
- Communal Storage: Use an existing Amazon S3 bucket in the same region as your instances. Specify a new subfolder name, which Vertica will dynamically create within the existing S3 bucket. For example, s3://existingbucket/newstorage1. You can create a new subfolder within existing ones, but database creation will roll back if you do not specify any new subfolder name.
- Number of Shards: Use a whole number. The default is equal to the number of nodes. For optimal performance, the number of shards should be no greater than 2x the number of nodes. When the number of nodes is greater than the number of shards (with ETS), the throughput of dashboard queries improves. When the number of shards exceeds the number of nodes, you can expand the cluster in the future to improve the performance of long analytic queries.
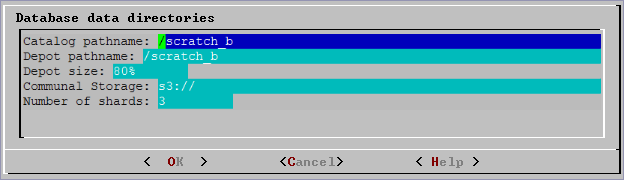
Catalog and depot paths must contain only alphanumeric characters and cannot have leading space characters. Failure to comply with these restrictions could result in database creation failure.
- Check the current database definition for correctness. Click Yes to proceed.
- A message indicates that you successfully created a database. Click OK.