Adding Subclusters in MC
You can add a subcluster to an Eon Mode database on-premises or in the cloud, to provide your database with more compute power, and to separate workloads.
For more information about the rules governing subclusters, see Subclusters.
For Eon Mode databases, MC supports actions for subcluster and node management:
- In the cloud: On AWS and GCP.
- On-premises: For Pure Storage FlashBlade.
In Enterprise Mode, subclusters are not supported.
On-Premises
For an Eon Mode database on-premises, you can use MC to create additional subclusters. MC displays all available Vertica hosts that are not part of the database. It configures the ones you select to become the nodes in the new subcluster in your database.
- On the Manage > Subclusters tab, click Create Subcluster at top left. MC opens the Create Subcluster wizard.
-
In the first screen, respond in the following fields:
- Subcluster Name: Enter a name for the new subcluster.
- Subcluster type dropdown (unlabeled): Select Primary or Secondary.
- Select nodes that will be added to a subcluster: Select from the list of IP addresses. MC displays all available Vertica hosts within the cluster that are not currently members of a database.
- Confirmation: Click the Confirmation check box to indicate that you want to create the named subcluster, to include the Vertica hosts you selected as nodes.
- After you click the Confirmation check box, the Proceed button changes from grayed out to active. Click Proceed.
MC displays a progress screen while it creates the requested subcluster. Wait for all steps to complete.
In the Cloud (AWS and GCP)
When you use MC to add a subcluster in Eon Mode on a cloud platform, MC provisions the requested instances, configures them as nodes in your database cluster, and forms those nodes into a new subcluster.
The steps below describe the process of adding a subcluster on AWS.
- On the Manage > Subclusters tab, click Add Subcluster at top left. MC opens the Add Subcluster wizard.
-
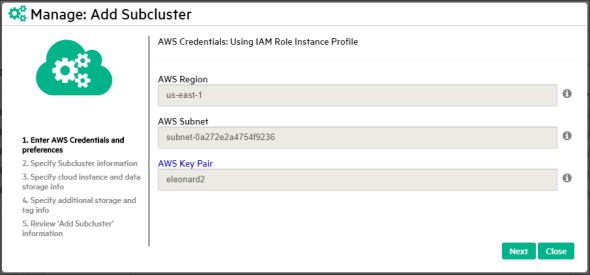
In the first screen, enter your AWS credentials. Wait a moment or two, to see which fields MC fills in for you automatically based on your previous choices. Accept the defaults or enter values in the AWS Region, AWS Subnet, and AWS Key Pair fields.
-
Click Next. On the Specify Subcluster Information screen, enter a name for your subcluster, choose Primary or Secondary, and enter the number of nodes you want in the subcluster.
If you are using MC with the free Community Edition license and the number of nodes in your database is greater than 3, MC displays a field asking you to enter an upgraded license to continue.

You can add a second primary subcluster in order to stop the original primary. Be sure to make the replacement primary subcluster at least one node larger than the original. (If you make them the same size, they both count equally toward the quorum, and stopping either would violate the quorum, so you cannot stop either one. For more information, see Maintaining Data Integrity and High Availability in an Eon Mode Database.)
- Enter your Vertica license and choose a node IP setting. If you choose Public IP, the address is not persistent across instance stop and start.
-
Click Next. On the Specify cloud instance and data storage info screen, Database Depot Path is populated to match the original cluster configuration. Select or enter a value in the following:
- EC2 Instance Type: For recommended instance types, see Choosing AWS Eon Mode Instance Types. For a comprehensive list of Vertica supported instance types, see Supported AWS Instance Types.
- EBS Volume Type: This field is populated with the volume configuration defaults for the associated instance type. Select a new value to change the default.
- EBS Volume Size (GB) per Volume per Available Node: This field is populated with the volume configuration defaults for the associated instance type. Enter a new value to change the default.
-
Click Next. On the Specify additional storage and tag info screen, the following fields are populated:
- Database Catalog Path: The path to a persistent storage location.
- Database Temp Path: The path to an ephemeral storage location if the node instance type includes the ephemeral storage option.
Under each path, there are EBS Volume Type and EBS Volume Size (GB) per Volume per Available Node fields that are populated with volume configuration defaults for the associated instance type. Select or enter a new value to change the default.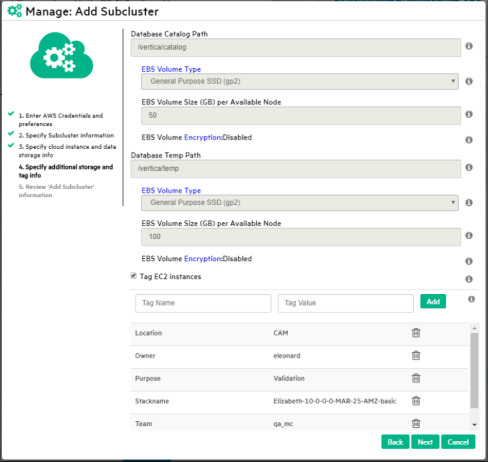
- Optionally, select Tag EC2 Instances to assign distinctive, searchable metadata tags to the instances in your new subcluster. The pre-existing tags are displayed, and you can add or remove tags as necessary.
-
Click Next. MC displays the Review 'Add Subcluster' information screen so that you can confirm the configuration details for your new subcluster. To complete the subcluster as described, click Add Subcluster.

MC displays the Manage > Subclusters page again, which now includes your new subcluster. MC automatically subcribes the nodes in your new subcluster to shards, so the nodes are ready to use.
See Also