


Securing Vertica Using NetIQ Advanced Authentication: Technical Exploration
Many of the data-driven companies leveraging Vertica’s analytics platform find its layered security model to be robust, but increasingly IT groups are protecting administrative access to sensitive information with multi-factor authentication. Fortunately, the Vertica platform is part of a growing list of Micro Focus products that offer authentication integration with NetIQ Advanced Authentication. Advanced Authentication delivers various authentication mechanisms to enable identity assurance and proofing in addition to the traditional username and password-based authentication. This document uses the following scenario to explain how you can integrate the Vertica platform into Advanced Authentication’s framework:
Scenario: Leverage the different methods of Advanced Authentication in multi-factor chain combinations for Windows authentication and secure the Vertica environment.
No doubt that the information that you are gathering via Vertica is of high value and possibly high sensitivity. So, it’s that very reason that you owe it to yourselves to secure your privileged Vertica users with another layer of identity verification via multi-factor authentication. Because NetIQ’s Advanced Authentication gives your organization unmatched authentication flexibility it only makes sense to use it to secure the valuable information within your Vertica environment so, in this example, we’re going to use Smartphone and some other methods from a large variety of supported authentication methods for Windows authentication. A best practice of our customers is using a combination of LDAP Password which is their domain password with another factor, like Smartphone, Fingerprint, SMS OTP, or a contactless card. Advanced Authentication supports more than 20 different authentication methods which can be combined into authentication chains and used to authenticate in different places by your needs.
Perform the following tasks to implement multi-factor authentication for Windows logon:
1. Setting up the Advanced Authentication Server
5. Assigning a Chain to the Windows Logon Event
6. Setting Up the User Workstation
To understand how an end user enrolls the authentication methods and authenticates to the Windows workstation using Advanced Authentication, see End User Tasks.
Setting up the Advanced Authentication Server
1. Download the Advanced Authentication server (AA server) appliance from https://download.microfocus.com
2. Install the appliance in the same way as you would install an operating system.
For example, you can install the AA appliance on advauth.yourcompany.com VM with an IP address 10.204.130.130. After a successful installation, the appliance console requests for login.
3. Open https://advauth.yourcompany.com and configure your first Advanced Authentication Server. For more information, see Configuring Global Master Server.
4. Log in to the Administration portal (https://advauth.yourcompany.com/admin) with the local admin credentials that you specified in the previous step.
Note Advanced Authentication supports deployment in Amazon Web Services and Azure Kubernetes Services. For more information, see Installing Advanced Authentication.
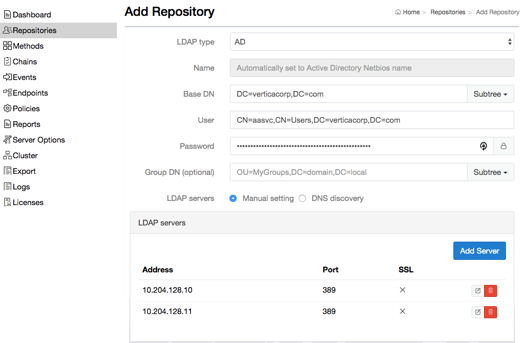
Adding a Repository
In Advanced Authentication, add Active Directory as a repository from where the user details are fetched for validation.
1. Click Repositories on the Advanced Authentication Administration portal.
2. Click Add LDAP repo.
3. Select AD (Active Directory Domain Services) from the LDAP type list.
4. Specify a container for the users in Base DN.
5. Create a service account in Active Directory without a password expiration.
6. Specify the service account and its password in User and Password respectively.
7. Add your Domain Controllers as LDAP Servers either manually or detect them automatically through DNS.
8. Click Save.
Configuring Methods
Almost all authentication methods work with pre-defined settings. However, you can modify the available settings on Administration portal – Methods. For more information, see Configuring Methods.
Configuring Smartphone Method
The Smartphone method facilitates users to authenticate through their smartphones. The authentication happens through the NetIQ Auth app to perform the out-of-band authentication. The out-of-band authentication is typically a two-factor authentication that requires a secondary verification through a separate communication channel along with the ID and password.
The authentication flow for the Smartphone method in Advanced Authentication is described in the following image.
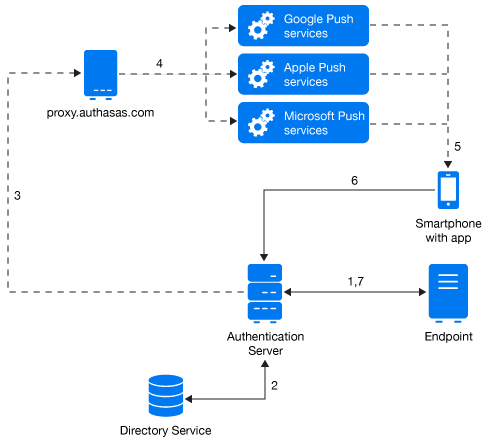
The following steps describe the authentication flow of the Smartphone method:
1. When the authentication request is initiated, the endpoint contacts the Advanced Authentication server.
2. The Advanced Authentication server validates the user’s credentials.
3. After validating the credentials, the Advanced Authentication server sends a push message to a proxy server.
4. Depending on the platform of the Smartphone, the server selects an appropriate push service and then forwards the push message to the Smartphone.
5. The push message is then delivered to the user’s Smartphone to inform that an authentication request has been initiated.
6. When the user opens the Smartphone app, the app reaches the Advanced Authentication server to validate if there is an authentication needed. The authentication is indicated by the Accept and Reject options. The user’s selection is then sent to the server.
7. Finally, the server validates the authentication and the endpoint gets authenticated.
The Smartphone method contains the different security and feel-and-look settings available in Administration portal – Methods – Smartphone, but they are optional. For more information, see Smartphone.
It’s required only to set up the public URLs in Administration Portal – Policies – Public external URLs. The smartphones must be able to reach the Advanced Authentication Server to check for pending authentication requests and send a user response.
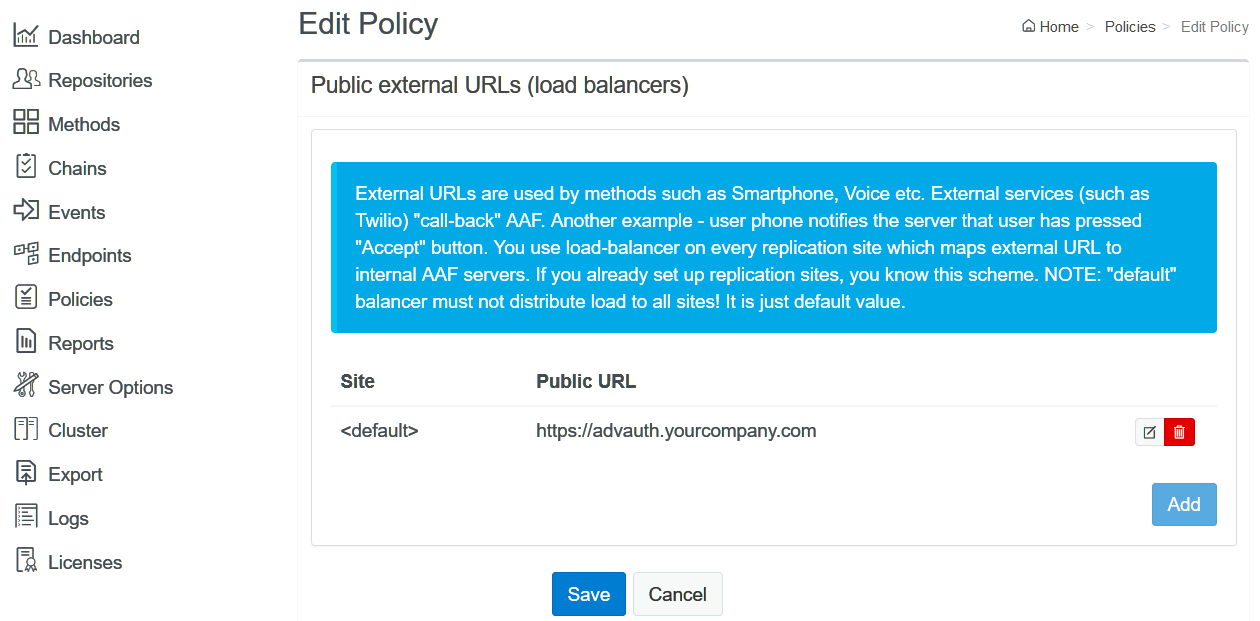
It’s recommended to validate the specified Public external URL by opening the URL with ending /smartphone on any smartphone. If it works, you should see a message “IT WORKS”.
Configuring SMS Method
In the SMS OTP authentication method, a one-time password (OTP) is sent with the SMS text to the user’s phone. The user receives the OTP and enters it on the device where the authentication is happening. The OTP must be used within a specific time frame (by default 2 minutes).
The related settings are available in Administration Portal – Methods – SMS OTP:
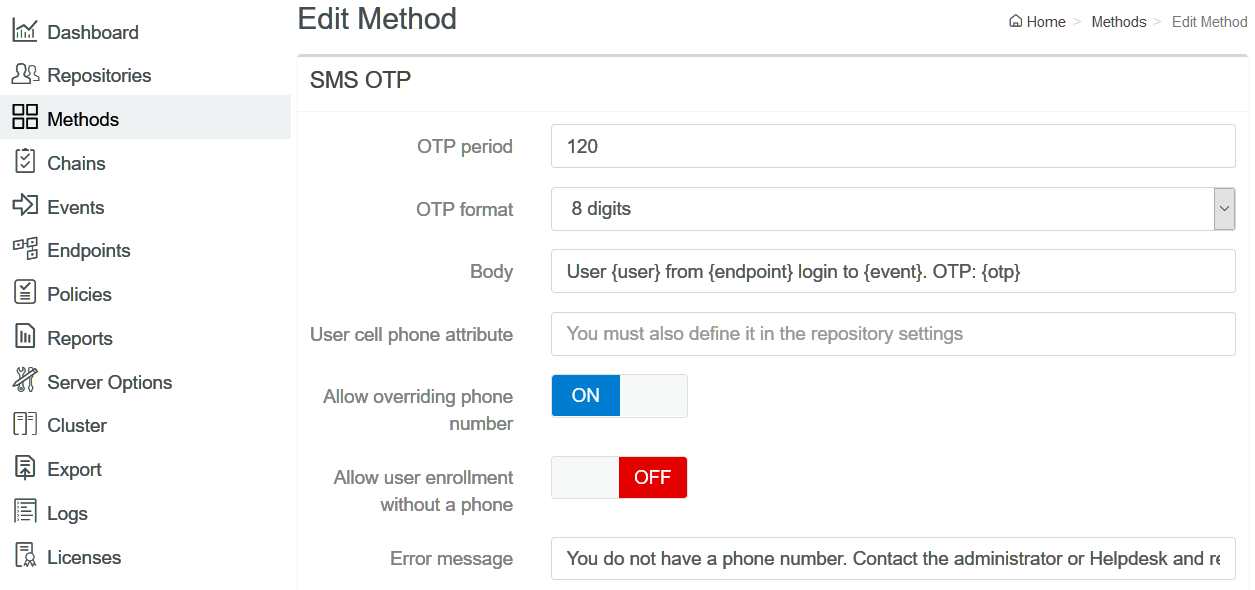
For more information, see SMS OTP.
A third-party SMS service must be used to provide the SMS sending functionality. Check and configure the settings in Administration Portal – Policies – SMS sender. For more information, see SMS sender.
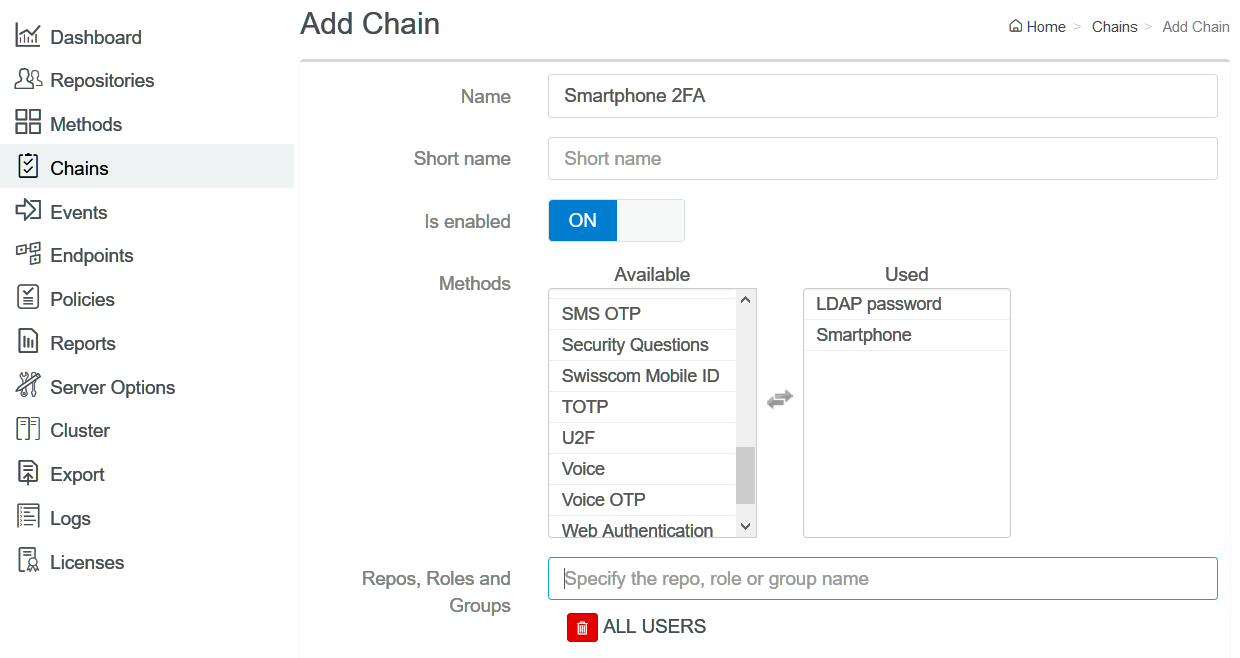
Creating a Chain
Perform the following steps to create an authentication chain with the LDAP Password and Smartphone methods:
1. Click Chains > Add in the Advanced Authentication Administration portal.
2. Specify the name of the chain.
3. Select the LDAP Password and Smartphone methods to add to the chain.
In this example, the Smartphone is selected for a second-factor authentication. However, you can select preferred methods based on the sensitivity of the information that the administrator can access in Vertica.
4. Specify ALL USERS in Roles and Groups.
In this example, the chain has been assigned to ALL users. However, you can select the preferred group that you have created for Vertica users. You may create and use different chains for different departments in your company.
You can create other chains in the same way.
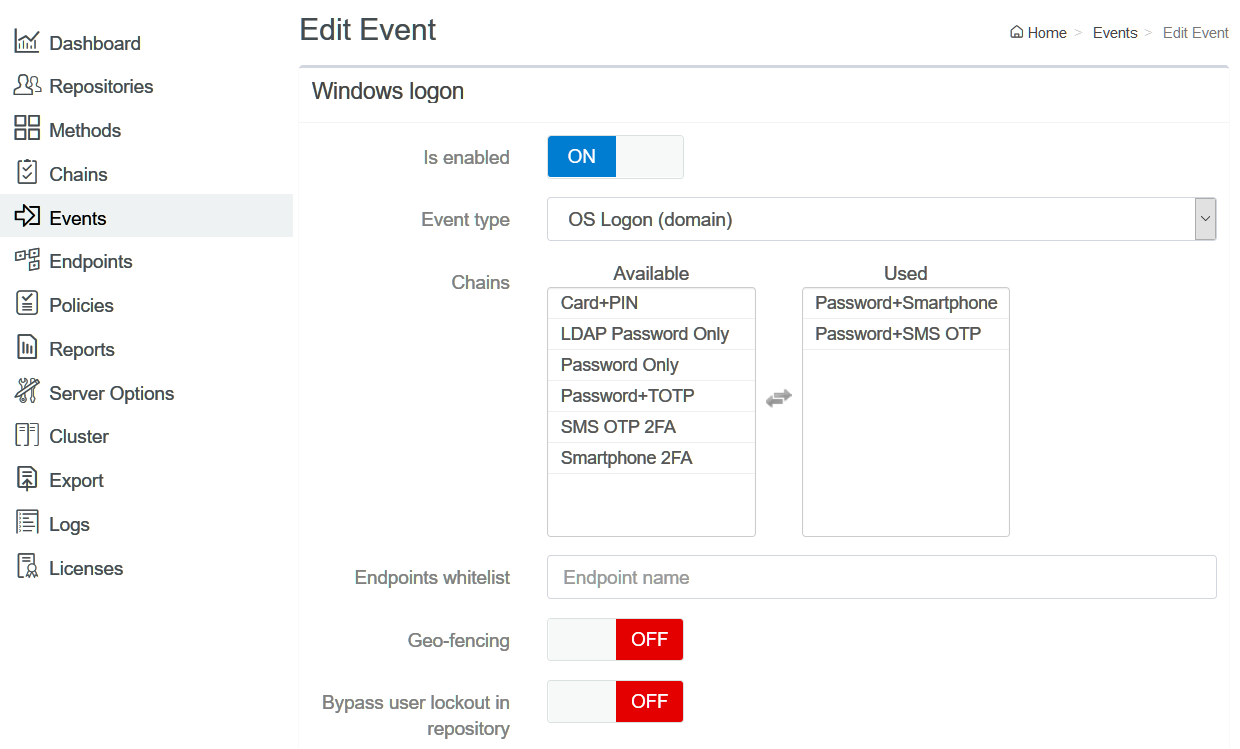
Assigning a Chain to the Windows Logon Event
1. Click Events.
2. Click Edit next to the Windows Logon event.
3. Ensure that Is enabled is set to ON.
4. Select the chains that you have created in Creating a Chain.
5. Click Save.
Setting Up the User Workstation
Install the Advanced Authentication Windows Client on the user workstation. For more information, see Installing Windows Client.
DNS needs to be configured to allow the Windows Client to discover and connect with the Advanced Authentication server. For more information, see Setting a DNS for Advanced Authentication Server Discovery.
Some authentication methods like Card, Fingerprint, Face, PKI, Windows Hello, Bluetooth, and U2F require to have the Advanced Authentication Device Service installed on the workstation. For more information, see Installing and Upgrading Device Service.
End User Tasks
An end user must perform the following tasks to authenticate to Vertica server with the configured chains:
1. Enrolling the Smartphone Method
2. Authenticating to Windows Workstation Using the Smartphone Method
The end user must ensure to install the NetIQ Advanced Authentication app on their smartphone to enroll the Smartphone method. For more information about downloading and installing the NetIQ Advanced Authentication app, see Installing NetIQ Advanced Authentication App.
Enrolling the Smartphone Method
To enroll the Smartphone authenticator using the Advanced Authentication smartphone app, perform the following steps:
1. Log in to the Advanced Authentication Self-Service portal (https://advauth.yourcompany.com/account) with your domain account.
2. Click the Smartphone ![]() icon in Add Authenticator section.
icon in Add Authenticator section.
3. Click Save to show a QR code.
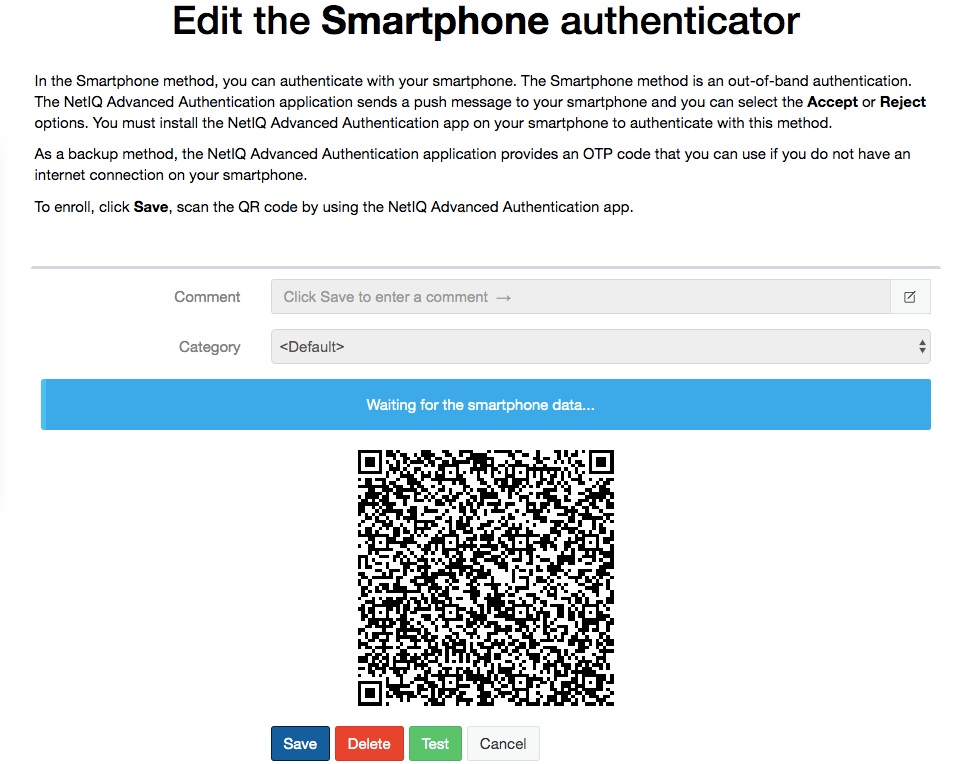
4. Open the NetIQ Advanced Authentication app on your smartphone.
5. Tap + to add a new authenticator.
The camera of the smartphone is launched.
6. Scan the QR code using the camera on the smartphone.
Authenticating to Windows Workstation Using the Smartphone Method
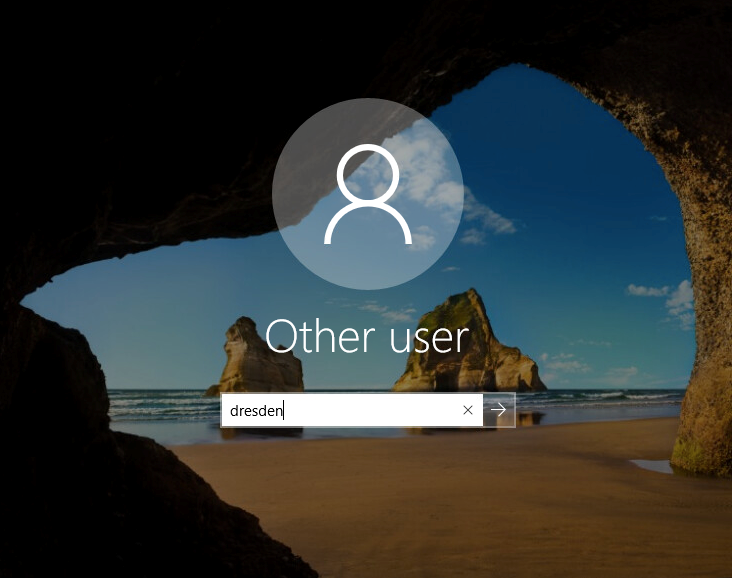
1. Turn on the Windows workstation.
The lock screen is displayed.
2. Press any button.
3. Specify Username.
Note It is not required to prefix the domain name before the username.
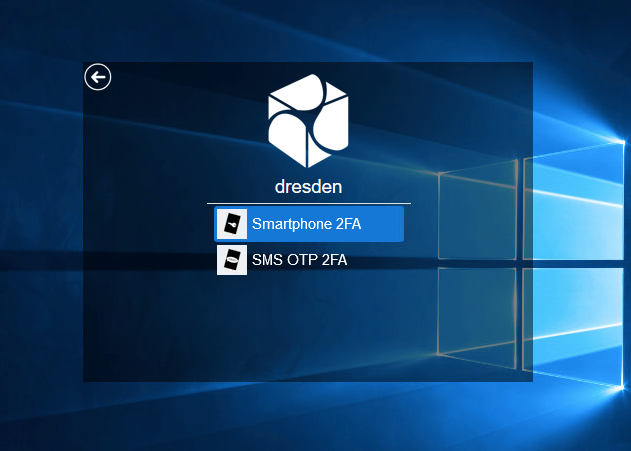
4. Choose an authentication chain (if more than one chain is available).
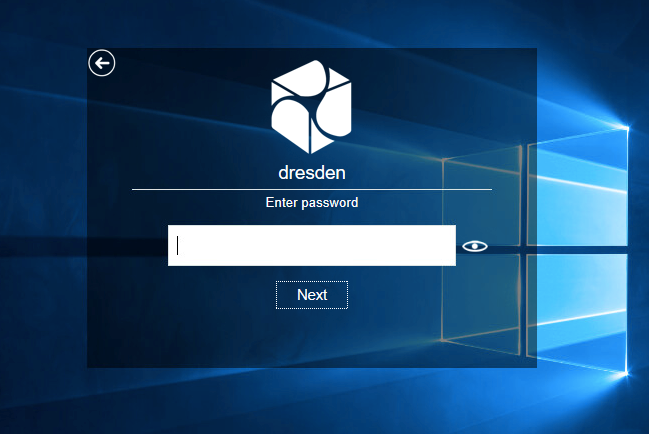
5. Specify your domain password.
A prompt message to accept the authentication request on Smartphone is displayed.

6. Open the NetIQ Advanced Authentication app on your smartphone. In a few seconds you will get the authentication request.
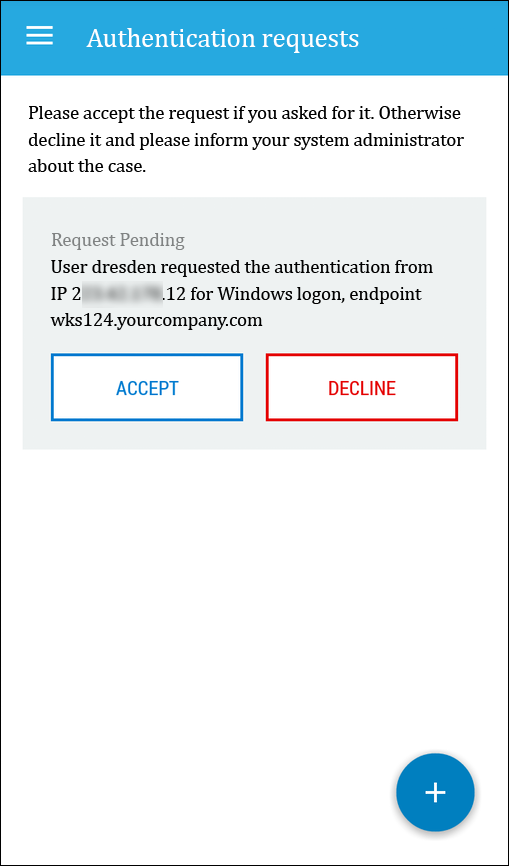
Note If you have no network connection on your smartphone you may use a one-time password shown in the application.
7. Tap ACCEPT.
User authenticates to the Windows workstation.
It’s possible to use other authentication methods and their chain combinations for Windows login. For example, if you choose another assigned chain with an SMS OTP, after providing the domain password the user will receive an SMS message with a one-time password and it will be required to enter the one-time password in the field:
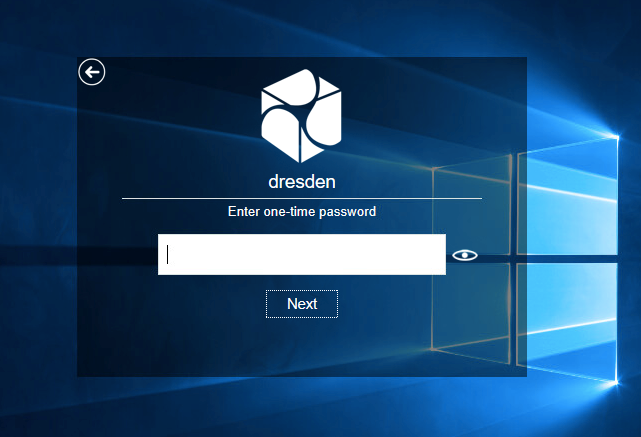
After providing a correct one-time password the user will be logged in to the workstation.
Single Sign-on to Vertica
When the user is authenticated to the Windows workstation with strong multifactor authentication, you can simply perform a Single Sign-on to Vertica environment by executing the following command in Command line:
C:\Users\dresden>vsql -p5461 -U dresden -h vert.yourcompany.com -c "select user_name, authentication_method from sessions"
user_name | authentication_method
-----------+-----------------------
dresden | GSS-Kerberos
(1 row)
Learning More About NetIQ Advanced Authentication
Beyond protecting access to Vertica, Advanced Authentication offers a standards-based framework where all types of authentication options are supported. That open architecture approach allows organizations to consolidate their silos of authentication into one repository, giving organizations a way to reduce administration hassle and cost, while rooting out uneven policies at the same time. To learn more, check out NetIQ Advanced Authentication.
Contact
For information about advanced authentication, contact George Teys at George.Teys@microfocus.com.

