Vertica Integration with Precisely Connect (Previously Syncsort DMExpress): Connection Guide
About Vertica Connection Guides
Vertica connection guides provide basic instructions for connecting a third-party partner product to Vertica. Connection guides are based on our testing with specific versions of Vertica and the partner product.
Vertica and Precisely Connect: Latest Versions Tested
| Software | Version |
|---|---|
| Partner Product |
Precisely Connect 9.10.34 |
| Desktop Platform |
Windows Server 2016 |
| Vertica Client |
Vertica ODBC 11.0.0 |
| Vertica Server | Vertica 11.0.0 |
Precisely Connect Overview
Precisely Connect is a data integration application tool that can extract large amount of data from any data source and load it into Vertica. DMX also allows you to transform that data while loading the data into a target data warehouse.
Installing Precisely Connect
- Go to https://www.precisely.com/product/precisely-connect/connect to request a demo.
- After you get a download link for the exe file from the support team, follow the installation instructions to install the software.
To view Precisely Connect documentation, log into the Precisely Customer Community Page using your business account.
Installing the Vertica Client Driver
Before you connect Vertica to Precisely Connect, you must install the Vertica client driver. Follow these steps:
- Navigate to the Client Drivers page on the Vertica website.
-
Download the ODBC client driver that is compatible with your Vertica server version.
Note For details about client and server compatibility, see Client Driver and Server Version Compatibility in the Vertica documentation.
-
Follow the installation instructions in the Vertica documentation.
- Create a DSN as described in Creating an ODBC Data Source Name (DSN).
Precisely Connect Components
When creating a connection to Vertica, you need to be familiar with the following Precisely Connect components:
Access these components from the Start > Connect Task Editor menu.
Connect Job Editor
Use the Job Editor to configure your data flow. In the Job Editor, you can add jobs and tasks to the canvas and create sequences between them. This helps you develop, manage, and oversee the data flow from your sources to your targets.
Connect Task Editor
Use the Task Editor to define your transformations. Precisely Connect allows you to perform the following set-level transformations on your data:
- Join
- Copy
- Merge
- Sort
- Aggregation
You can also specify how to perform the following transformations on a field-level basis:
- Date/time functions
- String manipulations
- Lookups
- Mathematical operations
Connect Server
The Connect Server provides information about the server and jobs that are scheduled, executing, or complete.
Select the Status button to retrieve information about your connection.
In the Status window, you can:
- View information about scheduled, executing, and completed jobs.
- Monitor job execution status.
- Modify Connect environment variables.
Connecting Vertica to Precisely Connect
Follow these steps to connect to Vertica using Precisely Connect.
- Select Start > Connect > Connect Task Editor.
The Task Editor appears: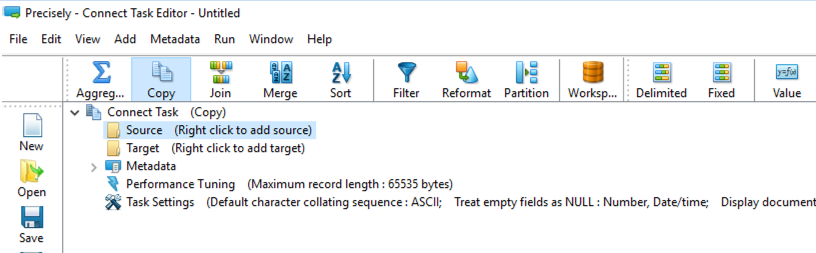
- Click New to create a new task. In this example, the new task defines the Vertica data source, the Vertica target, and transformation. Continue to Define the Vertica Data Source to continue creating the task.
Defining the Vertica Data Source
-
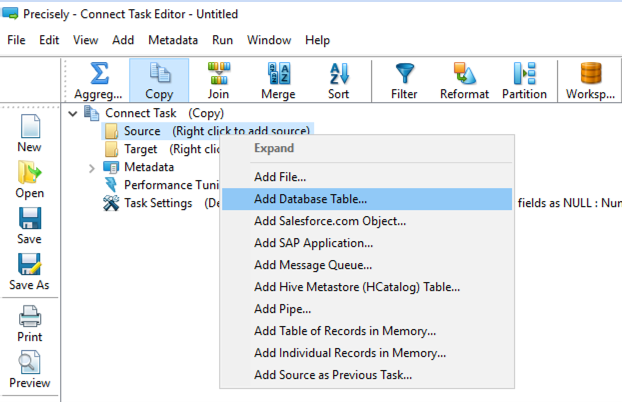
In Connect Task, right-click Source and select Add Database Table to define the source Vertica database.
-
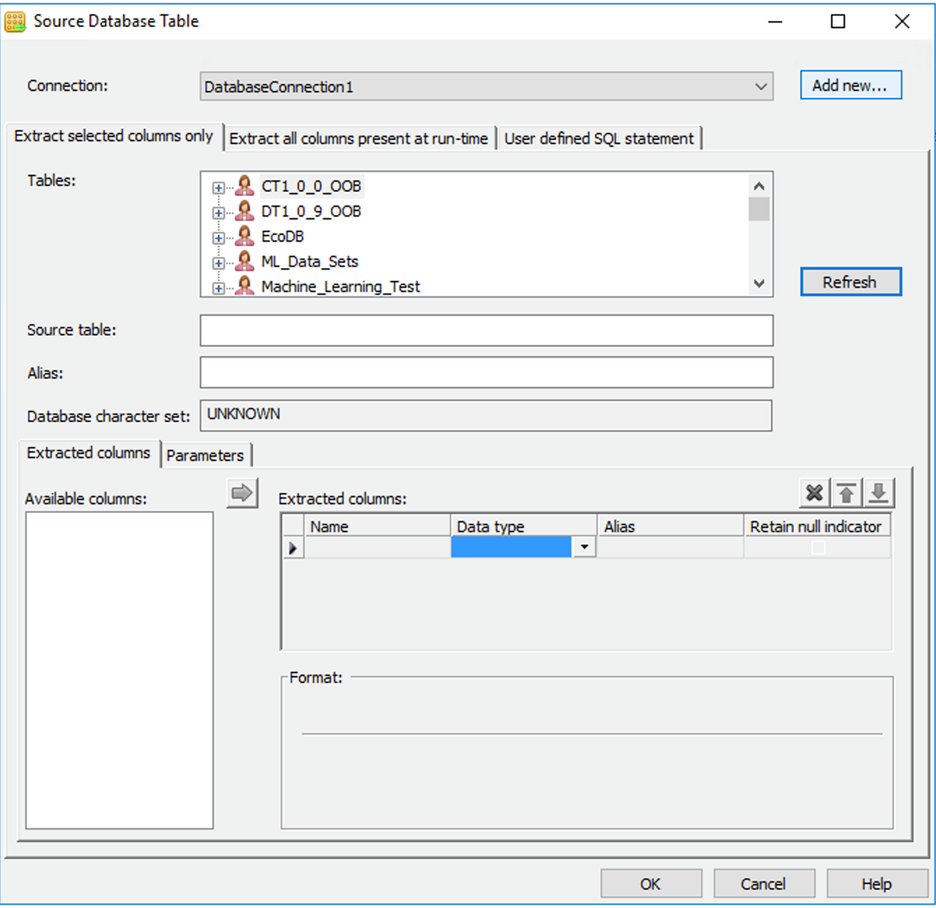
In the Source Database Table dialog box, click Add new in the upper-right corner.
-
In the Database Connection dialog box, enter the Vertica source database connection information. Select Vertica from the DBMS drop-down list.
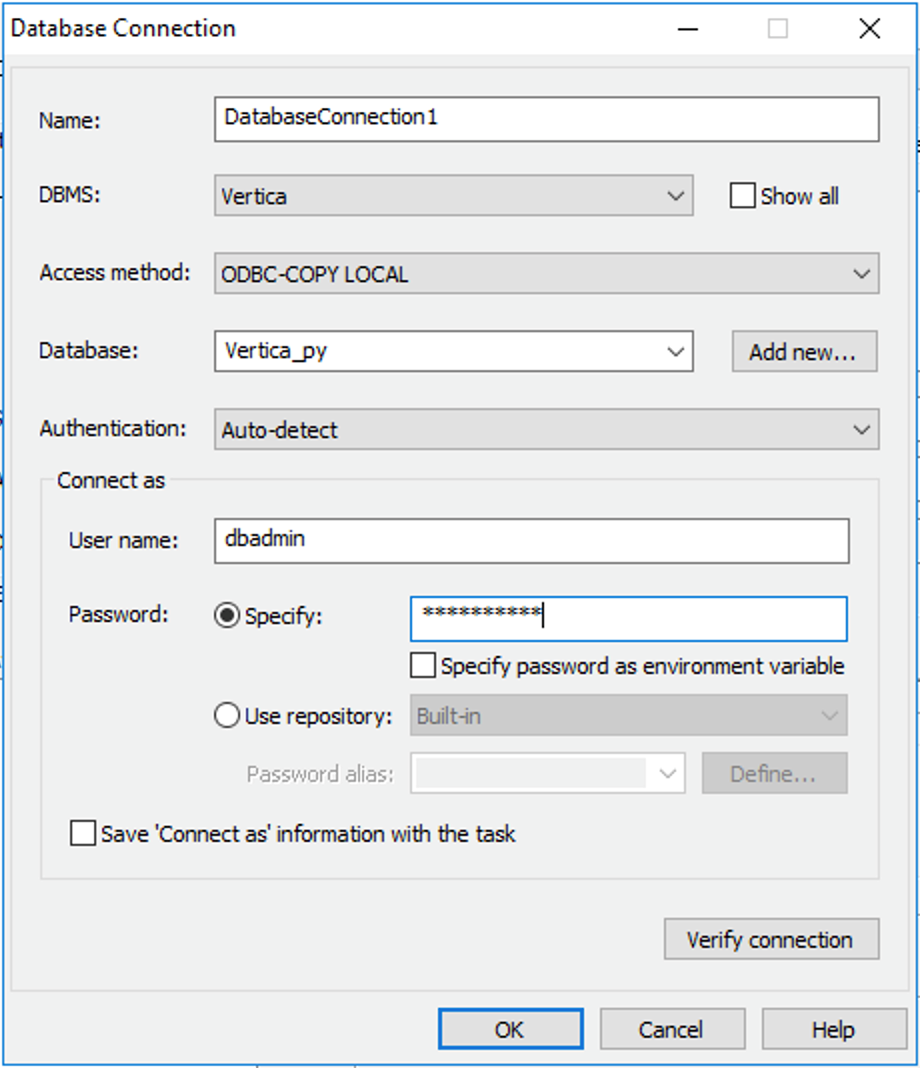
- Click Verify connection.
- Upon successful connection, click OK to exit the Database Connection dialog box.
-
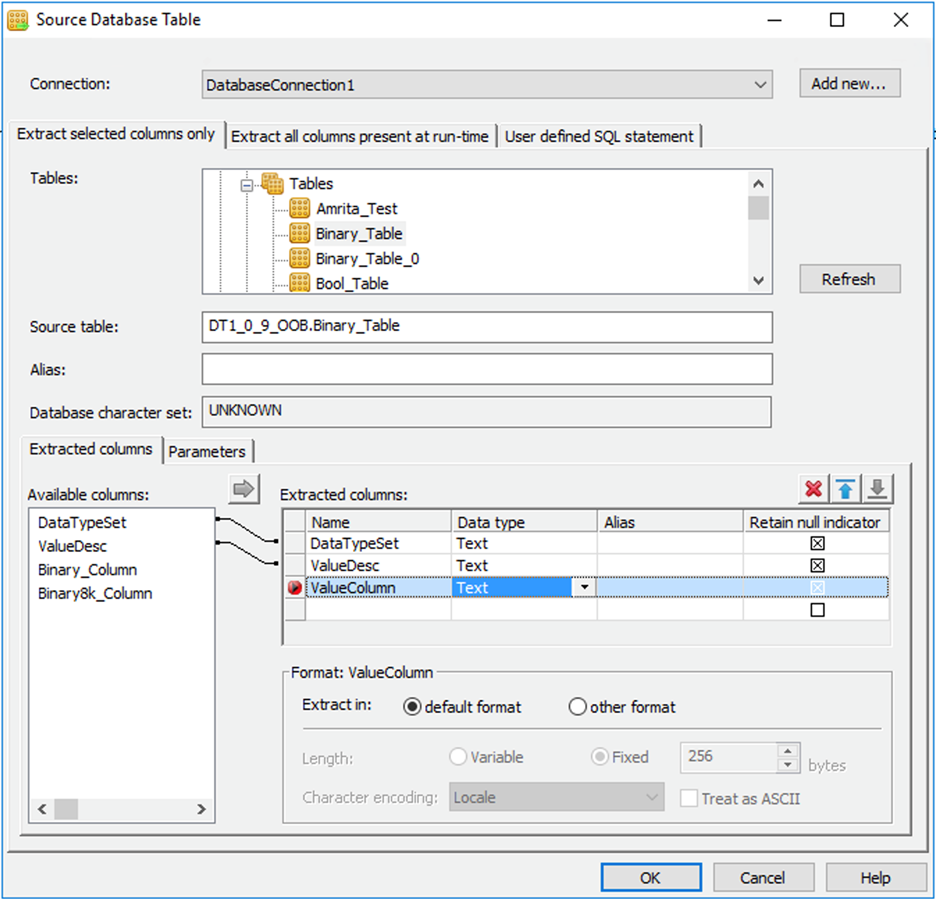
The Source Database Table dialog box appears and contains the information about the Vertica source database. For this example, the connection is called DatabaseConnection1.
-
Select the source Vertica database table and columns that you want to transform and define the desired transformation.
-
Click OK.
Precisely Connect creates and saves the transformation and closes the Source Database Table dialog box. Continue to Define the Target Database to continue creating the task. For this example, the target database is also a Vertica database.
Defining the Target Database
-
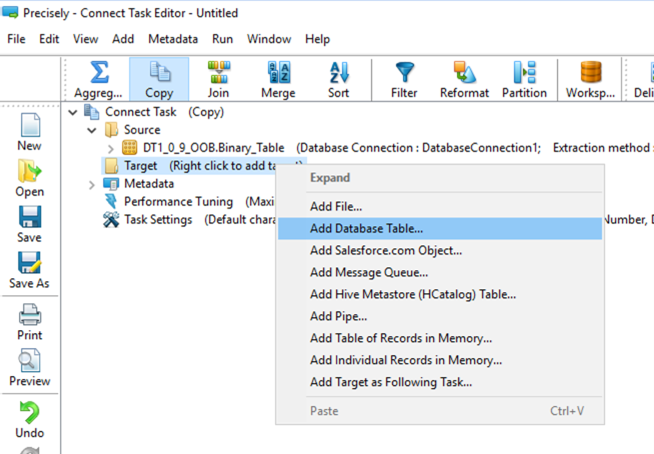
In Connect Task, right-click Target and select Add Database Table.
- In the Target Database Table dialog box, click Add New.
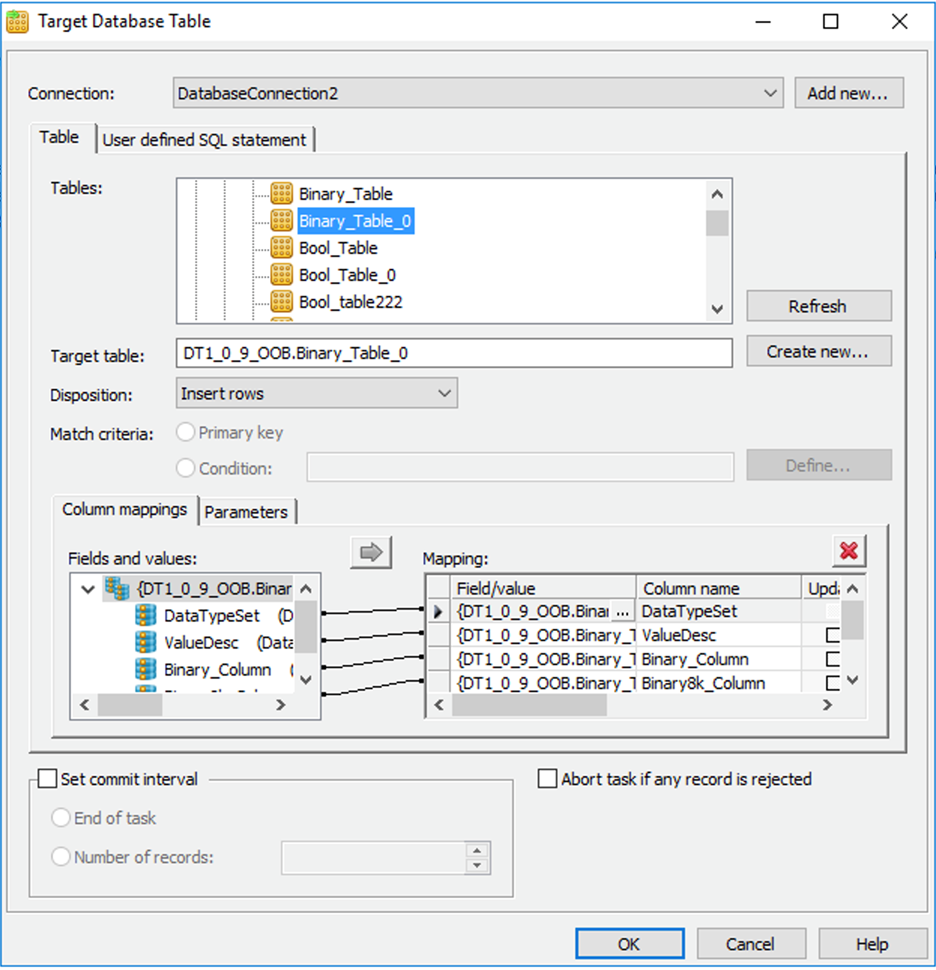
- In the Database Connection dialog box, enter the target Vertica database information. Select Vertica from the DBMS drop-down list.
- Click Verify connection.
- Upon a successful connection, click OK to exit the Database Connection dialog box.
-
The Target Database Table dialog box appears and contains the information about the Vertica target database. For this example, the connection is called DatabaseConnection2.
-
Select the target Vertica database table and specify the desired column mappings between the source and the target.
-
Click OK.
Precisely Connect saves the column mapping and closes the Target Database Table dialog box.
Running a Job
To extract the data from the source, transform the data, and save it in the target
Click Run to execute the job using the designated source and target Vertica databases.

When you run the job, Precisely Connect connects to the Vertica source, extracts the data, transforms it, and then connects to the Vertica target where it saves the data.
Verifying the Job Status
To check the status of your job, click Status. On the Jobs tab, look under the Job Status field for the status of your job.
Possible values for the job status are:
- Starting
- Running
- Completed successfully
- Completed with exceptions
- Ended in error
- Lost contact
- Unknown
Known Limitations
- INTERVAL SECOND and INTERVAL MONTH data types are not supported.
- For BINARY, CHAR, VARCHAR, and LONGVARCHAR data types, the values are truncated or not loaded.
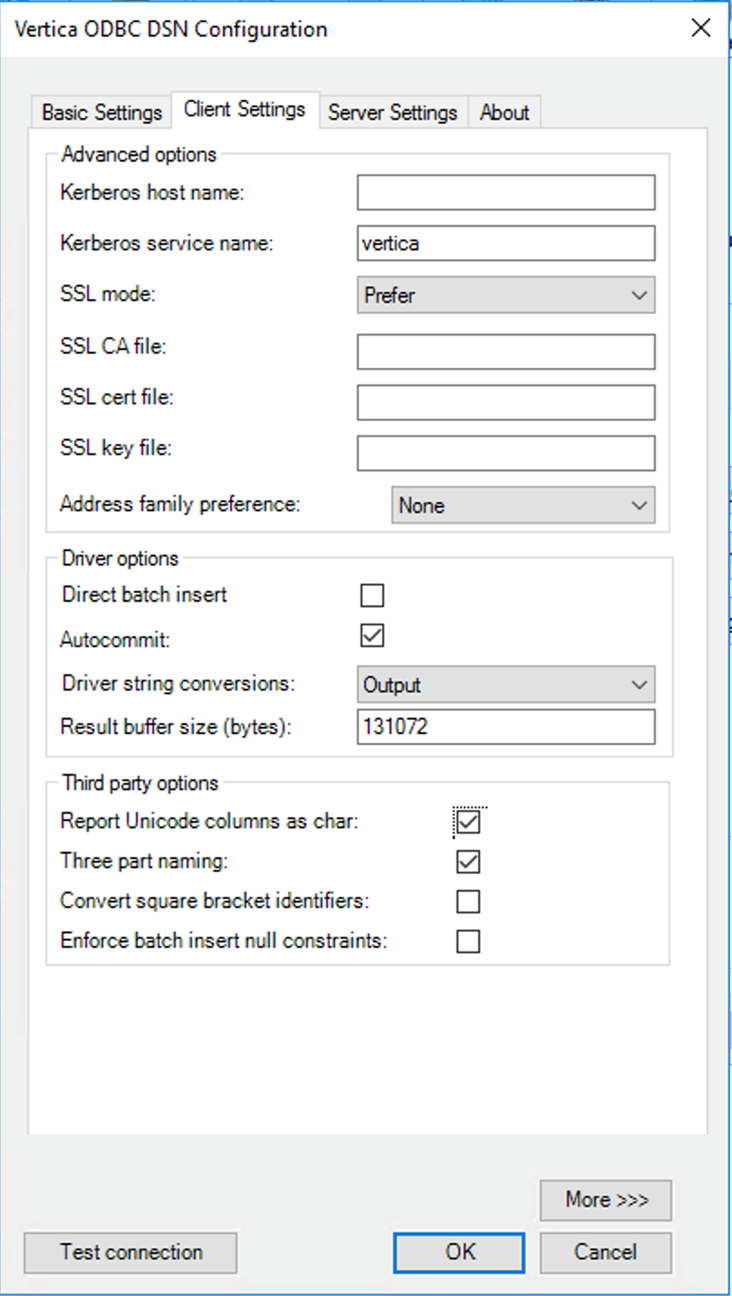
To fix this issue, enable the Report Unicode columns as char setting in Windows:
Select Start > Control Panel > Administrative Tools > Data Sources (ODBC).
Click System DSN.
Select your DSN and click Configure.
Click the Client Settings tab.
Select Report Unicode columns as char.