


Vertica Integration with Stambia DI Designer: Connection Guide
To read this article in PDF format, click here.
About Vertica Connection Guides
Vertica connection guides provide basic instructions for connecting a third-party partner product to Vertica. Connection guides are based on our testing with specific versions of Vertica and the partner product.
Vertica and Stambia DI Designer: Latest Versions Tested
| Software | Version |
|---|---|
| Partner Product |
Stambia DI Designer S19 (19.0.14) with Stambia DI Runtime 17 (17.6.3) and 12-05-2018 Vertica template |
| Desktop Platform |
Linux CentOS 7.4 (Windows 10 VNC Viewer connecting to Linux host running tigervnc) |
| Vertica Client |
Vertica JDBC 9.2.0 |
| Vertica Server | Vertica server 9.2.0 |
| Server Platform | Linux CentOS 7.4 |
Stambia Overview
Stambia helps their customers manage traditional data integration needs as well as more innovative projects around new Digital Business initiatives.
Stambia is a software editor for an agile, bi-modal data integration solution (ELT, ETL, EAI). Stambia is based on a model-driven approach that allows the customer to design and start quickly, and that provides a way to industrialize and reduce the cost of ongoing maintenance.
For details about Stambia, visit the Stambia website.
Install Stambia DI Designer
- Create an account on the Stambia website.
-
Followo the instructions in these Stambia documents to download and install Stambia DI Designer, obtain a trial license, start the executable, and install the trial license:
Install the Vertica Client Driver
Stambia DI Designer uses the Vertica JDBC driver to connect to the Vertica database. Follow these steps to install the driver:
- Navigate to the Client Drivers page on the Vertica website.
-
Download the JDBC driver package.
Note
For details about client and server compatibility, see Client Driver and Server Version Compatibility in the Vertica documentation.
-
Make sure Stambia DI Designer’s embedded runtime has been started. The Vertica JDBC jar file must be copied to a folder within the runtime environment.
-
Follow the steps outlined in these two documents to install the default and Vertica templates and the Vertica JDBC driver:
Connect Stambia DI Designer to Vertica
Configure the Driver
After you copy the Vertica JDBC driver to the Stambia runtime environment, you must edit the driver configuration to specify the connection details. Follow these steps:
-
In the menus, select Window > Preferences > SQL Explorer > JDBC Drivers.
A scrollable list of supported drivers displays.
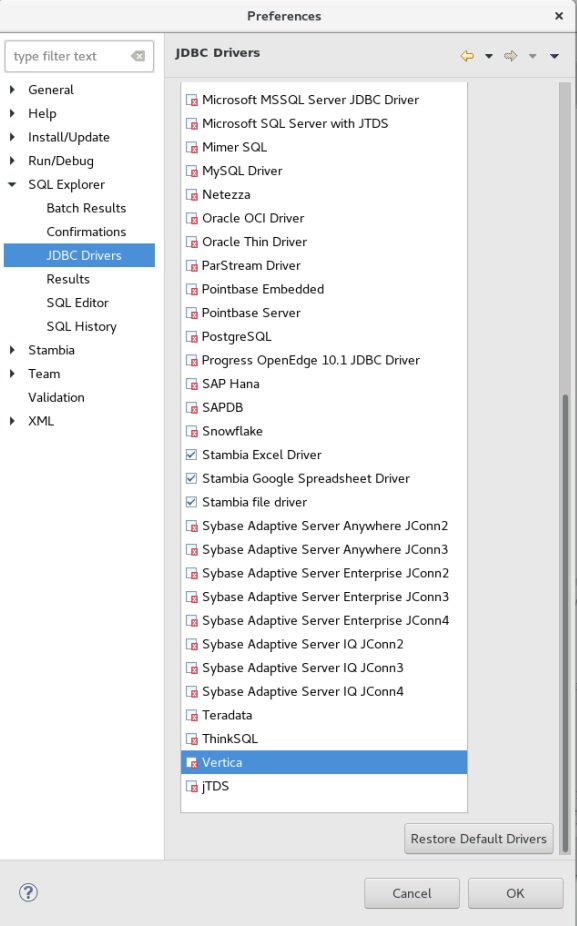
Note
A check mark icon identifies the drivers that have been configured. Drivers that have not been configured are flagged with a red X icon.
- Scroll to the Vertica driver and select it, then scroll up and click Edit.
-
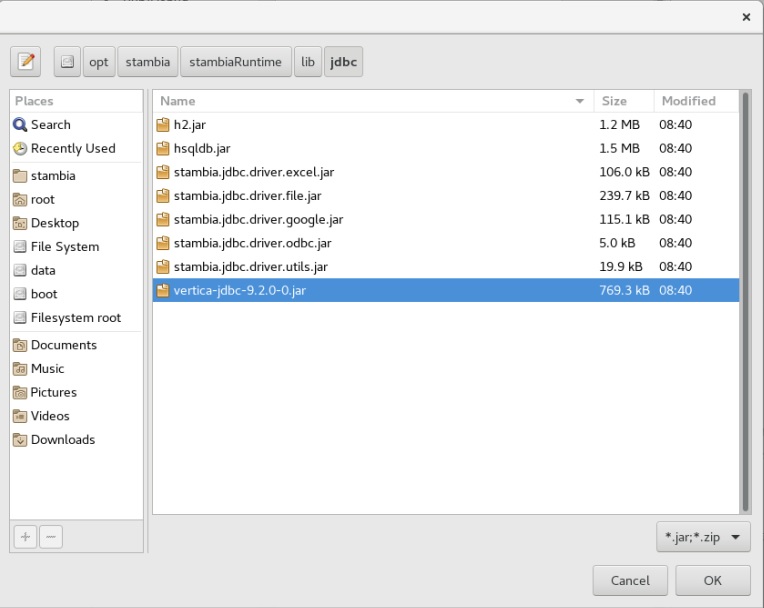
Select the Extra Class Path tab and click Add Jars.
-
Navigate to the path where you copied the Vertica JDBC jar file:
/opt/stambia/stambiaRuntime/lib/jdbc
-
Select the jar and click Ok.
-
Remove any other Vertica jar entries that might exist in the Extra Class Path.
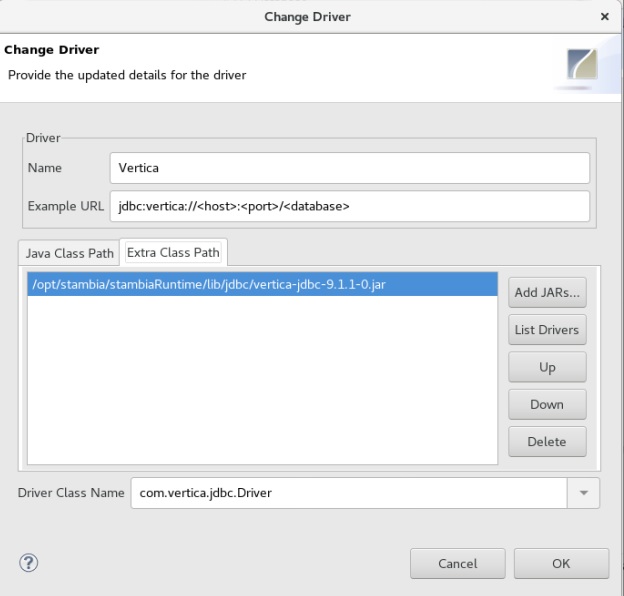
- Click Ok again to return to the Workbench.
- Stop the demo database and runtime, then exit Stambia.
- Restart Stambia.
- Restart the runtime and demo database and reconnect.
- In the menus, select Window > Preferences > SQL Explorer > JDBC Drivers.
- Scroll to the Vertica driver and confirm that it has a check mark, indicating a successful configuration.
Verify Driver Connectivity
- In the menus, select File > New > Project.
- Select General > Project and click Next.
- Type a Project name (for example:
Vertica), then click Next. - Select global and click Finish,
- In the Project Explorer window, right-click the new project and select New > Metadata.
- From the scroll list, select Vertica and click Next.
- Type a name (for example:
VMartOn183) and click Next. -
Click Finish.
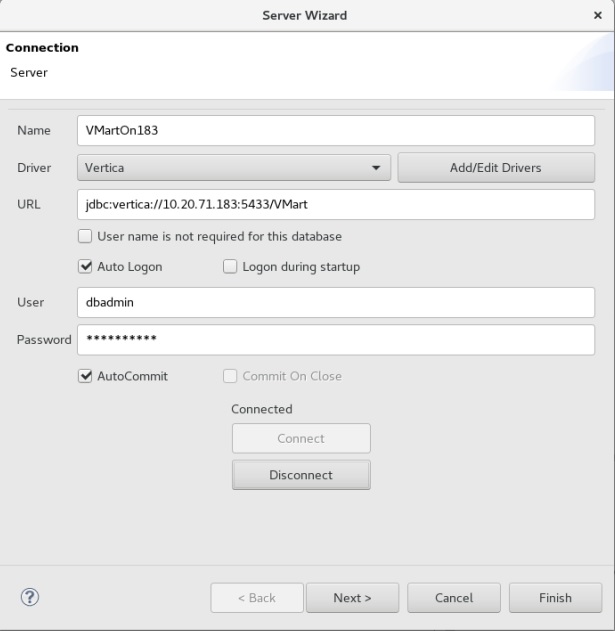
The Server Wizard displays.
- In the Driver pulldown list, select Vertica.
- In the URL field, modify the entry to include the host, port, and database name of your Vertica database.
- Uncheck User name is not required for this database.
- Check Auto Logon.
- Type the Vertica database user ID and password. For example: the name and password of dbadmin.
-
Click Connect.
Disconnected should change to Connected.
- Click Finish.
Further Verification of the Connection
If you want to further verify the connection, follow these steps:
-
In Project Explorer, drill on your Project and double click the Metadata you created.
This should open up the Metadata in the various frames in the Designer screen.
-
Right-click the Metadata object in the Tree tab of the *.md frame. Select Actions and click Launch DataSchema Wizard.
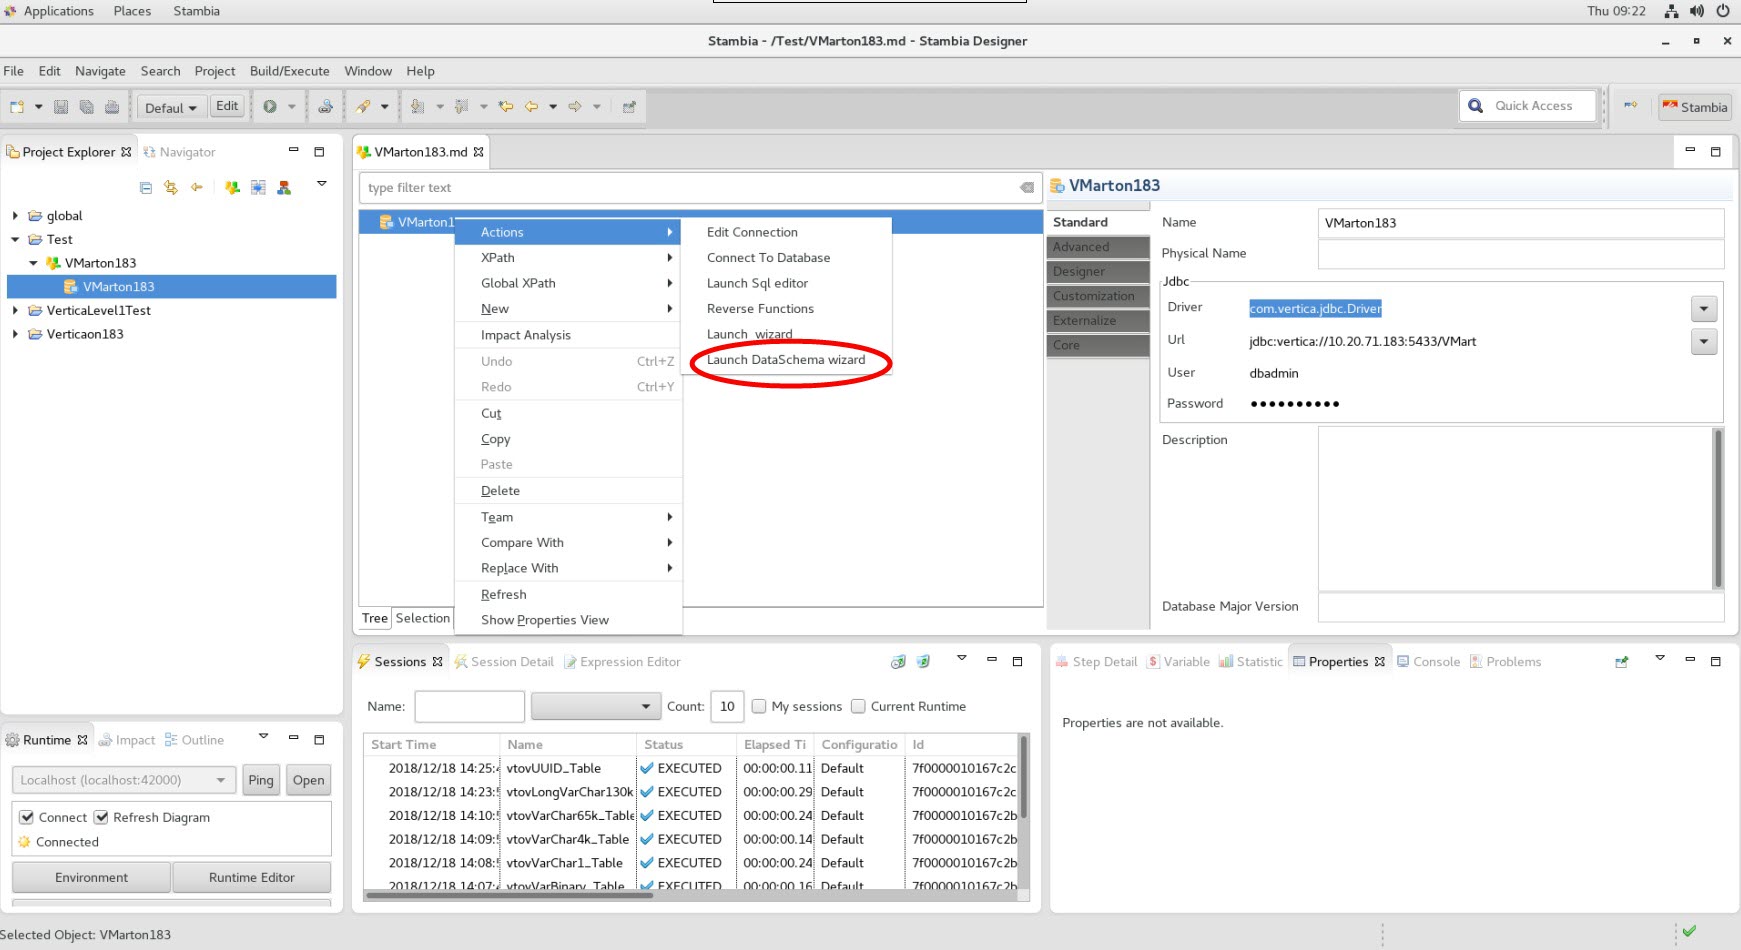
-
In the Schema Wizard, click Refresh Values, then click the drop-down menu.
The list should include the database schemas for which you create the Metadata.
-
Select one of the schemas and click Next.

-
In the second Schema Wizard screen, click Refresh Values.
The Object List should populate with the tables that are in that schema.
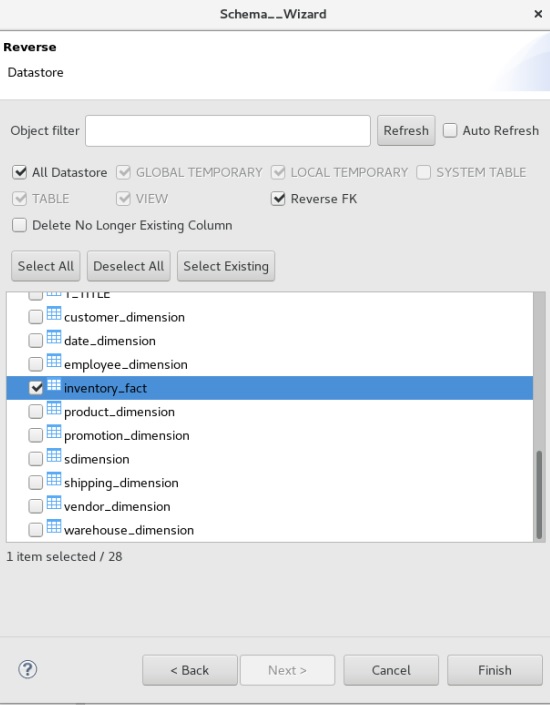
- Click Cancel.
- In the menus, select File > Save to save the Project and Metadata object you created.
Recap and Next Steps
So far you’ve created a Project and Metadata to connect to Vertica. You've verified the connection and ensured that you can navigate and select schemas and their tables.
At this point, refer to the Stambia documentation and tutorials to learn the basics of administration and operation, and to learn how to manage data transfers and transformations with Vertica as a source and/or target:
Troubleshooting
ClassPathNotFound Error on Execution of a Mapping or Process
Usually this error will point to the class that wasn’t found, and that class can be tracked by name back to its jar. In the context of executing a mapping or process, most likely this is the database jar file (for example, the Vertica JDBC driver jar file).
As noted in Install the Vertica Client Driver above, the runtime and Designer have to be restarted after you copy the driver. This ClassPathNotFound error will happen if they have not been restarted.
See the following article from the Stambia Knowledge Base for more details:
UUID Data Type
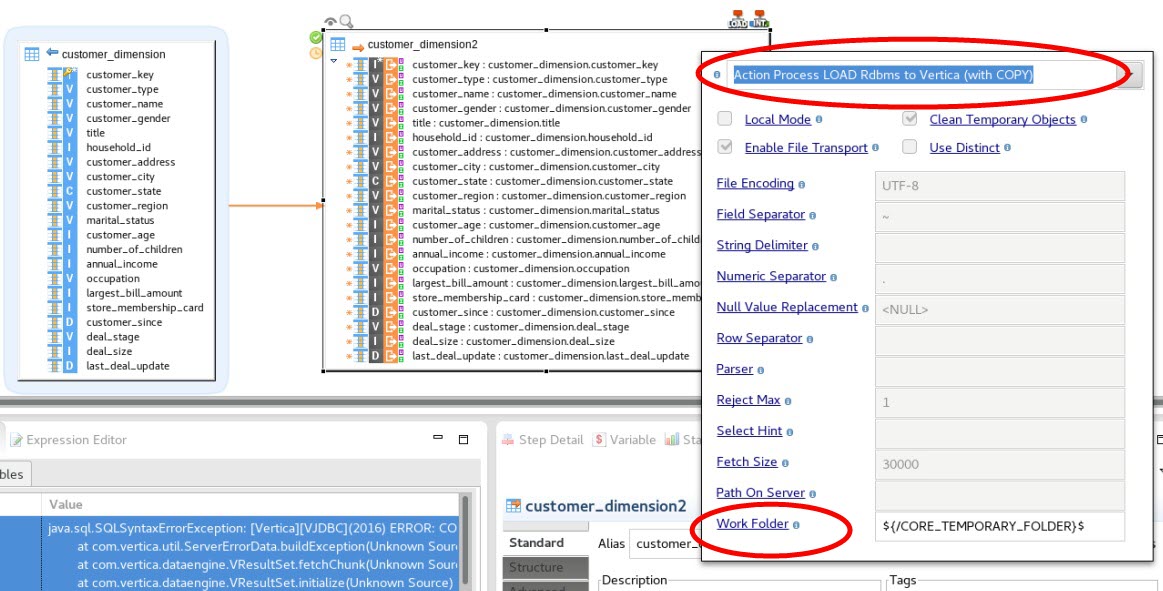
If you reverse engineered a table containing a UUID column, and process a mapping that includes the UUID column, it may fail and generate a stack trace of the process step that failed. For example: Creation of load table, similar to the one below:
java.sql.SQLSyntaxErrorException: [Vertica][VJDBC](4856) ERROR: Syntax error at or near "NULL"
  at com.vertica.util.ServerErrorData.buildException(Unknown Source)
  at com.vertica.dataengine.VDataEngine.prepareImpl(Unknown Source)
  at com.vertica.dataengine.VDataEngine.prepare(Unknown Source)
  at com.vertica.dataengine.VDataEngine.prepare(Unknown Source)
  at com.vertica.jdbc.common.SStatement.executeNoParams(Unknown Source)
  at com.vertica.jdbc.common.SStatement.executeUpdate(Unknown Source)
  at com.indy.engine.actionCodes.JdbcActionCodeI.executeDDL_DML(SourceFile:914)
  at com.indy.engine.actionCodes.JdbcActionCodeI.executeSimpleCode(SourceFile:1427)
  at com.indy.engine.action.common.ActionCodeTypeI.executeCode(SourceFile:1693)
  at com.indy.engine.action.common.ActionCodeTypeI.run(SourceFile:1852)
  at java.lang.Thread.run(Thread.java:748)
Caused by: com.vertica.support.exceptions.SyntaxErrorException: [Vertica][VJDBC](4856) ERROR: Syntax error at or near "NULL"
... 11 more
This could mean that you don’t have the latest Vertica templates with the UUID data type support. You can verify this in the Project Explorer by drilling on Global > Templates > Vertica > vertica.rdbms > Vertica and scrolling through the data types list. If UUID is missing, then the template does not support that data type.
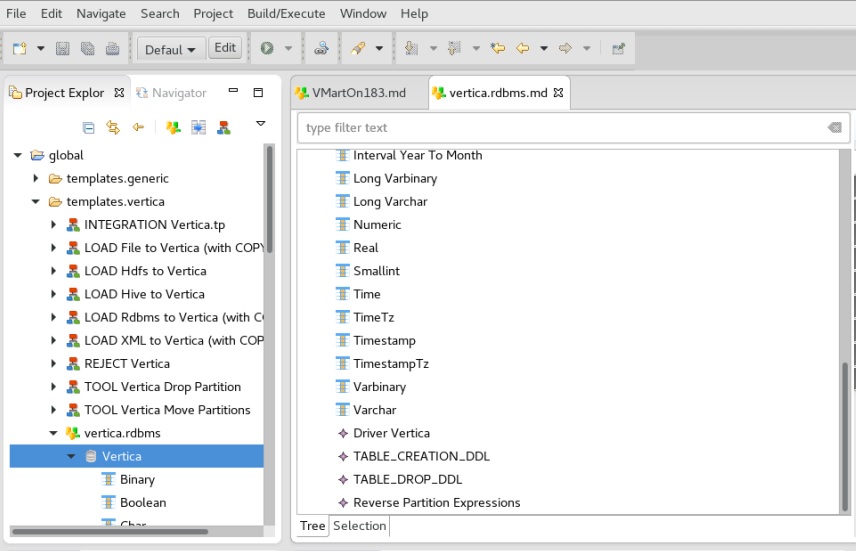
You should download the latest Vertica templates, which include an update for support of the UUID data type.
Rejected Data File Errors
If you execute your mapping with Vertica as a target, and there is an issue with the data being imported, you may get an error indicating a failure to write the rejection file in the temp.
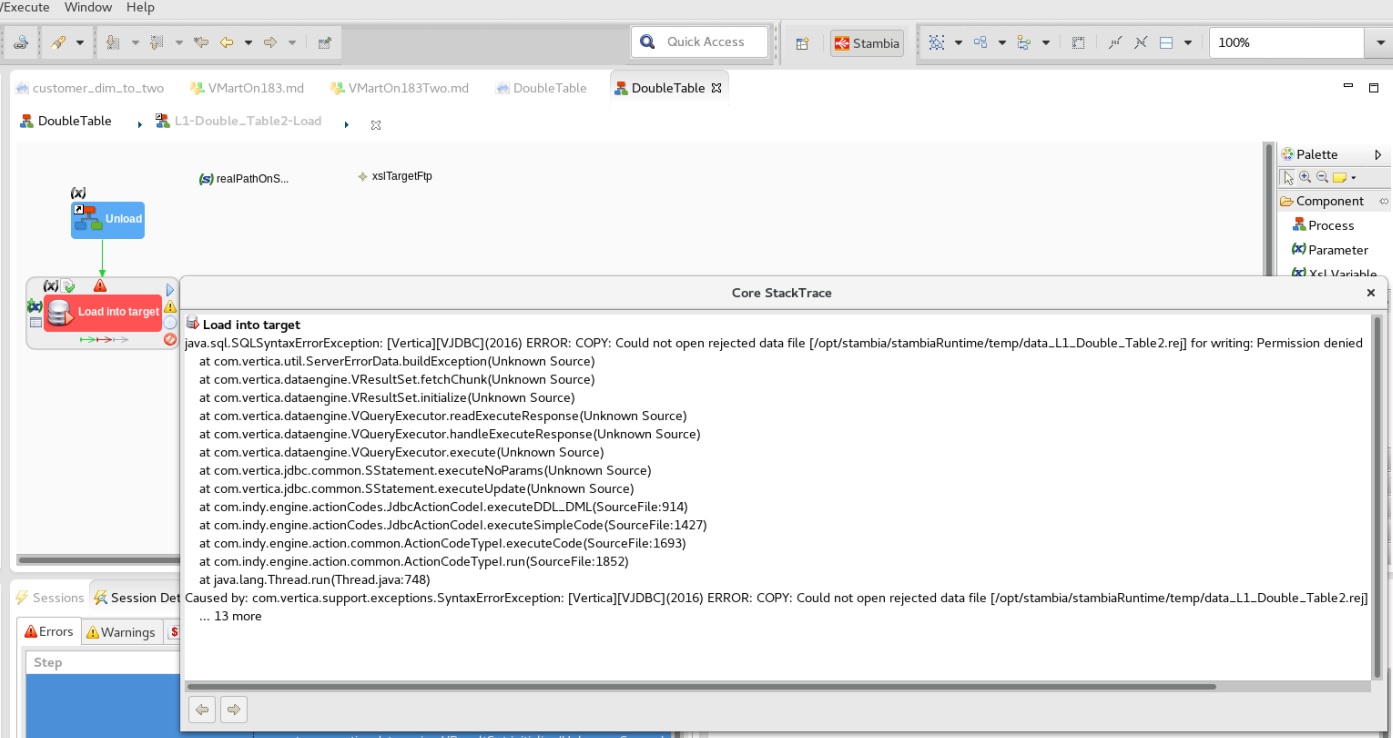
Looking at the Vertica.log, you will find something similar to the entry below, which notes the error opening the rejected data file.
2018-12-11 13:32:27.697 Init Session:7f4cbe7fd700-a000000000c8e6 [Catalog] <INFO> Comparing projection
L1_Double_Table_super and L1_Double_Table_super
    HINT:  Exceptions may be written to files
[/opt/stambia/stambiaRuntime/temp/data_L1_Double_Table.err],
[/opt/stambia/stambiaRuntime/temp/data_L1_Double_Table.err.1], etc
2018-12-11 13:32:27.714 Init Session:7f4cbe7fd700-a000000000c8e6  <ERROR> @v_vmart_node0001: 42501/2016:
COPY: Could not open rejected data file [/opt/stambia/stambiaRuntime/temp/data_L1_Double_Table.rej] for writing: Permission denied
2018-12-11 13:32:27.725 Init Session:7f4cbe7fd700-a000000000c8e6 [Txn] <INFO> Rollback Txn: a000000000c8e6
'COPY DT1_0_6_OOB2.L1_Double_Table FROM
'/opt/stambia/stambiaRuntime/temp/data_L1_Double_Table.dat' DELIMITER '~' EXCEPTIONS
'/opt/stambia/stambiaRuntime/temp/data_L1_Double_Table.err' REJECTMAX 1 REJECTED DATA
'/opt/stambia/stambiaRuntime/temp/data_L1_Double_Table.rej' DIRECT NULL '<NULL>''
The most likely cause is restricted permissions on the temp directory.
By default, Stambia uses /<stambiainstalldir>/stambiaRuntime/temp for intermediate scratch files, which is owned by root. The Vertica process is typically owned by dbadmin, which does not have write access to that path. So if that path is passed in the INSERT command SQL to Vertica, and the temp location is not writable by the Vertica process executing the SQL, it will fail with the noted error.
The solution is to change the Work Folder property on the Load template on the target side to a path that Vertica can write to.
For More Information
- Stambia Data Integration
- Stambia User Community
- Vertica Community Edition
- Vertica User Community
- Vertica Documentation

