


Vertica and ReactJS: Technical Exploration
The goal of this solution is to create a sample ReactJS application using the vertica-nodejs driver to build a UI that uses Vertica. ReactJS is a JavaScript based frontend UI development library. To connect Vertica and ReactJS, we used the open-source vertica-nodejs client driver. To get started, you need to have a Vertica database with sample data and ReactJS.
ReactJS Overview
ReactJS is a popular JavaScript library used for building interfaces. React enables you to create interactive UIs and it efficiently updates and renders the right components for each state of your application. ReactJS can also render on the server using Node.
Test Environment
For this solution, we used the following environment:
-
Vertica Analytic Database v12 on RHEL7.9
-
NodeJS v18.12.1
-
vertica-nodejs driver v1.0.0
-
ReactJS v18.2.0
-
Windows Server 2019
Installing ReactJS
To get started with ReactJS
-
Download and install node.js from the NodeJS website.
-
Create a folder in any directory of your choice and open this folder in your IDE (we used VS Code in this case).
-
Go to the Terminal in VSCode and click New Terminal.
-
Type the following command:
npx create-react-app my-app
This creates a new React application in the selected directory.
-
To run the React app, navigate to the new folder, in this case my-app, and type
npm start. -
Your my-app application opens in the browser and is hosted at https://localhost:3000/.
Note Make sure port 3000 is open for listening. If not, you can launch the application through any other port.
Installing the Vertica Client Driver
To connect Vertica to ReactJS, you need to install the vertica-nodejs package in your project directory.
Follow the steps to setup the vertica-nodejs client driver in your environment. You must follow the Installation and Post Installation sections in this link to configure the driver.
Integrating ReactJS and Vertica
In the following sample, we have an Employee table with rows of data in the Vertica Database. For this solution, the goal is to get the list of employees from our database and render it on the browser using ReactJS.
To implement this, we split the code into 2 parts for best coding practices, one for the client and the other for the server. We created 2 sub-directories: server and client inside the main directory (my-app).
In the server code, we execute an API call to get the result set of a sample Employee table from the Vertica database. The API call includes setting the connection with Vertica database using the connect() function and then querying it using the query() function. The results will be stored in the variable which is then passed to the frontend for rendering.
const client = new Client()

async function setup() {
  	client.connect()

}

app.get('/getemployees', (req, res) => {
  	setup();

  	client.query("select * from node_emp order by id", (err, results) => {
    		if (err) {
      			console.log(err)
    		} else {
      			res.status(200).send(results.rows)
    			}
  		})

})
Rendering the Frontend ReactJS Component
The following function App() includes calling the API from the backend (server). After data is received, the setEmployeeList() has all the rows of the queried resultset.
import { useState } from "react";
import axios from 'axios';

function App() {
  const [employeeList, setEmployeeList] = useState([]);

  const getEmployees = () => {
    axios.get("http://localhost:3001/getemployees").then((res) => {
      setEmployeeList(res.data);
    });
  }
Now, to request data, that is the employee list, from the React application in a browser, we use an Onclick event handler.
To render the queried data in the browser, you can return the values by calling getEmployees() that already has the employeeList. We then map with the key-value pairs in the form of JSX to display the rows in the browser.
return (
    <div className="App">
      <button onClick={getEmployees}> Get employees </button>
        <div >
          {
            employeeList.length > 0 &&
              <table className='table'>
                <tr>
                <th> ID  </th>
                <th> First Name </th>
                <th> Last Name  </th>
                <th> Age </th>
              </tr>

              {
                employeeList.map((val, key) => {
                  return (
                    <tr key = {key}>
                      <td> {val.id}</td>
                      <td> {val.first_name}</td>
                      <td> {val.last_name}</td>
                      <td> {val.age}</td>
                    </tr>
                  );
                })
              }
          </table>
          }
        </div>
    </div>
  );
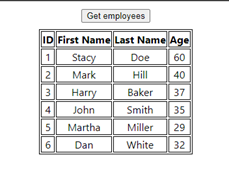
When you click Get employees after initializing the server, the employee list will be rendered and displayed on the browser.
Note You can customize the code based on your requirements or use case.

