


Re-IP: Checking All IP Addresses when Changing Using Re-IP
Re-IP changes the IP addresses in the catalog. Also, there are some other configurations that have IP addresses that must be changed when executing Re-IP. This article explains the steps to change all associated IP addresses or develop the script to change these addresses.
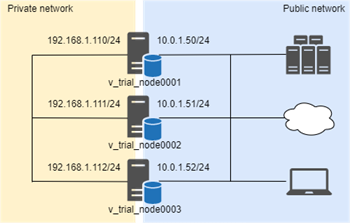
We used the following cluster as a sample:
This cluster uses different network segments for internal communication and export/import operations. The IP addresses will be changed as follows due to network reconfiguration:
| Private Network | Public network | |||
| Node | Current IP Address | New IP Address | Current IP Address | New IP Address |
| v_trial_node0001 | 192.168.1.110/24 | 192.168.100.10/24 | 10.0.1.50/24 | 10.20.0.100/24 |
| v_trial_node0002 | 192.168.1.111/24 | 192.168.100.11/24 | 10.0.1.51/24 | 10.20.0.101/24 |
| v_trial_node0003 | 192.168.1.112/24 | 192.168.100.12/24 | 10.0.1.52/24 | 10.20.0.102/24 |
Checking Current Configuration
Before changing the IP addresses on the nodes, check the current configurations. Some configurations are automatically changed when running RE-IP. Some other configurations need to be manually changed after running RE-IP.
Configuration - Automatically Changed by Re-IP Tool
Re-IP tool can change the following IP addresses:
- Node address
- Control Node address and Broadcast address (Optional)
To check the configurations with the above addresses, run the following queries and commands:
Queries
=> SELECT node_name, node_address, export_address FROM v_catalog.nodes;
node_name | node_address | export_address
------------------+---------------+----------------
v_trial_node0001 | 192.168.1.110 | 10.0.1.50
v_trial_node0002 | 192.168.1.111 | 10.0.1.51
v_trial_node0003 | 192.168.1.112 | 10.0.1.52
Commands
$ cat /opt/vertica/config/admintools.conf
[Configuration]
.....
controlmode = pt2pt
controlsubnet = default
.....
[Cluster]
hosts = 192.168.1.110,192.168.1.111,192.168.1.112
[Nodes]
node0001 = 192.168.1.110,/home/dbadmin,/home/dbadmin
node0002 = 192.168.1.111,/home/dbadmin,/home/dbadmin
node0003 = 192.168.1.112,/home/dbadmin,/home/dbadmin
v_trial_node0001 = 192.168.1.110,/home/dbadmin,/home/dbadmin
v_trial_node0002 = 192.168.1.111,/home/dbadmin,/home/dbadmin
v_trial_node0003 = 192.168.1.112,/home/dbadmin,/home/dbadmin
$ cat spread.conf
Spread_Segment 192.168.1.110:4803 {N192168001110 192.168.1.110 {192.168.1.110
}
}
Spread_Segment 192.168.1.111:4803 {N192168001111 192.168.1.111 {192.168.1.111
}
}
Spread_Segment 192.168.1.112:4803 {N192168001112 192.168.1.112 {192.168.1.112
}
}
Configuration - Change manually after Running Re-IP Tool
The following configurations are not changed by the Re-IP tool. You must manually change these addresses after running the Re-IP tool.
Export address
By default, Export address is the same as Node address on each node. This means importing from and exporting to another Vertica database uses the private network. To use the public network address for import and export activities, you need to change the subnet for the database and the export address for each node.
You can check the configurations for the above objects by running the following queries:
=> SELECT node_name, node_address, export_address FROM v_catalog.nodes;
node_name | node_address | export_address
------------------+---------------+----------------
v_trial_node0001 | 192.168.1.110 | 10.0.1.50
v_trial_node0002 | 192.168.1.111 | 10.0.1.51
v_trial_node0003 | 192.168.1.112 | 10.0.1.52
=> SELECT name, subnet FROM v_internal.vs_subnets WHERE oid IN (SELECT ei_subnet FROM v_internal.vs_databases);
name | subnet
-----------+----------
ex_subnet | 10.0.1.0
Connection Load Balancing Policy
There are 2 methods to implement the connection load balancing:
-
Classic Connection Load Balancing
This method uses the export address for load balancing. This address is changed by Re-IP tool. If you use Classic Connection Load Balancing, you do not need to do anything after running Re-IP tool.
-
Connection Load Balancing Policy
This method spreads the client connections based on the connection's origin. It consists of Network address, Connection Load Balancing Group and Routing Rule. Each configuration may have the IP addresses which are not changed by Re-IP tool.
You can check the configurations for the above objects by running the following queries:
=> SELECT name, node, address, port FROM v_catalog.network_addresses;
name | node | address | port
----------+------------------+-----------+------
ex_node1 | v_trial_node0001 | 10.0.1.50 | 5433
ex_node2 | v_trial_node0002 | 10.0.1.51 | 5433
ex_node3 | v_trial_node0003 | 10.0.1.52 | 5433
=> SELECT * FROM v_catalog.load_balance_groups ORDER BY name, object_name;
name | policy | filter | type | object_name
-----------+------------+--------+-----------------------+-------------
group_1 | ROUNDROBIN | | Network Address Group | ex_node1
group_1 | ROUNDROBIN | | Network Address Group | ex_node2
group_2 | ROUNDROBIN | | Network Address Group | ex_node2
group_2 | ROUNDROBIN | | Network Address Group | ex_node3
group_all | ROUNDROBIN | | Network Address Group | ex_node1
group_all | ROUNDROBIN | | Network Address Group | ex_node2
group_all | ROUNDROBIN | | Network Address Group | ex_node3
=> SELECT * FROM v_catalog.routing_rules;
name | source_address | destination_name
------------------+----------------+------------------
client_group_1 | 10.0.1.0/24 | group_1
client_group_2 | 10.0.2.0/24 | group_2
client_catch_all | 0.0.0.0/0 | group_all
In this example, the filter column of load_balance_groups table is empty. If you create the Connection Load Balancing Group from Fault Group or Subcluster, you can specify the IP address range for the filter.
Client Authentication
Client Authentication enables Vertica to restrict which database users can connect and which IP addresses are allowed to connect. You can check the configuration of Client Authentication by running the following query:
=> SELECT * FROM v_catalog.client_auth;
auth_oid | auth_name | is_auth_enabled | auth_host_type | auth_host_address | auth_method | auth_parameters | auth_priority | method_priority | address_priority
-------------------+---------------------+-----------------+----------------+-------------------+-------------+-----------------+---------------+-----------------+------------------
45035996273841268 | dbadmin_local_trust | True | LOCAL | | TRUST | | 10000 | 0 | 0
45035996273841272 | dbadmin_host_trust | True | HOST | 10.0.1.53/32 | TRUST | | 1000 | 0 | 128
In this example, dbadmin user can connect to the database locally and from the 10.0.1.53 machine.
How to Execute Re-IP Tool
Changing IP Addresses and Network-Related Configurations
Shutdown the cluster safely. Change the IP addresses on all nodes and network-related configurations such as firewall, hardware load balancer, and so on. Then, check network connectivity between the nodes by using the ping command and the ssh login.
Creating Mapping File
Create a Mapping file for Node address in the following format:
oldIPaddress newIPaddress, controlAddress (optional), controlBroadcast (optional)Ensure there is no 'comma' between oldIPaddress and newIPaddress. In this example, Mapping file is as follows:
192.168.1.110 192.168.100.10
192.168.1.111 192.168.100.11
192.168.1.112 192.168.100.12
Execute Re-IP Tool
Execute the Re-IP tool as follows
$ admintools -t re_ip -f mapfile
Parsing mapfile ...
New settings for Host 192.168.1.110 are:
address: 192.168.100.10
controlAddress: 192.168.100.10
controlBroadcast: 192.168.100.255
New settings for Host 192.168.1.111 are:
address: 192.168.100.11
controlAddress: 192.168.100.11
controlBroadcast: 192.168.100.255
New settings for Host 192.168.1.112 are:
address: 192.168.100.12
controlAddress: 192.168.100.12
controlBroadcast: 192.168.100.255
The following databases would be affected by this tool: trial
Checking DB status ...
Please check your new settings carefully, incorrect settings may cause database damage!
Enter "yes" to write new settings or "no" to exit > yes
Backing up local admintools.conf ...
Writing new settings to local admintools.conf ...
Writing new settings to the catalogs of database trial ...
The change was applied to all nodes.
Success. Change committed on a quorum of nodes.
You can start database trial again.
Initiating admintools.conf distribution ...
Success. Local admintools.conf sent to all hosts in the cluster.
>>> Write new settings successfully.
Checking SSH Connection
Run the following script as a dbadmin user to check the SSH connection between the nodes:
$ for host in `grep -E "^v_" /opt/vertica/config/admintools.conf | sort | awk '{ print $3 }' | awk -F, '{ print $1 }'`> do
> ssh -oStrictHostKeyChecking=no $host "uname -a"
> done
Warning: Permanently added '192.168.100.10' (ECDSA) to the list of known hosts.
Linux node0001 4.18.0-193.14.2.el8_2.x86_64 #1 SMP Sun Jul 26 03:54:29 UTC 2020 x86_64 x86_64 x86_64 GNU/Linux
Linux node0002 4.18.0-193.14.2.el8_2.x86_64 #1 SMP Sun Jul 26 03:54:29 UTC 2020 x86_64 x86_64 x86_64 GNU/Linux
Linux node0003 4.18.0-193.14.2.el8_2.x86_64 #1 SMP Sun Jul 26 03:54:29 UTC 2020 x86_64 x86_64 x86_64 GNU/Linux
Starting Up Cluster
Startup the cluster and check if the status of all nodes is changed to UP:
$ admintools -t list_allnodes
Node | Host | State | Version | DB
------------------+----------------+-------+------------------+-------
v_trial_node0001 | 192.168.100.10 | UP | vertica-10.0.1.0 | trial
v_trial_node0002 | 192.168.100.11 | UP | vertica-10.0.1.0 | trial
v_trial_node0003 | 192.168.100.12 | UP | vertica-10.0.1.0 | trial
Changing Configurations Not Automatically Changed by Re-IP Tool
Export address
First, change the database to use the private network for import and export activities. Then, recreate the subnet and the network interfaces for each node to use the public network with new IP addresses. When dropping the network interfaces, if they are associated with Connection Load Balancing Policy, it fails. To avoid this, add CASCADE option to DROP NETWORK INTERFACE statement.
=> ALTER DATABASE DEFAULT EXPORT ON DEFAULT;
=> DROP SUBNET ex_subnet;
=> DROP NETWORK INTERFACE ex_node1 CASCADE;
=> DROP NETWORK INTERFACE ex_node2 CASCADE;
=> DROP NETWORK INTERFACE ex_node3 CASCADE;
=> CREATE SUBNET ex_subnet WITH '10.20.0.0';
=> ALTER DATABASE DEFAULT EXPORT ON ex_subnet;
=> CREATE NETWORK INTERFACE ex_node1 ON v_trial_node0001 with '10.20.0.100';
=> CREATE NETWORK INTERFACE ex_node2 ON v_trial_node0002 with '10.20.0.101';
=> CREATE NETWORK INTERFACE ex_node3 ON v_trial_node0003 with '10.20.0.102';
=> ALTER NODE v_trial_node0001 EXPORT ON ex_node1;
=> ALTER NODE v_trial_node0002 EXPORT ON ex_node2;
=> ALTER NODE v_trial_node0003 EXPORT ON ex_node3;
=> SELECT node_name, node_address, export_address FROM v_catalog.nodes;
node_name | node_address | export_address
------------------+----------------+----------------
v_trial_node0001 | 192.168.100.10 | 10.20.0.100
v_trial_node0002 | 192.168.100.11 | 10.20.0.101
v_trial_node0003 | 192.168.100.12 | 10.20.0.102
=> SELECT name, subnet FROM v_internal.vs_subnets WHERE oid IN (SELECT ei_subnet FROM v_internal.vs_databases);
name | subnet
-----------+-----------
ex_subnet | 10.20.0.0
Connection Load Balancing Policy
Change the configuration of the load balance group and the routing rule to use new IP addresses.
=> SELECT * FROM v_catalog.load_balance_groups ORDER BY name, object_name;
name | policy | filter | type | object_name
-----------+------------+--------+-------------+-------------
group_1 | ROUNDROBIN | | Empty Group |
group_2 | ROUNDROBIN | | Empty Group |
group_all | ROUNDROBIN | | Empty Group |
=> ALTER LOAD BALANCE GROUP group_1 ADD ADDRESS ex_node1, ex_node2;
=> ALTER LOAD BALANCE GROUP group_2 ADD ADDRESS ex_node2, ex_node3;
=> ALTER LOAD BALANCE GROUP group_all ADD ADDRESS ex_node1, ex_node2, ex_node3;
=> SELECT * FROM v_catalog.routing_rules;
name | source_address | destination_name
------------------+----------------+------------------
client_group_1 | 10.0.1.0/24 | group_1
client_group_2 | 10.0.2.0/24 | group_2
client_catch_all | 0.0.0.0/0 | group_all
=> ALTER ROUTING RULE client_group_1 SET ROUTE TO '10.20.0.0/24' TO group_1;
=> ALTER ROUTING RULE client_group_2 SET ROUTE TO '10.20.1.0/24' TO group_2;
Client Authentication
Change the configuration of the client authentication which has the host IP address to use new IP addresses.
=> ALTER AUTHENTICATION dbadmin_host_trust HOST '10.20.0.103/32';

