


Vertica Integration with Jaspersoft ETL: Connection Guide
About Vertica Connection Guides
Vertica connection guides provide basic information about setting up connections to Vertica from software that our technology partners create. These documents provide guidance using one specific version of Vertica and one specific version of the third-party vendor’s software. Other versions of the third-party product may work with Vertica. However, other versions may not have been tested.
This document provides guidance using the latest versions of Vertica and Jaspersoft ETL as of December, 2016.
Jaspersoft ETL Overview
Jaspersoft ETL is an open source tool that you can use to perform extract, transform, and load operations on your data. You can load the transformed data into many databases and file formats.
This document is based on the results of testing the Vertica Server 8.0.0 and the Vertica JDBC Driver 7.0.x with Jaspersoft ETL 6.0.1 (Windows Server 2012 r2).
Download and Install Jaspersoft ETL
To download the latest version of Jaspersoft ETL, go to Three Ways to Test Drive Jaspersoft BI Software.
Once you have downloaded the software, the Quick Start Guide explains how to install and configure the Jaspersoft ETL software.
Jaspersoft ETL uses JDBC to connect to Vertica. The Jaspersoft ETL installation process installs the supported Vertica JDBC driver, so you do not need to install Vertica JDBC driver separately.
Connect Vertica to Jaspersoft ETL
When you install Jaspersoft ETL, the installer extracts two application files (along with other required files):
- JETLXCmmty-win32-x86
- JETLXCmmty-win-x86-64
To start Jaspersoft ETL, run the application appropriate to your Windows operating system.
The following topics describe how to create a Jaspersoft ETL project that connects to Vertica, and how to create a job that when executed, performs the desired extractions, transformations, and loads.
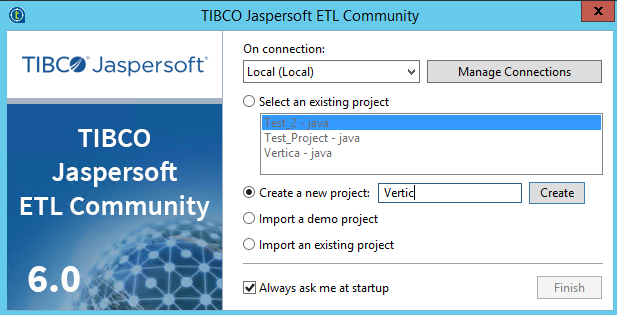
Create a Project
A project in Jaspersoft ETL is a top-level structure that contains objects, job designs, and metadata. Create a separate Jaspersoft ETL project for each business purpose.
The following steps explain how to create a project:
- Start Jaspersort ETL.
-
On the dialog box that opens, select Create a new project.
-
Enter the project name and click Create.
The main Jaspersoft ETL window opens.
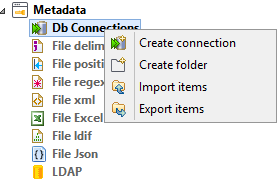
Create the Connection to Vertica
Follow these steps to create a connection to your Vertica database.
- On the left-hand pane, expand Metadata.
-
Right-click Db Connections and select Create connection.
-
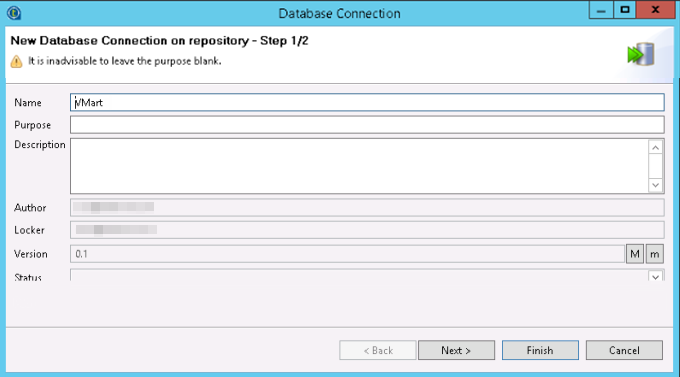
In the New Database Connection window, enter information about the database from which you want to extract data. This example uses the name VMart for the source database connection.
-
Click Next.
The second New Database Connection window opens.
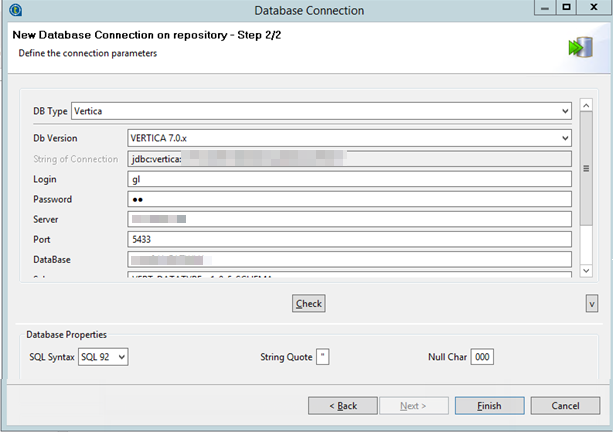
- Enter the credentials for the Vertica database that you want to extract data from, including the connection information.
- Click Check to have Jaspersoft ETL confirm that the connection is valid.
-
After the Check Connection dialog box opens to tell you that the connection was successful, click OK.
If the connection is not successful, review the credentials you entered.
-
Click Finish.
You have created the source database connection.
-
To define the target database connection where you will store the transformed data, repeat Steps 1–8 .
After you define the source and target connections, they appear under Repository > Metadata > Db Connections. with the names you designated (Vmart and Target_VMart). Note that Jaspersoft ETL appends "0.1" to their name.
-
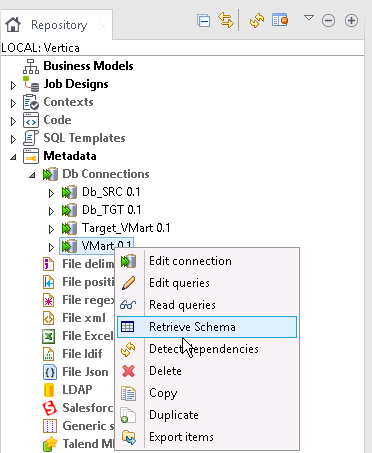
To select the data from the source database that you want to transform, right-click VMart and select Retrieve Schema.
-
In the next window, click Next.
The Schema window opens.
-
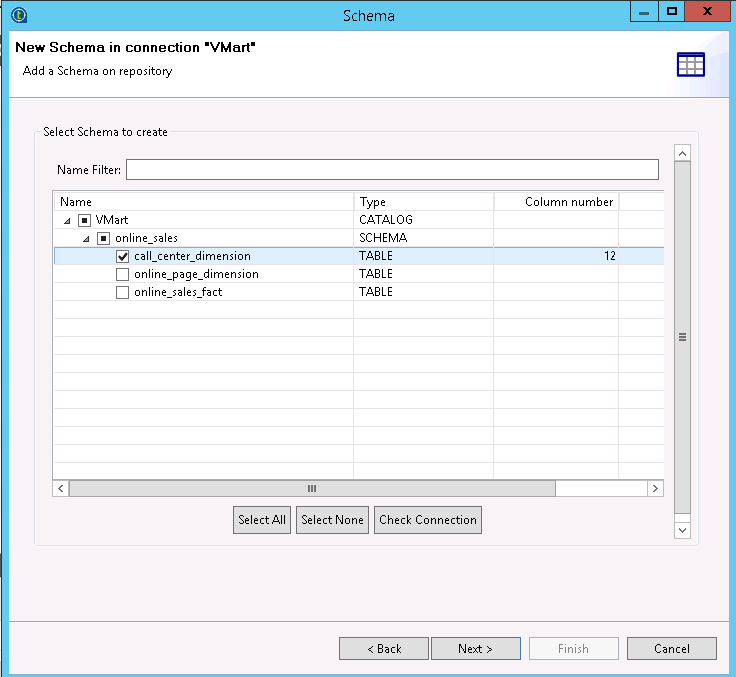
Click Next.
The following image shows the call_center_dimension table selected.
-
Select the tables that you want to extract to use with Jaspersoft ETL and click Finish.
Select the call_center_dimension table and click Next.
The next window shows the column details of the call_center_dimension table.
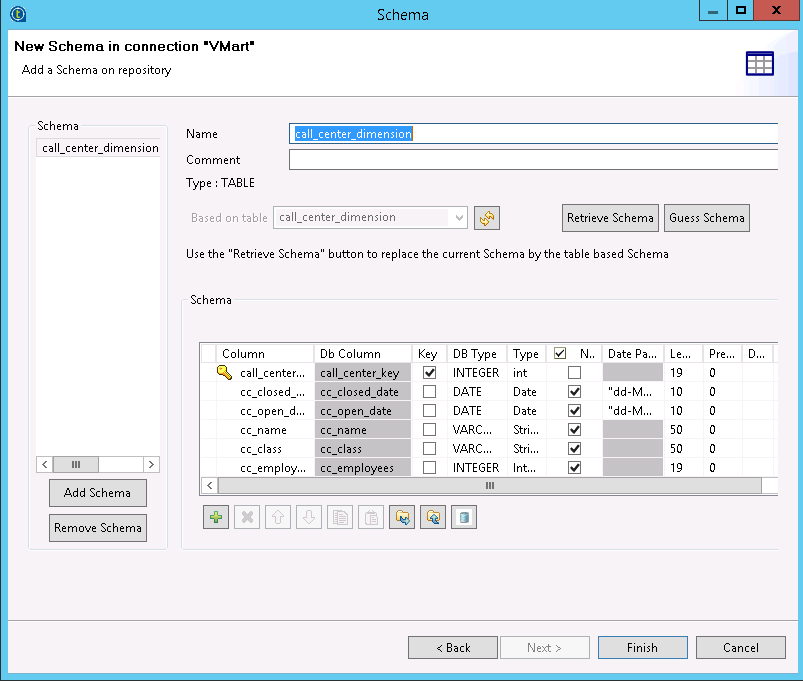
- Review the details of the selected tables and click Finish.
Create a Job
A job contains the details that Jaspersoft ETL needs to execute the workflow that you define for the ETL operations.
To create a job to perform these operations, follow these steps:
-
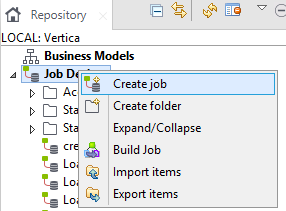
In the Repository tab, right-click Job Designs and select Create job.
-
In the New Job window, enter the name of the new job and click Finish.
- Under Repository > Metadata > Db Connections > VMart 0.1, select the desired table. This example uses the call_center_dimension table.
-
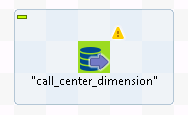
To add the table to the Job Designer, drag the table onto the canvas.
The Job Designer provides a high-level view of the workflow components and connections.
-
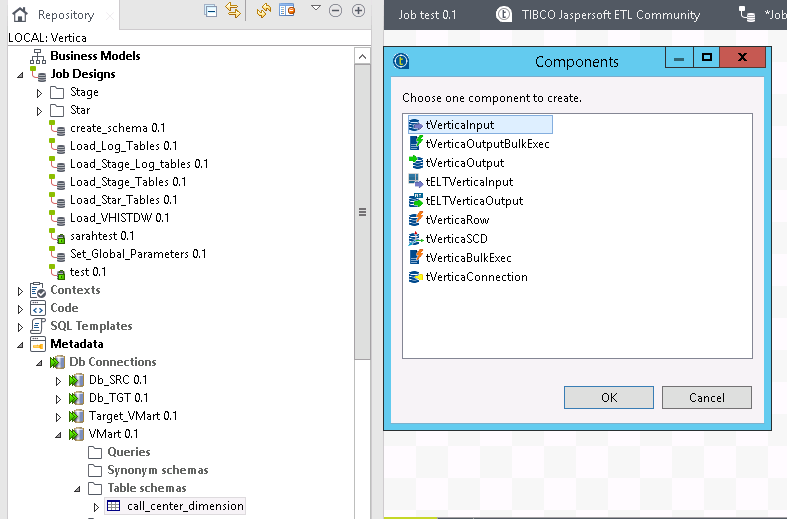
The Components window opens and lists the types of components you can create in the Job Designer. Select tVerticaInput, and click OK to add the component to the Job Designer.
-
To review the call_center_dimension component's properties, double-click the component on the canvas.
The properties include information about the connection and the query used to extract the data from the call_center_dimension in your Vertica database.
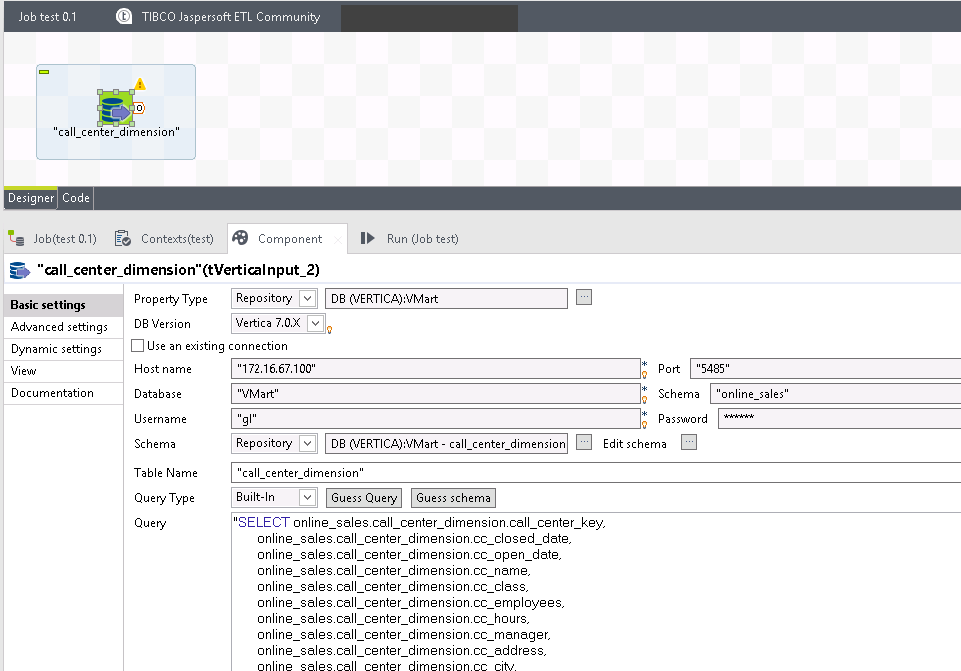
- In the properties window, specify the source data transformation.
- Click Repository > Metadata > Db Connections, > Target_VMart 0.1, select the call_center_dimension table and drag it into the Job Designer.
-
In the Components window, select tVerticaOutput and click OK.
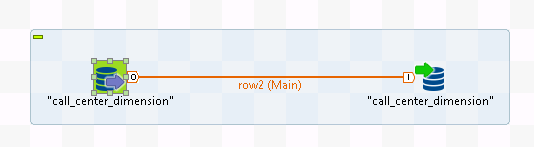
You can now see the source and target components in the Job Designer.
-
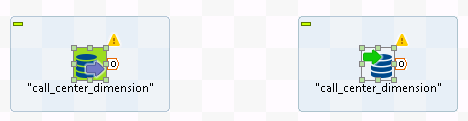
To map the two components, right-click the tVerticaInput component and select Row > Main.
-
Left-click the tVerticaOutput component.
The result looks like this:
-
To view the properties of the Target_VMart component, double-click the Target_VMart component in the Job Designer.
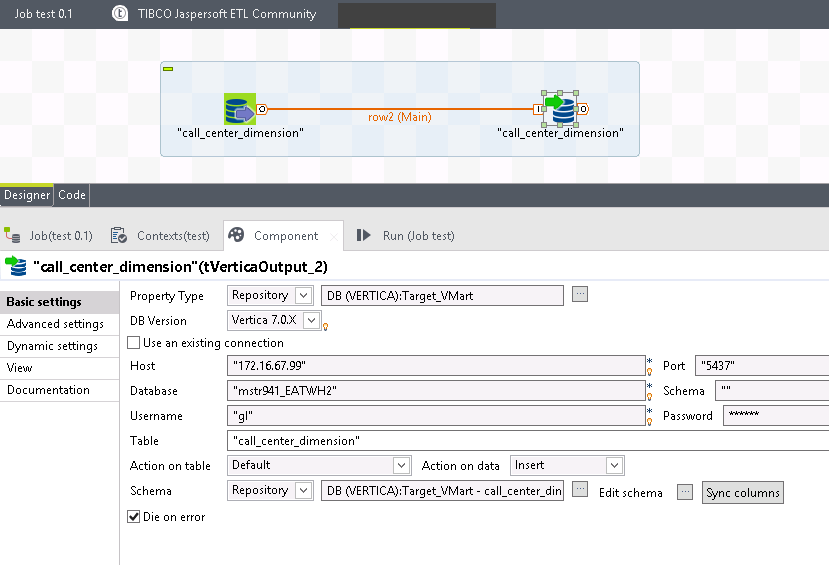
- In the properties window, configure the target data transformation.
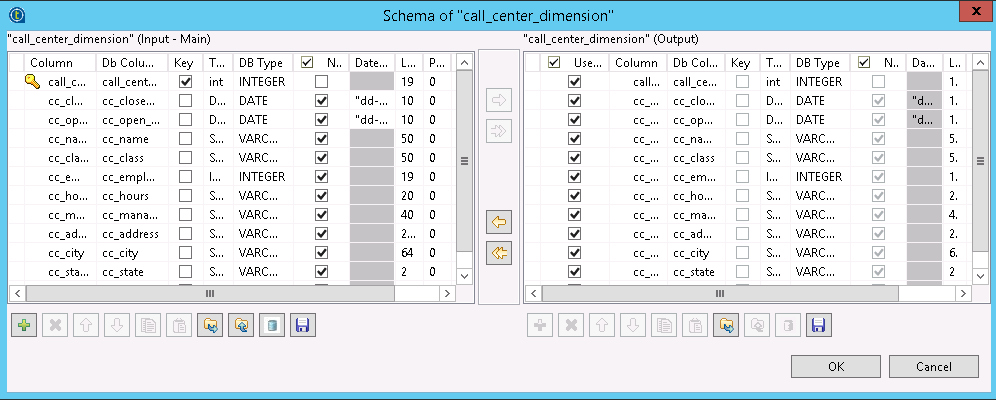
- To the right of the Edit Schema option in the bottom-right corner, click the box with the three dots.
-
From the pop-up window, select View schema and click OK.
Jaspersoft ETL displays the schema of the call_center_dimension table. For this example, the input and output tables have the same format.
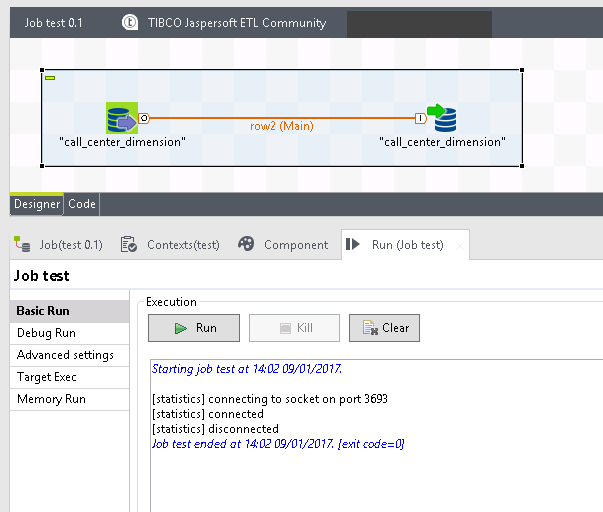
Run the Job
Now you're ready to run the ETL job. To start the job, click the Run icon (at the top of the window) or press F6.
If your job completes successfully, Jaspersoft ETL displays a message like the following.
Known Limitations
The following limitations apply to the Vertica integration with Jaspersoft ETL.
Support for JDBC
At the time of this writing (January, 2017), Jaspersoft ETL does not work correctly with the Vertica JDBC 7.1.x driver that it offers under the Vertica Version field of the Connection definition dialog box.
Choose one of the older versions of the Vertica JDBC driver when you define a connection. Vertica engineers tested the Vertica integration with Jaspersoft ETL using the Vertica JDBC 7.0.1 driver.
Integer Conversion
In a Vertica table, the maximum and minimum values for an INTEGER column are:
- Maximum: 922337203685477580
- Minimum: –9223372036854775807
When you try to load these values, Talend loads the values as 1 and –1, respectively.

