


Vertica Hardware Guide
Selecting and Configuring a Physical Server as a Vertica Node
The Vertica Analytics Platform software operates on a shared-nothing MPP cluster consisting of peer nodes. Each peer node functions independently, and processing occurs in a massively parallel manner. A Vertica node refers to a hardware host configured to run a Vertica instance.
This document provides guidance on the selection and setup of an individual physical server as a Vertica node. These recommendations facilitate discussions with your hardware vendor to create a cluster that is optimized for Vertica software performance. Whether you have a single-node instance or a multi-node cluster, they can be based on any x86_x64 processor architecture hardware environment.
For each Enterprise-Edition or Eon Mode cluster, Vertica nodes can be installed in one of the following environments:
-
Bare-metal on-premises or cloud servers
-
Virtual nodes based on on-premises or cloud servers
-
Kubernetes pods for Eon Mode databases only, based on on-premises or cloud servers
Recommended Software
This document assumes that once configured, your servers will run the following minimum software versions:
-
Vertica 24.1.x Enterprise Edition or Vertica in Eon Mode.
Vertica recommends using version 24.1.x or later to access the latest features, ensuring improved performance and rapid backup and restore.
-
Customers must install the latest Vertica version and the most recent operating system version supported for that specific Vertica version. For more information, refer to Vertica server and Management Console in the Vertica documentation.
Infrastructure Requirements
For high availability, it is recommended to use a minimum of 3 nodes. This ensures that your cluster can withstand the failure of a single node without any database downtime.
To determine the number of nodes required for a specific database, you should perform a capacity planning (CAPLAN) benchmark on an existing system. This benchmark emulates a production workload with different number of nodes and helps you make an informed decision.
If conducting a capacity planning benchmark is not feasible, you can consider the following synthetic sizing guidelines based on raw data size requirements:
| Total Raw Data Size | Number of Nodes | CPU per Node | Ram per node | Storage per Node |
|---|---|---|---|---|
| 5 TB | 3 – 4 | One socket 24-48 cores, 2.6 GHz processor or higher | 64 – 128 GB | At least 8 x 15K RPM spinning disks or 4 TB NVMe SSDs storage for EE Data partition or 2-4 TB NVMe SSDs Eon Depot. |
| 5-10 TB |
3 – 6 |
One socket 24-48 cores, 2.6 GHz processor or higher | 96 – 128 GB | At least 8 x 15K RPM spinning disks or 3-10 TB NVMe SSDs for EE Data partition, Or 2-4 TB NVMe SSDs storage for Eon Depot. |
| 10-50 TB |
4 – 10 |
1-2 socket 24-48 cores, 2.6 GHz processor or higher | 128 – 512 GB | At least 16 x 15K RPM spinning disks or 5-25 TB NVMe SSDs for EE Data partition, Or 2-6 TB NVMe SSDs storage for Eon Depot. |
| 50 TB to 10 PB | 8 – 100 | 1-2 socket 24-64 cores, 2.6 GHz processor or higher | 256 – 512 GB | At least 16 x 15K RPM spinning disks or 15-50 TB NVMe SSDs for EE Data partition, or 2-8 TB NVMe SSDs storage for Eon Depot. |
For a heavy-workload environment, oversize your cluster to achieve better performance, and for high concurrency requirements, increase the amount of RAM per node.
Vertica requires a minimum of 8 GB of memory per physical CPU core in each server. In high-performance applications, 12-16 GB of memory per physical core is recommended.
Selecting a Server Model
Through a combined process of lab and customer testing, Vertica has determined that for most customers, the best server model for individual Vertica nodes is one or two socket server that can support at least 64 GB of RAM and internal disk drives, or SSDs, preferably NVME, with a minimum total capacity of 2 TB for Enterprise Edition Database and Catalog, or Eon Mode depot storage.
Many vendors offer server models that fit into this recommendation. Engage with your hardware provider to select the exact model and parts required for your deployment.
Selecting a Processor
Vertica is a CPU-bound product, and the faster clock speed of the processor enhances the response time of the Vertica database. Additional cores enhance the cluster’s ability to simultaneously execute multiple MPP queries and data loads. Vertica has identified that the choice of 32-48 physical cores per CPU is the optimal number based on real-world customer deployments and average usage models.
From a performance perspective, two-socket servers generally offer superior overall performance than a server with one processor with the same total number of cores. However, one-socket servers may offer better price-performance. Note that above 48 cores per processor there is a higher potential for spinlock.
A higher CPU cache size contributes to enhanced performance by speeding up data access, reducing latency, and optimizing the efficiency of the CPU.
For an optimal balance between price and performance, consider various server and CPU models suitable for one or two-socket configurations. These instances serve as general references and do not endorse specific CPUs or vendors. Note that a higher CPU price may reflect the recency of the CPU rather than indicating a superior performance ratio.
Intel and AMD processors offer diverse options for different workload requirements. Intel's Xeon lineup includes models like the Xeon Platinum 8581V, Gold 6554S, Gold 6530, and Gold 6548N, providing a range of core counts, cache sizes, and clock speeds to suit various needs.
Similarly, servers like HPE ProLiant DL360 Gen11 and DELL PowerEdge R650 Rack Server offer configurations based on Intel Xeon processors, providing options for users seeking reliability and performance.
On the other hand, AMD's EPYC processors offer competitive alternatives with models such as EPYC 9224, EPYC 9374F, and EPYC 9684X, offering high core counts, generous cache sizes, and varying clock speeds to address diverse workload demands. Servers like DELL PowerEdge R6625 Server leverage AMD EPYC processors, providing cost-effective solutions with robust performance capabilities.
For reference, see Intel® Xeon® Platinum 8581V Processor, HPE ProLiant DL320 Gen11, and PowerEdge R6625 Rack Server.
Make the choice to enable hyper-threading on the CPU based on the individual workload. Hyper-threading increases the number of logical cores per CPU by allowing each core to process 2 threads simultaneously. This can be very effective for short, fast processes, but detrimental for long-running processes because a single process can cause the second process thread to wait.
Vertica recommends that you perform your own testing to determine the best settings for your data and workloads.
Selecting Memory
For maximum performance, Vertica nodes should include at least 256 GB of RAM. A good rule of thumb is to have 8–12 GBs of RAM per physical core in the server.
Check with your hardware vendors, but it is common practice to have multiple memory channels within a physical server to allow for several memory DIMMs to be installed. This allows you to configure memory in servers in a variety of ways to optimize costs. Typically, the most cost-effective approach is using a lot of DIMMs of smaller memory size to fill the available memory slots and channels.
Vertica recommends that you check with your hardware vendor and select DIMMs in appropriate sizes to avoid a situation where the memory speed may degrade.
Additional memory redundancy and correction technologies such as mirroring or sparing, offer additional system redundancies but come with an associated cost.
These technologies can enhance hardware reliability, but they might also elevate costs and potentially reduce performance.
Selecting and Configuring Storage
-
Increased Speed with Non-Volatile Memory Express (NVMe) Technology: Compared to traditional HDDs, SSDs already offer significantly improved read and write speeds. NVMe SSDs take speed to the next level. High-end NVMe SSDs can achieve speeds of up to 7,000 MB/s, providing a substantial boost in performance.
This speed increase enhances file read performance and reduced load times, positively impacting your database operations.
-
Enhanced Performance: NVMe SSDs facilitate the transfer of data at rates twenty-five times higher than SATA drives.
Transitioning to NVMe eliminates storage bottlenecks, leading to an overall improvement in your database workflow and efficiency.
-
Optimal Power Efficiency: NVMe SSDs exhibit low power consumption during standby mode, contributing to energy-efficient performance, making them a sustainable choice.
-
Advanced Compatibility and Form Factor: NVMe SSDs ensure worry-free compatibility, working seamlessly with major operating systems and systems released after 2015. Their direct communication with the CPU via the PCIe bus enhances compatibility.
In alignment with current trends and technologies, Vertica recommends a storage configuration that capitalizes on the advantages of NVMe SSDs.
-
For spinning disks, aim for a minimum of 10 disks (preferably 20), per server on a Vertica node to meet the I/O requirements efficiently, while for NVMe-based storage, consider the available PCIe lanes to avoid over-subscription.
-
While traditional enterprise-class 12 Gb/s SAS drives are still a viable option, consider incorporating NVMe SSDs for improved performance.
-
Employ a disk array controller with a minimum of four (4) 12 Gb/s SAS lanes, 1 GB of configuration cache, and support for RAID 1, RAID 5, RAID 10, or RAID 50.
-
Distribute storage locations, designating one for the operating system and catalog and another for data, on dedicated, contiguous-storage volumes.
Sample Storage Hardware Configuration for Maximum Performance
-
For the Operating System and Catalog Location:
800 GB SSD SAS Mixed Use up to 24 Gbps, or RAID 1 as mirrored SAS disks should be configured.
-
For Vertica Enterprise Edition Data Location:
22x 1.2 TB SAS disks (configured as RAID 10), or 10 x 1.6 TB SSD SAS Mixed Use up to 24 Gbps, or NVMe SSDs, providing approximately 13 TB total formatted storage capacity per Vertica node.
For Vertica Eon Mode Depot Location:
4-10 x 1.2 TB SAS disks (configured as RAID 10), 10 x 800GB SSD SAS Mixed Use up to 24 Gbps, or NVMe SSDs, providing approximately 4 to 8 TB total formatted storage capacity per Vertica node.
Redundancy Consideration
If supported by the disk array controller, additional NVMe SSDs can be used as hot spares for added redundancy, although this is deemed unnecessary with a RAID 1+0 configuration.
Storage Type Consideration
While Vertica can operate on various storage types, including internal storage, SAN arrays, NAS storage units, or DAS enclosures, the use of SSD SAS Mixed Use disks or NVMe SSDs in a RAID configuration is highlighted for its optimal price, performance, and availability characteristics.
I/O Performance Recommendations
Minimum required I/O is 20 MB/s read and write per physical processor core on each node, with Vertica recommending 40 MB/s read and write per physical core or more for enhanced performance.
For additional details, refer to the Vertica documentation, specifically the Vioperf tool, for a comprehensive understanding of I/O performance.
Data RAID Configuration
For best performance, all data drives should be configured as one RAID 10 device with a default strip size of 512 KB. However, if you are willing to trade some disk performance to increase storage space and provide more redundancy, you can alternately choose RAID 5 or RAID 50.
The controller cache ratio setting should favor writes heavily as opposed to reads (10/90, if available).
The logical drive should be partitioned with a single primary partition spanning the entire drive.
Place the Vertica data location on a dedicated physical storage volume. Do not co-locate Vertica data location with Vertica catalog location.
The Vertica catalog location on a Vertica node should be either co-located with the operating system drive or configured on an additional drive.
For more information, refer to Before you install Vertica in the Vertica documentation, particularly information about Vertica storage locations.
Note Vertica only supports storage configured with the Linux Logical Volume Manager in the I/O path on LVM version 2.02.66 or later and must include device-mapper version 1.02.48 or later.
This limitation applies to all Vertica storage locations, including the catalog, which is typically placed on the operating system drive.
Linux I/O Subsystem Tuning
To support maximum performance on a Vertica node, Vertica recommends the following Linux I/O configuration settings for the Vertica data location volumes:
- The recommended Linux file system is ext4 or XFS.
- The recommended Linux I/O Scheduler:
- Deadline scheduler is best used on physical media drives (disks using spinning platters), as it attempts to group requests for adjacent sectors on a disk, lowering the time the drive spends seeking.
- NOOP scheduler is best for NVMe or SSD based storage as it uses a simple FIFO approach, placing all input and output requests into a single queue.
- The recommended Linux readahead setting is 8192 512-byte sectors (4 MB).
System administrators should durably configure the right scheduler and readahead settings for the Vertica data volume so that these settings persist across server restarts.
Caution Failing to use the recommended Linux I/O subsystem settings adversely affects the performance of your Vertica database.
Data RAID Configuration Example
The following configuration and tuning instructions pertain to the Vertica data storage location after the disk array has been created using the appropriate tools for your specific controller.
Note The following steps are provided as an example, and may not be correct for your machine. Verify the drive numbers and population for your machine before running these commands.
-
Partition and format the RAID 10 data drive:
# parted -s /dev/sdb mklabel gpt mkpart primary ext4 0% 100%
# mkfs.ext4 /dev/sdb1
-
Create a /data mount point, add a line to the /etc/fstab file, and mount the Vertica data volume:
# mkdir /data
[add line to /etc/fstab]: /dev/sdb1 /data ext4 defaults,noatime 0 0
# mount /data
-
So that the Linux I/O scheduler, Linux readahead, and hugepage defragmentation settings persist across system restarts, add the following lines to the
/etc/rc.localfile. Apply these steps to every drive in your system.Note The following commands assume that sdb is the data drive, and sda is the operating system/catalog drive.
echo deadline > /sys/block/sdb/queue/scheduler
blockdev --setra 8192 /dev/sdb
echo never > /sys/kernel/mm/redhat_transparent_hugepage/enabled
echo never > /sys/kernel/mm/redhat_transparent_hugepage/defrag
echo no > /sys/kernel/mm/redhat_transparent_hugepage/khugepaged/defrag
echo deadline > /sys/block/sda/queue/scheduler
blockdev –setra 2048 /dev/sda
- After you have configured the storage, run
vioperfto understand the baseline I/O performance.
The following numbers are good target goals for regular disk I/O performance where the data disk count is greater than 20:
- 2,200 MB/s for read and write when using 15K RPM drives
- 2,200 MB/s write and 1,500 MB/s read when using 10K RPM drives
- 800+800 MB/s for rewrite
- 7k+ for seeks
Since NVMe utilizes PCIe sockets, it transfers 25x more data than the SATA equivalent. Along with more data, NVMe’s commands are 2x faster than that of AHCI drivers. In addition, NVMe input/output operations per second (IOPS) exceeds 1 million and is up to 900% faster compared to AHCI drives.
For more information, refer to Understanding SSD Technology: NVMe, SATA, M.2.
For Communal storage, on-prem customer storage arrays can offer substantial effective capacities, efficient footprints like 5U, and impressive throughput capabilities like 36 GBps, with ultra-low latencies around 150 µs.
If your results are significantly lower, review the preceding steps to verify that you have configured your data storage location and disk array controller correctly.
Selecting a Network Adapter
To support the maximum performance MPP cluster operations, Vertica nodes should include at least two 10-gigabit Ethernet ports, bonded together for performance and redundancy. A Vertica cluster is formed with Vertica nodes, associated network switches, and Vertica software.
Especially for on-premises deployments, Vertica recommends that you consider connecting the Vertica nodes to two separate Ethernet networks:
- The private network, such as a cluster interconnect, is used exclusively for internal cluster communications. This network must be the same subnet, dedicated switch, or VLAN, 100 Gb Ethernet. Vertica performs TCP P2P communications and UDP broadcasts on this network. IP addresses for the private network interfaces must be statically assigned. Do not allow external traffic over the private cluster network.
- The public network is used for database client (that is, application) connectivity, and it should be 10 Gb Ethernet. Vertica has no rigid requirements for public network configuration. However, Vertica recommends that you assign static IP addresses for the public network interfaces.
The private network interconnect should have Ethernet redundancy. Otherwise, the interconnect (specifically, the switch) would be a single point of a cluster-wide failure.
Cluster operations are not affected, even in the event of a complete failure of a public network. Thus, public network redundancy is not technically required. However, if a failure occurs, the application connectivity to the database is affected. Therefore, consider public network redundancy for continuous availability of the entire environment.
To achieve redundancy on both the private and public networks:
- Take the two ports from the Ethernet card on the server and run one to each of the two top-of-rack switches (which are bonded together in an IRF).
- Bond the links together using LACP.
- Using VLANs, divide the links into public and private networks.
Configuring the Network
The following figure illustrates a typical network setup that achieves high throughput and high availability. (This figure is for demonstration purposes only.)
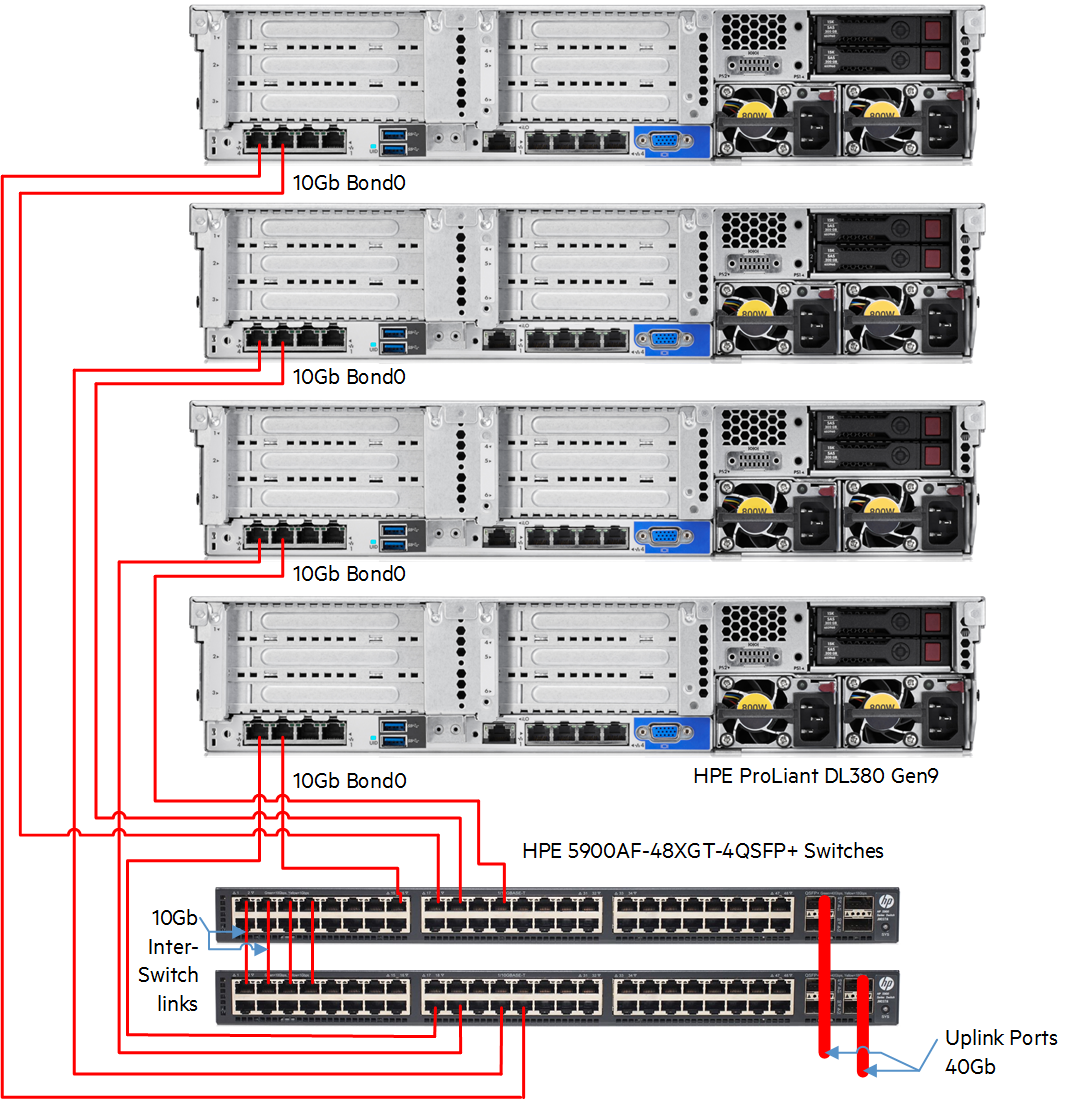
This example shows that the bonding of the adapters allows for one adapter to fail without the connection failing. This bonding provides high availability of the network ports. Bonding the adapters also doubles the throughput.
Furthermore, this configuration allows for high availability with respect to the switch. If a switch fails, the cluster does not go down. However, it may reduce the network throughput by 50%.
Tuning the TCP/IP Stack for RHEL 8 and 9
-
Increase the Number of Incoming Connections
To enhance scalability, adjust the net.core.somaxconn parameter in /etc/sysctl.conf:
net.core.somaxconn = 1024This setting controls the maximum number of pending connections in the listen queue. Adjust it based on your workload and system capacity.
-
Socket Buffer Sizes
Modify the send and receive socket buffer sizes for optimal throughput:
net.core.wmem_max = 16777216net.core.rmem_max = 16777216net.core.wmem_default = 262144net.core.rmem_default = 262144These values control the buffer sizes for data transmission and reception.
-
Network Device Backlog
Increase the length of the processor input queue:
net.core.netdev_max_backlog = 2000This parameter affects how many packets can queue up when an interface receives data faster than the kernel can process.
-
TCP and UDP Parameters
Adjust the following TCP and UDP settings:
net.ipv4.tcp_mem = 16777216 16777216 16777216net.ipv4.tcp_wmem = 8192 262144 8388608net.ipv4.tcp_rmem = 8192 262144 8388608net.ipv4.udp_mem = 16777216 16777216 16777216net.ipv4.udp_rmem_min = 16384net.ipv4.udp_wmem_min = 16384These settings impact memory allocation and buffer sizes for TCP and UDP traffic.
-
Apply Changes
After editing /etc/sysctl.conf, reload the configuration using:
sudo sysctl --systemThe changes will take effect after the next reboot.
Additional (BIOS) Settings
For optimal performance with Vertica on RHEL/Rocky Linux 8 and RHEL 9, it is crucial to fine-tune the hardware for high-performance, low-latency applications. Both Intel and AMD processors offer a variety of power-saving technologies. While these technologies can help reduce overall power consumption, they may also impact high-end performance.
To achieve the best performance, refer to the hardware manufacturer's guide and disable CPU scaling and power-saving features in the BIOS of the Vertica nodes. Many hardware vendors offer documented guides for optimizing their specific servers for high-performance, low-latency applications like Vertica.
Additionally, adjust the max_cstate value by setting it to 0 to disable CPU C-states.
For modifying kernel parameters:
-
Edit the
/etc/default/grubfile for RHEL/Rocky Linux 8 and RHEL 9. -
Add the following arguments to the
GRUB_CMDLINE_LINUXparameter:-
For Intel processors:
intel_idle.max_cstate=0 processor.max_cstate=1 intel_pstate=disable -
For AMD processors:
idle=nomwait
-
-
After editing, regenerate the GRUB configuration by running
sudo grub2-mkconfig -o /boot/grub2/grub.cfg.
VerticaValidation Utilities
Included with every Vertica installation is a set of validation utilities, typically located in the /opt/vertica/bin directory. These tools, as mentioned previously, can help you determine the overall performance of your Vertica nodes and cluster.
- Use the
vcpuperfutility to measure your Vertica node’s CPU processing speed and check the high and low load times, which determine if CPU throttling is enabled. - The
vioperfutility tests the performance of your Vertica nodes’ input and output subsystems, allowing you to identify I/O bottlenecks. - The
vnetperfutility allows you to measure the network performance between your Vertica nodes, providing an indication of networking issues that may be impacting your cluster performance.
Vertica recommends that you use these tools during initial deployments, but also to run the utilities periodically to determine if performance has changed over the course of time. This allows you to identify if any system changes are having an adverse effect on Vertica performance.
Best Practices for Optimizing VMware Configuration with Vertica
Optimize Resource Allocation
In the VM guest, aim to deploy the same number or fewer CPUs than are physically available on the host. Allocate memory carefully to prevent over-subscription.
Enhance Hypervisor Configuration for Performance
Disable power-saving features and CPU frequency scaling on the hypervisor hardware.
Select a Compatible Operating System
Choose an operating system supported by both Vertica and the hypervisor.
Maximize CPU, Storage, and Network Efficiency
After installing Vertica, you will have access to the following scripts in /opt/vertica/bin:
-
vcpuperf - CPU performance test that verifies your CPU performance.
-
vioperf - Input/Output test that verifies the speed and consistency of your hard drives.
-
vnetperf - Network test tests the latency and throughput of your network between hosts.
These utilities help you verify whether you meet the minimum requirements for Vertica. While they can be run at any time, they are especially useful to run before executing the install_vertica script.
VMDirectPath I/O
VMDirectPath I/O (PCI passthrough) enables direct assignment of hardware PCI Functions to virtual machines. This gives the virtual machine access to the PCI Functions with minimal intervention from the ESXi host, potentially improving performance.
DirectPath IO allows the VM to have direct access to the physical device all the time.
Dynamic DirectPath IO allows the VM to access the physical device only when the VM is powered on.
For more information, see VMware documentation and vSphere VMDirectPath I/O and Dynamic DirectPath I/O.
Allocate Memory Appropriately
Allocate a generous 8 GB of memory per virtual core in the VM. To avoid contention, ensure that the total assigned memory does not exceed the physical capacity of the host.
Ensure Network Excellence
Validate network minimum requirements using the vnetperf utility. Minimize latency between Vertica nodes and ensure each VM has a robust networking infrastructure of at least 10 Gb. Use network adapters that support single root I/O virtualization, to allow the VM direct access to the network card.
Limit Vertica VMs per Host
Deploy Vertica VMs efficiently by limiting the number per physical host. Distribute VMs across multiple hosts to strengthen the cluster against single physical hardware failure.
Address UDP Broadcast Challenges
Configure the --point-to-point flag during the execution of the install_vertica script. This configures spread daemons to communicate directly.
Avoid Enabling vNUMA for Vertica
Enabling VMware Virtual Non-Uniform Memory Access (vNUMA) for Vertica installations is generally not advised due to potential performance implications.
Vertica is designed to efficiently manage memory across its cluster nodes and may not benefit from the additional layer of abstraction introduced by vNUMA.
Memory reservation
Set the VM memory reservation to match the combined size of the Vertica process and the operating system's used memory.
Swap Space Guidelines
Follow the same swap space guidelines as in physical environments.
Vertica recommends configuring a 2 GB swap space, irrespective of the installed RAM amount. While larger swap spaces are acceptable, they are unnecessary.
Jumbo Frames and Virtual NIC MTU size
A jumbo frame Maximum Transmission Unit (MTU) can be increased from the default 1500 bytes to 4096 bytes. The larger payload provides for increased efficiency and higher throughput. Vertica, by default, uses 4096 bytes block size to store data in the database.
Increasing the TCP/IP payload to 4500+ bytes allows an entire Vertica block to be transmitted as one jumbo frame instead of dividing it up into six TCP/IP packets. Only enhanced VMXNET3 adapters can be used with jumbo frames. For example, the distributed switch dVSwitch has MTU set to 4500 bytes (jumbo frames).
VMware Tools
VMware Tools™ comprises services and components that facilitate enhanced management and seamless user interactions with guest operating systems across various VMware products. As a best practice, consider using VMware Tools for your Vertica virtual machines.
Reference Architecture Examples
The objective of the following hardware reference architecture is to present a recommended combination of components for a Vertica node cluster.
Note that these examples are for illustrative purposes only and do not imply a preference for any specific hardware brand or server model.
DELL PowerEdge R6625 Server configured with
SI# C88415 PowerEdge R6625 - OCP & VMware AMD
2.5 Chassis
SAS/SATA/NVMe Capable Backplane
No Rear Storage
GPU Enablement
Trusted Platform Module 2.0 V3
2.5" Chassis with up to 10 SAS4/SATA Drives including 4 Universal Slots, Front PERC 11
AMD EPYC 9334 2.70GHz, 32C/64T, 128M Cache (210W) DDR5-4800
AMD EPYC 9334 2.70GHz, 32C/64T, 128M Cache (210W) DDR5-4800
Additional Processor Selected
Heatsink for 2 CPU configuration (CPU less than or equal to 240W)
Performance Optimized
4800MT/s RDIMMs
24*64GB RDIMM, 4800MT/s Dual Rank
Unconfigured RAID
PERC H755 SAS Front
Front PERC Mechanical Parts, rear load
2*480GB SSD SATA Mix Use 6Gbps 5 12 2.5 in Hot-plug AG Drive, 3 DWPD
Power Saving BIOS Settings
UEFI BIOS Boot Mode with GPT Partition
High Performance Fan x4
Single, Hot-plug, Power Supply Non-Redundant (1+0), 1400W, Mixed Mode
2* Jumper Cord - C13/C14, 4M, 250V, 12A (North America, Guam, North Marianas, Philippines, Samoa)
Riser Config 3, 2 x16 FH (Gen5)
PowerEdge R6625 Motherboard
Broadcom 57504 Quad Port 10/25GbE, SFP28, OCP NIC 3.0
Broadcom 5720 Dual Port 1GbE Optional LOM
QLogic 2772 Dual Port 32Gb Fibre Channel HBA, PCIe Full Height, V2 TRAY,W/LBLS,X8/X10,R6625
Standard Bezel
HPE ProLiant DL360 Gen10 Plus 8 x SFF NVMe configured with
HPE DL360 Gen10 Plus 8 SFF Server
HPE 800W Flex Slot Universal Hot Plug Low Halogen Power Supply
2x Intel Xeon-Platinum 8362 2.8GHz 32-core 265W Processor for HPE
16x HPE 16GB (1x16GB) Dual Rank x8 DDR4-3200 CAS-22-22-22 Registered Smart Memory Kit
2x HPE 4TB NVMe Gen3 High Performance Read Intensive SFF
Intel E810-XXVDA2 Ethernet 10/25Gb 2-port SFP28 OCP3 Adapter for HPE
HPE Ethernet 10/25Gb 2-port 621SFP28 Adapter
HPE iLO Standard with Intelligent Provisioning
Kubernetes/Pods Deployments FAQs
Which differences in the OS settings mentioned in the Vertica documentation could affect cluster deployments on Kubernetes (K8s)?
Vertica documentation details general Operating System configurations that must be set manually:
Consider the following topics when deploying on K8s clusters:
Generally, swap space isn't configured in K8s clusters. K8s won't start if swap is enabled.
For optimizing performance in K8s clusters, keep the following suggestions in mind:
-
It is best practice to set resource limits to ensure Vertica pod is on a K8s host with enough cpu/memory. Refer to Resource limits and requests.
-
Use node affinity/anti-affinity to ensure proper placement of Vertica pods to the desired K8s host. This may be required to ensure you run in the same Availability Zone (AZ) as the other Vertica pods, or to select a specific AWS instance type. Refer to Node affinity.
-
If you are using the AWS load balancer, it is advisable to use the network load balancer. This isn't specific to K8s but has come up in EKS deployments. Refer to Configure TCP keepalive with AWS network load balancer and External client connections.
-
By default, we use a persistent volume claim to store catalog and depot. Some customers like to use network backed storage for their PVCs . To improve performance when using the depot, you can use an emptyDir volume, which is essentially an ephemeral local disk on the K8s host. Refer to the local.depotVolume parameter in Custom resource definition parameters.
The downside is that you can lose your entire depot if a pod restarts.
Cloud and On-Premises Deployments FAQs
-
From a price/performance perspective, which approach is more advantageous: more weaker servers or fewer, more powerful servers in a Vertica cluster?
The Vertica platform is CPU-bound, and efficiency is achieved with fewer servers. It’s advisable to opt for fewer nodes with stronger processors. However, a higher server count can enhance your parallel data load performance. Additionally, consider failure scenarios; In a 3-node cluster, a single failure represents 33% of your cluster capacity, whereas in a 12-node cluster, a single node failure results in a 9% reduction in cluster capacity.
-
Which is preferable: one-socket servers or two-socket servers?
Consider price comparison because from a performance perspective, two-socket servers generally offer superior overall performance. However, one-socket servers may offer better price-performance.
-
Is higher core count per processor better?
A higher core number is an advantage, however when we go above 48 cores per processor there is a higher potential for spinlock. Unlike traditional locks that put a thread to sleep if the resource is locked, a spinlock continuously "spins" in a loop, repeatedly checking if the lock is available. It keeps the CPU busy (hence the term "spin") until the lock becomes available.
Spinlocks are typically used in situations where the expected wait time for the lock to become available is very short. They are more efficient than traditional locks in such cases because they avoid the overhead of putting a thread to sleep and waking it up. However, higher spinlock occurrence may reduce the overall processor usage efficiency and can cause performance issues.
-
What are the recommended minimum performance specifications for Vertica's communal storage on S3 object storage, whether on the cloud or on-premises?
For the S3 communal storage, the minimum throughput is 200 Megabyte/sec and recommended 500 Megabyte/sec read and write per node. For example, if you have a 20 nodes cluster, the minimum required throughput is 20x200=4000 Megabyte/sec = 4 Gigabyte/sec, assuming more read activities, or half reads and half writes.
Throughput is the clear storage performance influencer and IOPS is the least important factor in the calculation.
Amazon S3 performance supports at least 3,500 requests per second to add data (write) and 5,500 requests per second to retrieve data (read). Refer to Amazon S3 Strong Consistency.
To measure S3 performance characteristics for Vertica's communal storage and verify if it meets the minimum required throughput, consider the following options:
Measure the throughput of copying a file from one of your Vertica servers to AWS S3 and from S3 to your server.
To measure the throughput of copying a file from one of the Vertica Linux servers to AWS S3:
-
Install Pipe Viewer (pv) via one of the following bash copy code:
sudo apt-get install pv # For Ubuntu/Debian
sudo yum install pv # For CentOS/RHEL
-
# Replace placeholders with actual values:
aws s3 cp /path/to/local/file.txt s3://<bucket-name>/<destination-path-in-s3> | pv -b > /dev/null
-
Observing throughput - The pv command will show the progress and throughput. Look for "real-time" throughput value. For example,
aws s3 cp ~/Downloads/myfile.txt s3://my-s3-bucket/data/ | pv -b > /dev/null
Measure the throughput of copying a file from AWS S3 to one of the Vertica Linux servers.
Replace placeholders with actual values:
aws s3 cp s3://<bucket-name>/<source-path-in-s3> /path/to/local/destination/file.txt | pv -b > /dev/null
For example,
aws s3 cp s3://my-s3-bucket/data/myfile.txt ~/Downloads/ | pv -b > /dev/null
Sample Script
For more information, refer to this discussion post on the Vertica Forum.
The script performs a sequence of PUT, delay, bucket listing, and DELETE operations allowing you to observe the consistency of bucket listings under different delay scenarios. The output provides a percentage of success, indicating the level of consistency achieved.
Ensure to replace the placeholder values for endpoint, profile, and bucket with your specific S3 configuration. Additionally, ensure that AWS CLI is installed and configured with the necessary permissions.
Note The provided script is intended as an illustrative example for educational purposes only. It is not an official or production-ready solution, and it may contain bugs. The script is offered without any warranty or guarantee of fitness for a particular purpose.
# Replace placeholders with your specific information endpoint="http://ip:port" profile="profname" bucket="bucketname" # Create a test file echo "1234567890123456789012345678901234567890123" > rw_access_test.txt # Loop over delay times for _delay in $(seq 1 1 9); do echo -n "Delay .$_delay: " __sum=0 # Loop for 100 iterations for x in $(seq 1 1 100); do # Perform PUT operation with delay (aws s3 --endpoint-url $endpoint --profile $profile cp ./rw_access_test.txt s3://$bucket/rw_access_test_${x}.txt &> /dev/null &) sleep .$_delay # Perform bucket listing aws s3 ls --endpoint-url $endpoint --profile $profile s3://$bucket 2> /dev/null | grep -q "rw_access_test_${x}.txt" __return=$? echo -n $__return ((__sum += $__return)) # Perform DELETE operation aws s3 rm s3://$bucket/rw_access_test_${x}.txt --endpoint-url $endpoint --profile $profile &> /dev/null done # Calculate and display success percentage echo -n " : " echo "100 - ($__sum * 100 / 100)" | bc | tr -d "\n" echo "%" done -
-
What are the deep dive characteristics of Vertica Eon Mode communal storage and Depot READ operations?
The characteristics of read queries from Vertica communal storage on S3 vary based on whether the Vertica Eon depot is in use or not.
When DEPOT is OFF, Vertica won’t prefetch an entire file before executing the query. Vertica will read parts of it as needed. Depending on the nature of the query, it might access different blocks in the file in an arbitrary order. Each range read is typically a curl connection opened and closed.
Vertica requests those blocks via the usual GET request of ‘size’ bytes from ‘offset’, which would be equivalent to the local: seek(offset) – read(size).
If the query has a somewhat chaotic query pattern or if the file is opened by multiple operators (for example, self-join), then the pattern of those GET requests will be chaotic as well, with potential duplicates. The pattern of S3 requests is the same as it is for a local disk file, no special optimizations. That’s why the depot is recommended for reads as it dampens remote storage delays.
When DEPOT is ON, Vertica streams the file to the depot by multiple reads of 1 MB chunks. The file size for storage containers is known since it’s stored in the catalog. Each stream is a curl connection, with less traffic than depot off range reads.
-
What are the deep dive characteristics of Vertica Eon Mode communal storage and Depot WRITE operations?
Following are the characteristics of write queries from Vertica communal storage on S3 when using or not using Vertica Eon depot.
When DEPOT is OFF: The uploaded file size is not known and Vertica allocates a 5 MB buffer and writes into it.
If the buffer isn't filled to the max when the file is closed, then Vertica can safely upload that single chunk with a PUSH.
If the buffer fills (the effective file size becomes >=5 MB), then Vertica switches to multi-part upload (a series of special POST requests: init-upload-…-finalize).
Due to AWS S3's limitations on the file size and the maximum number of upload parts, Vertica uses an arithmetical progression, where the buffer size increases from one part to another. This saves a little on the buffer size, so Vertica does not have to allocate a large one beforehand.
Vertica starts with a 5 MB buffer (specified by the internal-use-only knob S3UploadBufferSizeKb), which is the first part and increases the size of each part after the previous one is uploaded. The buffer size stays at 5 MB, but the on-disk part of the HybridStream, a file in TEMP backed by the initial 5 MB in-memory buffer, keeps increasing. This is done to work around S3's two limitations: a 10 TB max file size and 10,000 max MPU pieces. Hence, the part sizes are represented as arithmetical progressions: 5M + S2 ... + Sn = 10 TB, where n=10,000.
When DEPOT is ON: The uploaded file size is known, so Vertica uploads constant-size chunks. The same is done for internal copies, like catalog sync.
-
Does Vertica support NUMA-based hardware architecture?
Vertica performs better on non-NUMA-based hardware architecture where all processors have equal memory access speed.
To verify your on-prem environment is configured as non-NUMA, run:
sudo cat /proc/cmdline | grep "numa=off"
To verify you avoid NUMA > 1 on AWS nodes, run:
yum install numactl
numactl --hardware
numactl --show
-
What is the average Eon Mode ROS file size in the Vertica S3 communal storage?
The file size is usually between one to five megabytes with the exception of dozens of megabytes from time to time.
-
How to connect the servers to the Eon Mode Vertica S3 communal storage to gain the best performance?
When connecting servers to Eon Mode Vertica S3 communal storage for optimal performance, it’s essential to consider both network speed and throughput. Let’s break it down:
Network Speed
For connecting S3 storage to Vertica Eon Mode, you can connect your servers with two 10Gb network cards.
One of our customers connected the enclosure providing S3 storage to the servers using four 100Gb network cards to establish high-speed, redundant connections.
The network speed determines how quickly data can be transmitted between the servers and the communal storage (such as S3). Faster network speeds (for example, 10Gb, 100Gb) allow for quicker data transfers, reducing latency and improving overall performance. Ensure that your servers are equipped with high-speed network cards (for example, 100Gb) to maximize data flow.
Throughput
Throughput refers to the amount of data that can be transferred per unit of time (for example, megabytes per second). As mentioned earlier for the S3 communal storage, the minimum throughput is 200 Megabyte/sec and recommended 500 Megabyte/Sec, read and write per node.
Redundancy
Redundant connections enhance reliability and performance. For example, using multiple network cards (NICs) allows for load balancing and failover.
The customer’s approach of connecting the enclosure providing S3 storage to servers using four 100Gb network cards is an excellent example of redundancy and high-speed connections.
-
Is hyper-threading recommended, and if so, why?
Hyper-threading is generally recommended for its potential to improve multitasking and parallel processing. It increases the number of logical cores per CPU by enabling each core to process two threads simultaneously.
This can be particularly effective for short, fast processes. However, it may have a detrimental impact on long-running processes, as a single process can cause the second thread to wait. The decision to enable hyper-threading should be based on the specific workload. Vertica suggests conducting a test to determine the optimal settings for your data and workloads.
-
Is it advisable to enable turbo boost (overclocking) in addition to hyper-threading?
Whether it's advisable to enable turbo boost alongside hyper-threading depends on factors such as system workload, CPU frequency, and associated risks. While it can enhance performance in certain scenarios, it is not generally advised due to potential heat generation, system stability concerns, and the varied impact on different workloads.
-
What is the recommended number of shards in a Vertica cluster, and can it be changed?
For optimal data loading performance, it is recommended to set the number of shards in the default_namespace (from Vertica v24.1) and in the cluster (from Vertica v12) equal to the number of nodes in the cluster. Alternatively, it can be set to be divided equally, such as the node number divided by the shard number.
Resharding the default_namespace can be considered from v24.1:
Improving Large Subcluster Performance: For example, if you have a 24-node subcluster and a namespace with 6 shards, using Elastic Crunch Scaling (ECS) to distribute data processing among nodes may not be as efficient. Resharding the namespace to 24 shards aligns with a 1:1 shard-to-node ratio, improving performance.
Reducing Catalog Size: Reshaping the number of shards in default_namespace can reduce catalog size, optimizing storage efficiency.
Enhancing Performance After Mode Migration: When migrating from Enterprise Mode to Eon Mode, adjusting the number of shards in default_namespace can improve performance. The default shard count may not be ideal after migration.
Effective Database Scaling: To evenly distribute work among nodes, the number of nodes in the database should be a multiple of the number of shards. Resharding the namespace ensures compatibility with scaling subclusters to a desired size.
Maintaining Flexibility in Subcluster Scaling:
Choosing a shard count with more divisors provides flexibility in scaling subclusters. For instance, a namespace with 7 shards aligns well with subclusters having a multiple of 7 nodes.
It is important not to perform frequent resharding during subcluster scaling, as it may affect database performance. After resharding, there is a temporary misalignment between storage containers and new shard subscription bounds, adding overhead to query execution. Vertica recommends conducting testing to determine the optimal settings for specific data and workloads.
-
How can we determine if our cluster needs more resources, such as upgrading nodes or adding new nodes?
When assessing whether a cluster upgrade is necessary, the most effective approach is to observe the impact on canary queries after adding nodes.
If adding nodes or upgrading existing ones for benchmarking purposes is not feasible, follow these alternative steps.
-
Establish a performance baseline when your cluster is running optimally. This baseline will help you compare against current performance.
For example, check canary query behavior in the last 24 hours, using request_label for a specific query:
select time_slice(start_timestamp, 1, 'hour'), count(1), min(request_duration_ms) min_ms, max(request_duration_ms) max_ms, round(avg(request_duration_ms)) avg_ms from query_requests where request_type = 'QUERY' and request_label = 'your_canary_query_label' and start_timestamp > CLOCK_TIMESTAMP() -24 group by 1 order by 1; -
Run this query:
select event_type,event_description, count(*)
from query_events
where ( NOW() - EVENT_TIMESTAMP) < '24 hour'
group by 1,2
order by 3 desc;
Check the cluster when it is running optimally and check the counts in the same time window when the queries run slow.
Check the differences in the following:
MEMORY LIMIT HITcount which indicates query complexity or possibly, lack of available system memory.JOIN_SPILLEDcount which consumes resources while using disk as virtual memory.GROUP_BY_SPILLEDcount which indicates that you might need to adjust resource pools, projections, or the amount of RAM available. -
Check query runtime vs acquisition time:
select TIMESTAMPDIFF('minute', r.queue_entry_timestamp, r.acquisition_timestamp) as wait_to_acq, floor(request_duration_ms/1000/60) run_time_min, ((floor(request_duration_ms/1000/60)) - (TIMESTAMPDIFF('minute', r.queue_entry_timestamp, r.acquisition_timestamp))) as pure_tune_time, r.queue_entry_timestamp, r.acquisition_timestamp, r.transaction_id, r.statement_id, left(s.request, 100) from v_monitor.RESOURCE_ACQUISITIONS r join v_monitor.query_requests s using (transaction_id, statement_id) WHERE r.pool_name='job_manager_pool' and r.queue_entry_timestamp > now() -2 and r.acquisition_timestamp > r.queue_entry_timestamp and r.node_name ILIKE '%node0001' and floor(request_duration_ms/1000/60) > 0 order by 1 desc limit 100; -
Monitor the difference between the acquisition_timestamp and the queue_entry_timestamp using a query like the following:
SELECT pool_name, queue_entry_timestamp, acquisition_timestamp,
(acquisition_timestamp-queue_entry_timestamp) AS 'queue wait'
FROM V_MONITOR.RESOURCE_ACQUISITIONS WHERE node_name ILIKE '%node0001';
-
Determine all spills in the last 12 hours:
SELECT DISTINCT transaction_id, statement_id, request_id, event_type, event_description FROM dc_execution_engine_events WHERE (NOW() - time) < '12 hours' AND event_type ILIKE '%SPILL%'; -
Check the top 50 Files Refetched in the Depot in the last 7 days.
A file refetched into the depot multiple times indicates depot thrashing. It also indicates that the depot size is too small and/or the users are querying data from communal storage.
Adding the query hint
/*+DEPOT_FETCH(none)*/will prevent a query from fetching data into the depot.select /*+label(refetches)*/ node_name, storageid, history_hours, count(*) cnt_of_refetches ,
case when count(*) > 2 then 'V_ACTION_SHOULD: File is refetched into depot more than once in 7 days indicate depot size is not sufficient or depot thrashing by queries. You may also consider depot pinning feature to pin table or partition to depot.' end from dc_depot_fetches, (select datediff('hour', min(time), max(time)) history_hours from dc_depot_fetches) foo where time > (select max(time) - interval '7 days' from dc_depot_fetches ) group by 1,2,3 having count(*) > 1 order by 4 desc,1 limit 50;
-
Cloud Deployments FAQs
-
Which AWS Region is recommended for Vertica?
You should choose a region that is close to your data sources and users to minimize network latency and data transfer costs. For example, if your data is generated and consumed mostly in Europe, you might want to use the EU (Ireland - eu-west-1) region. You should also consider the availability and reliability of the region, as well as the types and sizes of instances that are offered. Some regions may have more frequent outages or limited capacity than others.
For example, US East (N. Virginia - us-east-1) is a popular and well-established region, but it may also experience higher demand and congestion than other regions.
-
Which AWS EC2 instance type is optimized for Vertica cluster workloads?
Amazon EC2 R6a instances, ranging from r6a.2xlarge to r6a.48xlarge, are optimized for Vertica cluster workloads, providing 8 GB of RAM per core, powered by 3rd generation AMD EPYC processors, and offering up to 50 Gbps of networking speed. These instances are ideal for memory-intensive workloads with high concurrency in Vertica clusters.
As EBS Optimized EC2 instances, they deliver dedicated throughput between the EC2 instance and its EBS volumes, ranging from 500 Mbps to 80 Gbps depending on the instance type.
The older i3 instance family is also worth considering, offering NVMe SSD-backed instance storage optimized for low latency, high random I/O performance, and high sequential read throughput at a low cost, including Bare Metal instances (i3.metal) powered by the Nitro System.
Additionally, AWS recommends other instance types for Vertica clusters, including r7i, r7a (with extremely fast CPU but higher cost), r6i, r6a, and r6in (offering better networking and EBS throughput).
For storage, AWS suggests using GP3 SSD disks with 16K IOPS and 1000 MB throughput, or alternatively, a RAID 0 configuration of several GP2 disks, each limited to 250 MBps throughput.
The following table is an example from the AWS EC2 Instance comparison website. For the most up-to-date information, refer to the relevant cloud provider's specification reference.

-
Which is the newest AWS instance type to fit a Vertica cluster with high-end performance requirements?
The newest instance type suitable for a Vertica cluster with high CPU and memory-intensive demands is the Amazon EC2 R7iz. These instances are powered by 4th Generation Intel Xeon Scalable processors.
They feature 4th Generation Intel Xeon Scalable Processors (Sapphire Rapids 6455B) with an all-core turbo frequency of up to 3.9 GHz. Additionally, they come with discrete built-in accelerators (available on R7iz bare metal sizes only - coming soon), including the Data Streaming Accelerator (DSA), In-Memory Analytics Accelerator (IAA), and QuickAssist Technology (QAT). These accelerators efficiently offload and accelerate data operations, optimizing performance for databases, encryption, and compression.
The R7iz instances offer up to 50 Gbps of networking speed and queue management suitable for high-end Vertica workloads. They are built on the AWS Nitro System, a combination of dedicated hardware and a lightweight hypervisor.
Its better price performance makes it most consumed and hard to find as available. It is required to add EBS for Vertica Depot because these instance types do not include disks.
-
Where can we find benchmark references to evaluate the impact of containers on a Vertica cluster?
To assess the performance impact of containers and compare containerized Vertica with non-containerized Vertica, Vertica Engineering conducted the following test. Here's an EKS example to compare the results between EKS and EC2, which revealed a slight performance advantage for the non-containerized cluster when Depot is disabled, and a slight performance advantage for the containerized cluster when Depot is enabled.
EC2 Instances: R5.2xlarge
EKS Vertica Cluster: CPU 6/8 (75%), Memory 60/64 (93.75%)

On-Premises Deployments FAQs
-
When planning to purchase new hardware with 256 GB RAM, for better performance, should we prefer small DIMMs (example, 8 x 32GB) or larger DIMMs (example, 2 x 128GB)?
Smaller DIMMs allow for more memory channels to be populated, which can lead to better memory bandwidth and performance. However, in a few cases fully populating all the memory channels can down cycle memory speed.
It is recommended to discuss this with the server vendor to get the best possible memory configuration for the specific server.
-
For better price performance, a one-socket server is preferred. How can we configure a one-socket instance on AWS?
To increase the likelihood of using a one-socket instance type, you can choose an instance size that utilizes only half of the available sockets.
For example, for the r6i instance type, this includes all instances ranging from r6i.2xlarge to r6i.16xlarge.
-
Where can we find benchmark references for on-prem bare metal servers?
You can find benchmark results for servers suitable for Vertica clusters at the following link. Although these are not Vertica benchmarks, but rather TPCH benchmarks against other databases, they provide a sense of performance comparison for hardware choices.
For more information, see TPC-H V3 Top Performance Results - Non-Clustered
For example: TPC-H V3 Top Performance Results - Non-Clustered - @10,000GB

If you follow the hardware recommendations in this documentation, you should experience excellent performance from your Vertica database. For additional resources about tuning your Vertica database, refer to the Vertica Knowledge Base.
If you have problems, contact Vertica Support.

