


Backing Up Vertica to an Azure Storage Account Without Using Managed Identities
Vertica fully supports backing up the Vertica database to an Azure Storage Account, and there are a few ways to accomplish this. The first and simplest way is to use a Managed Identity that is assigned to the cluster nodes to provide Role Based Access Control to the storage account. This method allows the VMs to read and write directly to the selected storage account without providing any additional form of authentication.
However, in some cases the use of a managed identity is unacceptable for various reasons. You will need to access the storage account by either providing an Access Key or a Shared Access Signature.
Accessing Azure Storage Account Using Access Key
When using vbr.py to back up your database to an Azure Storage Account, there are three major steps that are explained in this section.
Exporting the access credentials to a system variable
Note When defining the variable, you can only use accountKey OR sharedAccessSignature, not both.
The Vertica documentation describes the necessary information that must be set up to backup into the cloud. However, this description of the VbrCredentialConfig and VbrEndpointConfig system variables can be somewhat confusing if you are not familiar with the Azure environment.
-
For the VbrCredentialConfig, there are 4 JSON objects, however only 3 objects are required.
-
You can pull up the values for this variable from the Azure portal website for the storage account.
-
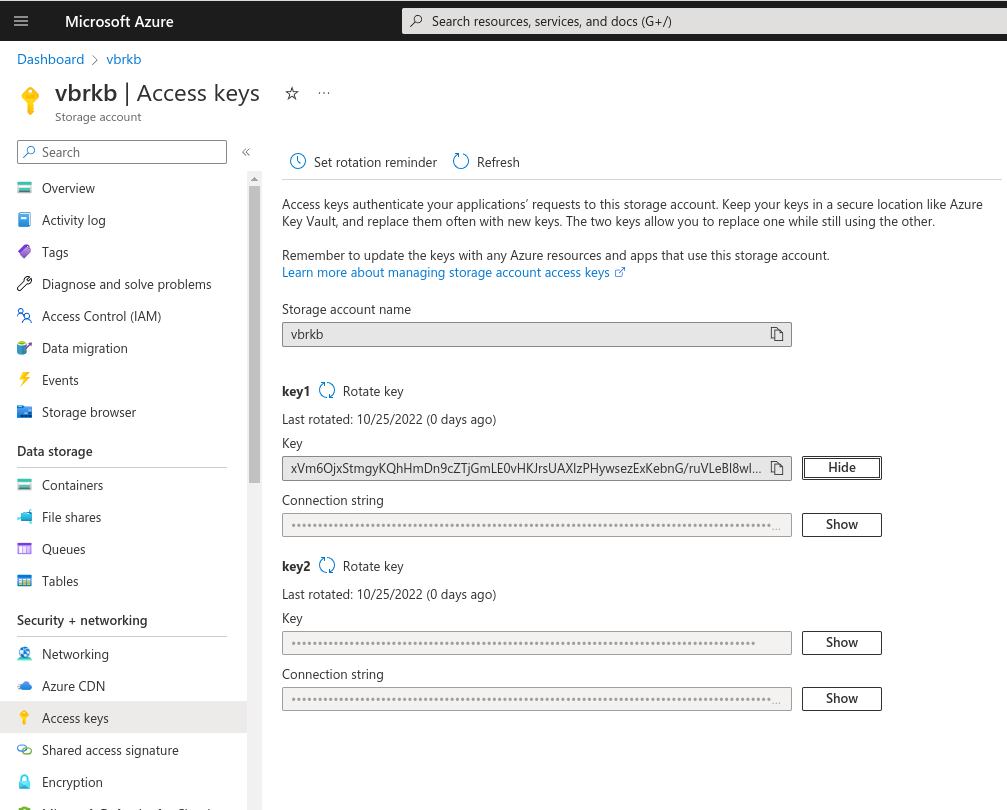
In the following image, we are looking at the storage account and have selected Access Keys in the left-hand pane.
-
From here we can gather the 3 objects required to complete the VbrCredentialConfig.
-
The accountName value is Storage account name.
-
The blobEndpoint value is Fully Qualified Domain Name for the storage account, this is typically, the Storage account name followed by “.blob.core.windows.net”
-
The accessKey is either the value of key1 key or key2 key.
Note These keys can change (rotate), so always check that you are using the current key.
-
-
In the case of this particular storage account, the correct way to set up the VbrCredentialConfig is as follows:
export VbrCredentialConfig='[{"accountName": "vbrkb","blobEndpoint": "vbrkb.blob.core.windows.net","accountKey": "xVm6OjxStmgyKQhHmDn9cZTjGmLE0vHKJrsUAXIzPHywsezExKebnG/ruVLeBl8wIKT/6N+S/5v1+ASt67iAUA==","sharedAccessSignature": ""}]' -
Since we know the accountName and blobEndpoint, we can also define the VbrEndpointConfig, which would look like this:
export VbrEndpointConfig='[{"accountName": "vbrkb", "blobEndpoint": "vbrkb.blob.core.windows.net", "protocol": "https"}]'
Setting Up a Backup Destination
With the two variables set, you only need to set the backup destination in the vbr config file.
Example configuration files for the vbr can be found in the /opt/vertica/share/vbr/example_configs folder on the Vertica nodes.
-
Copy the
backup_restore_cloud_storage.inifile to your local home directory, and open the file in an editor. -
In the CloudStorage section, comment out all
cloud_storage_backup_pathlines except the one that contains theazb://path. -
Change this line to equal
azb://account name/container name/pathif required. -
For the above example, the correct line would look like this:
cloud_storage_backup_path = azb://vbrkb/backup/
This denotes the storage account name and the container name that we have already created to store our backups.
Initializing the Backup Location
You will need to run an initialization of the backup location and this will also serve to validate that you have followed the steps correctly.
-
To run initialization, issue the following command:
vbr.py -t init -c backup_restore_cloud_storage.ini –cloud-force-init
-
You should receive the following output to indicate that you have setup the backup location correctly:
Initializing backup locations.
Backup locations initialized.
Accessing Azure Storage Account Using a Shared Access Signature
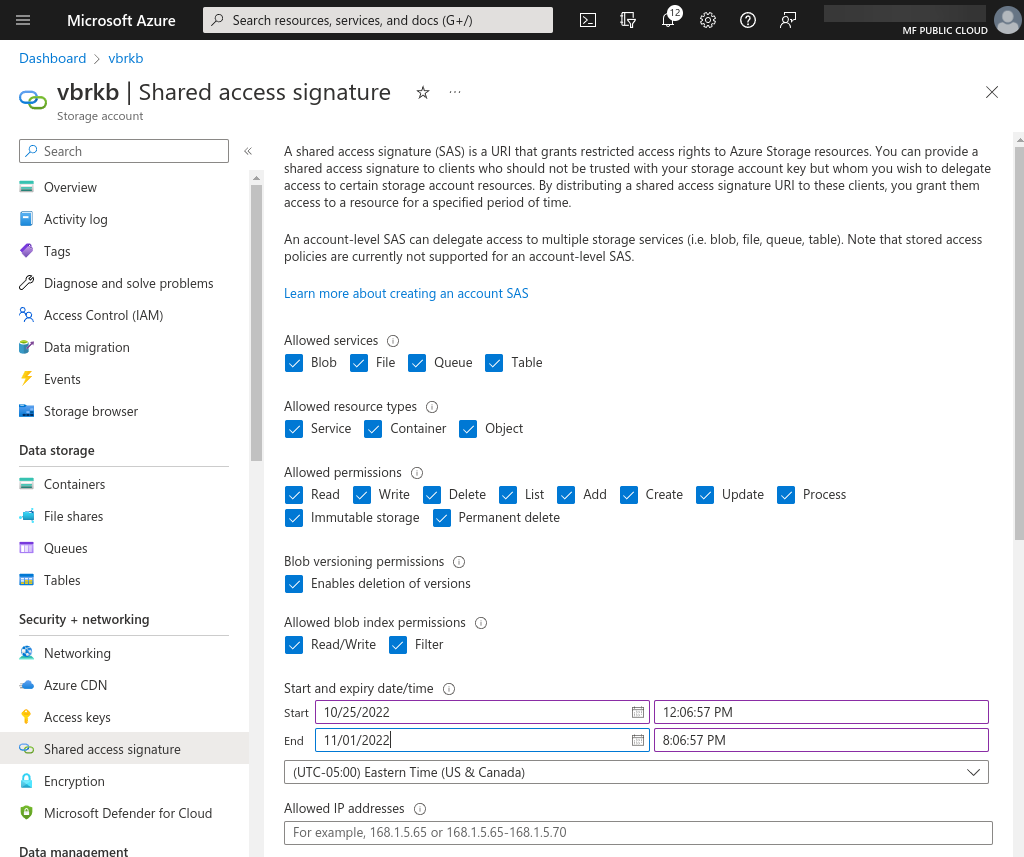
vbr also supports using a more granular access method called a Shared Access Signature.
A shared access signature can be created from within the storage account much like obtaining the key, but you can set many more restrictions to the signature, including a window of time in which it is valid.
-
In the left-pane, select Shared access signature.
-
To generate the SAS token required, simply select the access required, and set the beginning and ending dates.
-
Click Generate SAS and connection string.
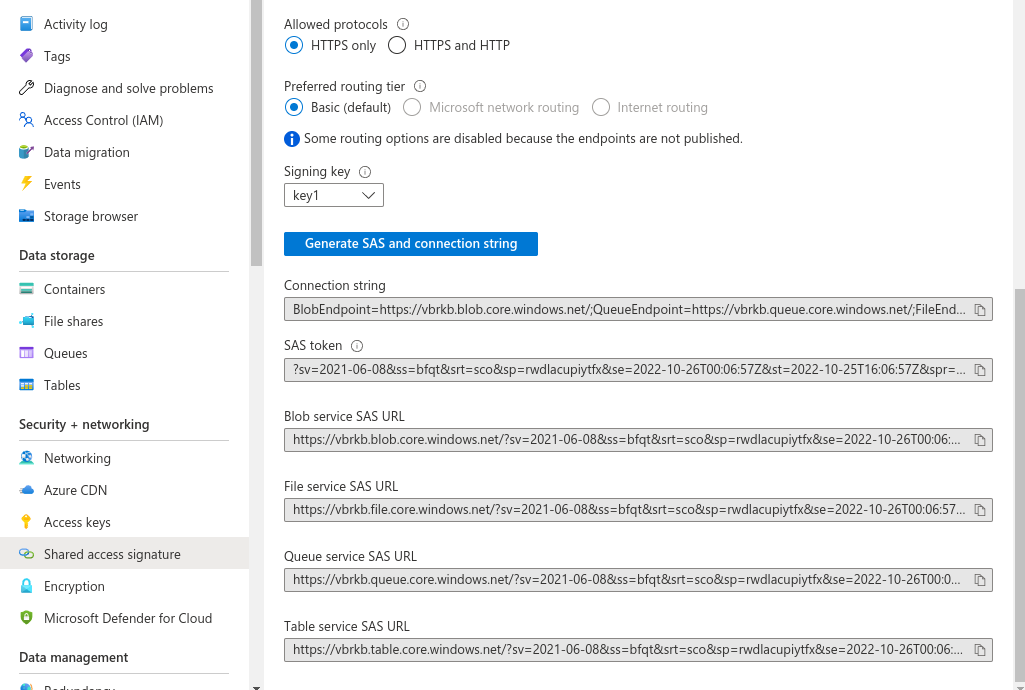
The SAS token is the value you will enter for sharedAccessSignature in the exported VbrCredentialConfig.
-
In the following example, this is the valid command to use to export VbrCredentialConfig for the image above:
export VbrCredentialConfig='[{"accountName": "vbrkb","blobEndpoint": "vbrkb.blob.core.windows.net","accountKey": "","sharedAccessSignature": "?sv=2021-06-08&ss=bfqt&srt=sco&sp=rwdlacupiytfx&se=2022-10-26T00:06:57Z&st=2022-10-25T16:06:57Z&spr=https&sig=qpJcp9FE7tVncxI1XR%2Bf1qt20zT%2F4okqBX9uOje%2Bn44%3D"}]'Note In this example, the accountKey value is blank.

