


Vertica Integration with AWS Glue: Connection Guide
About Vertica Connection Guides
Vertica connection guides provide basic instructions for connecting a third-party partner product to Vertica. Connection guides are based on our testing with specific versions of Vertica and the partner product.
Vertica and AWS Glue: Latest Versions Tested
| Software | Version |
|---|---|
| Partner Product |
AWS Glue 3 |
| JDK | 1.8 |
| Partner Product Platform | Windows Server 2019 |
| Vertica Client |
Vertica JDBC Driver 11.1.0 |
| Vertica Server | Vertica Analytic Database 11.1.0 |
AWS Glue Overview
AWS Glue is a fully managed serverless extract, transform, and load (ETL) service that enables you to discover, prepare, and combine data for analytics. It processes information from disparate data sources and organizes it in a central repository to make smarter business decisions.
Installing the Vertica Client Driver
Vertica integrates with AWS Glue Studio and scripted jobs using a custom connector which uses the Vertica JDBC driver. To download the client driver
- Navigate to the Client Drivers page on the Vertica website.
-
Download the JDBC driver package that is compatible with your Vertica server version.
Note For details about client and server compatibility, see Client Driver and Server Version Compatibility in the Vertica documentation.
-
Upload the Vertica JDBC driver to an S3 bucket. Make note of the full path to the JAR file. For example,
s3://verticajdbc/vertica-jdbc-11.1.jar
Connecting AWS Glue to Vertica
To connect AWS Glue to Vertica, you need to create a custom connector and create a connection using this custom connector. You can then load data with Vertica as a source and target.
Creating a Connection Using the Custom Connector
Loading Data from Vertica to Amazon S3
Creating a Custom Connector
In the following example, we are connecting to Vertica through a Custom Connector in AWS Glue Studio.
- In Amazon Glue Studio, on the left navigation pane, click Connectors.
- Click Create Custom Connector.
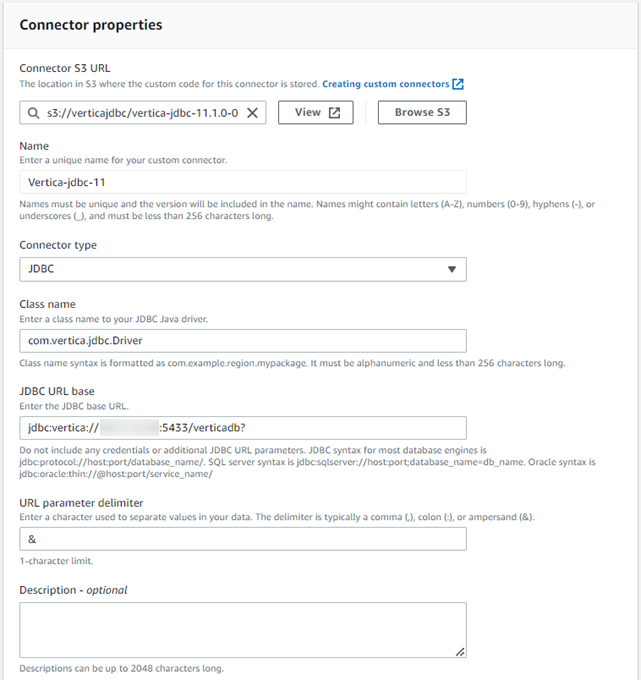
- Set the connector properties as follows:
- Connector URL: s3://<your-s3-bucket>/vertica-jdbc-11.1.jar
- Name: Enter a name for your connector.
- Connector type: JDBC
- Class name: com.vertica.jdbc.Driver
- JDBC URL base: jdbc:vertica://host:5433/database_name?
Note You must add ‘?’ at the end of the connection string.
- URL parameter delimeter: &
- Description: Add any description for your reference.
11. Click Create connector.
Creating a Connection Using the Custom Connector
To connect AWS Glue with Vertica, you need to create a connection using the custom connector that you created.
-
Select and click the custom connector you just created.
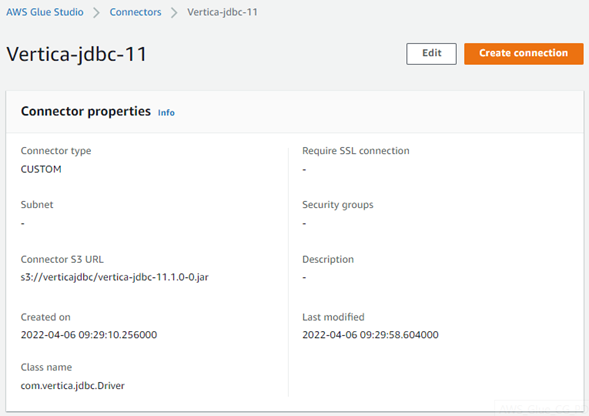
- Click Create Connection.
-
In Connection properties, provide a unique name for your connection.

-
In Connection access, provide the following details:
- Connection credential type: Select if you have one, else select default.
- AWS Secret (optional): Select your IAM user.
Note If you choose to enter your AWS Secret, you need to add the VPC endpoint for it. For more information, see AWS Secret Manager VPC Endpoint.
- Connection URL preview: Preview your connection URL and add additional URL parameters as below:
- Additional URL parameters:
- Key: user, Value: <your-verticadb-username>
- Key: password, Value: <your-verticadb-password>

-
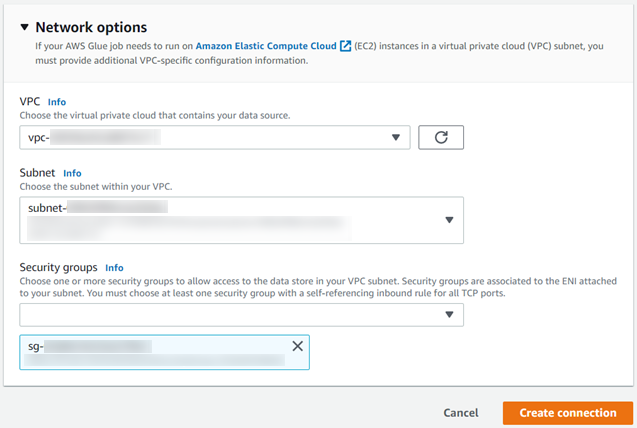
Additionally, if you want to use your VPC, configure it in the Network options.
- VPC: Select the VPC from the drop-down where your Vertica instances are. You need to create a Glue VPC Endpoint under your VPC ID. For more information, see AWS Glue and interface VPC endpoints (AWS PrivateLink).
- Subnet: Select the Subnet from the drop-down from within your VPC.
- Security Groups: Select the Security Groups to access Vertica instances.
Note Ensure the security group chosen has a self referencing inbound rule for all TCP ports.
-
Click Create Connection.
Your connection appears on the Connectors main page.
Loading Data from Vertica to Amazon S3
Note You can load data from Amazon S3 to Vertica, Vertica to Amazon S3, and Vertica to Vertica. Our example is for Vertica to Amazon S3. All transformations can be done by following the same steps in this section. Make sure to select the correct source and target based on your requirement.
To create a Glue job, go to the left navigation pane and click Jobs.
- In the Create job section,
- Select Visual with a source and target.
- Source: Vertica_Glue (Connection name you created)
- Target: Amazon S3

- Click Create.
You will be directed to the AWS Glue Studio console. - Click the edit icon next to Untitled job to rename the job as required.
- In the Visual tab, click Data source – Connection. On the right pane, click Data source properties – Connector.
- Choose the connection from the drop-down list and enter your table name or write a query. You can also preview the data under Data Preview.
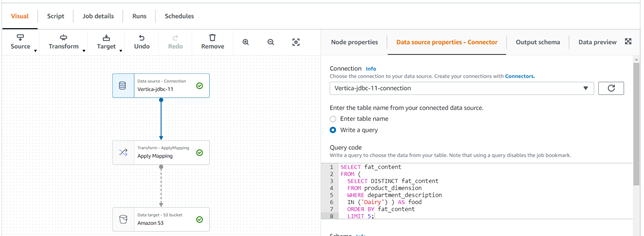
- Click Data target – S3 bucket in the graph.
- On the right pane, click Data target properties – S3.
- Choose the connection from the drop-down list and enter your table name.

- Click Job details and select your IAM role with permissions to access your data stores. For more information, see IAM roles.
- Click Save on the top right.
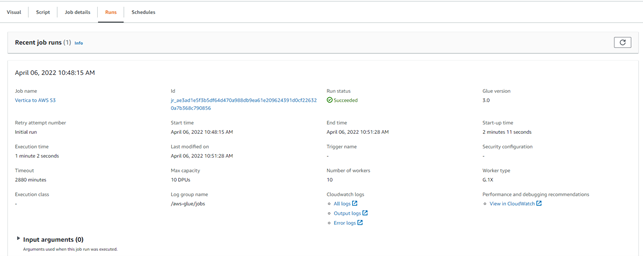
- Click Run to run the Glue job.
You can check the status of the run in the Runs section.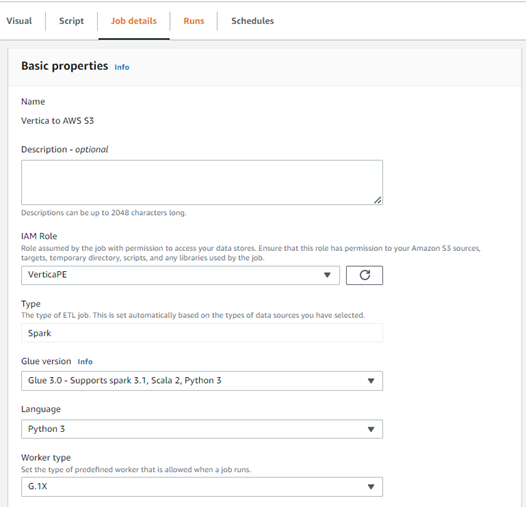
Known Limitations
- Since AWS Glue jobs run in Apache Spark, you need to know Spark well as the script generated will be in Scala or Python. You can't use job bookmarks if you specify a filter predicate for a data source node that uses a JDBC connector.
- Make sure not to include ‘#’ in your Database password string. It will display the ‘username/password incorrect’ error.
-
LONG VARCHAR data type only supports up to 6291456 bytes.

