Viewing and Managing Your Cluster
The Cluster page shows a node-based visualization of your cluster. This page shows the cluster's host addresses, the installed version of Vertica running, and a list of the databases on the cluster that Management Console is currently monitoring.
From this page, you can also create a new empty database on the cluster, or import any existing databases Management Console discovers on the cluster.
Management Console displays different options depending on whether you imported the cluster to Management Console, or created the cluster using Management Console:
- Imported cluster: Management Console displays monitoring information about the cluster.
- Cluster created using Management Console: Management Console displays both monitoring information and AWS management options. For clusters you created using the current MC, the Cluster page provides cluster and instance management options.
Go to the Cluster Page
To view the Cluster page:
- From the Home page, click View Your Infrastructure to go to the Infrastructure page. This page lists all the clusters and associated clusters the MC is monitoring.
- Click any cluster listed on the Infrastructure page. Select View or Manage from the dialog that appears (this button differs depending on if you imported or created the cluster using Management Console) to view its Cluster page.
Monitor Imported Clusters
Whether you have imported or created a cluster using MC, you can view information about it through the Cluster page.
This page includes the following information:
- Node visualization: A visualization of all nodes within the cluster. Icons at the top right of each node indicate if the nodes are up. Click any node to see details about its host name, CPU information and total memory. If there are many nodes in the cluster, use the Zoom Level slider at the bottom right of the page to zoom the visualization in or out.
- Node List: A list of all the node IPs within the cluster. Click any node in the list to see details about it.
- Cluster Summary: A summary of details about the cluster, including the version of Vertica running on the cluster and the number of hosts. If the cluster is running on AWS resources, you can also see region and instance type information.
- Databases: Lists all databases monitored by MC and their current state.
- At the bottom of the Databases section, click Create New to create a new empty database using Management Console.
- This section also lists any Vertica databases on this cluster, if existing, that are not yet monitored by Management Console. See Importing an Existing Database Into MC for the process of importing a discovered database.
The screen capture below shows an overview of a 3-node on-premises cluster, which was created using the command line and imported into Management Console. This cluster has a running Enterprise Mode database on it. 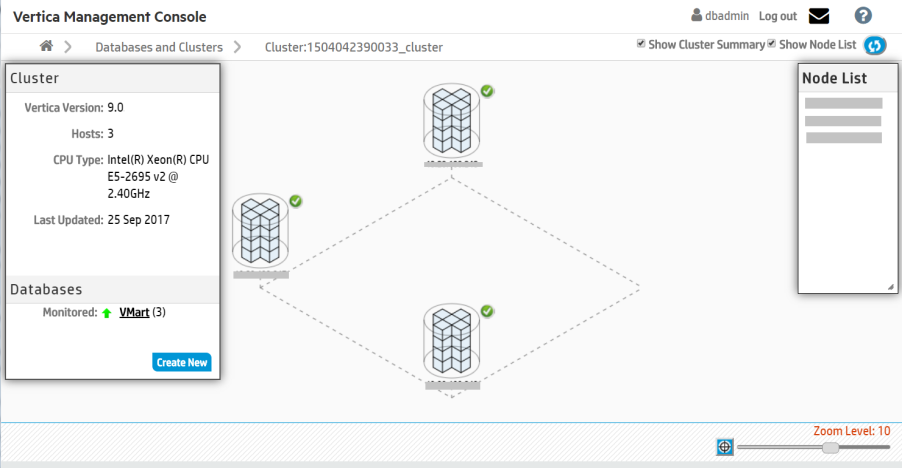
Manage a Cluster Created on AWS with the Cluster Creation Wizard
If you installed Vertica from the AWS Marketplace using AWS resources, Management Console offers cluster management operations that are specific to the cloud. In this way, you can manage a cluster running on AWS without going to the AWS console.
If you upgrade the cluster's Vertica version manually through the command line, AWS management operations in MC become disabled for the cluster, even if you created that cluster using Management Console. Make sure to upgrade the cluster's Vertica version through Management Console in order to preserve AWS management capabilities for that cluster in Management Console.
In the screen capture below, the Cluster page shows a 4-node cluster, which was provisioned using the Cluster Creation wizard. (See Provision a New Vertica Cluster and Database on AWS Resources.)
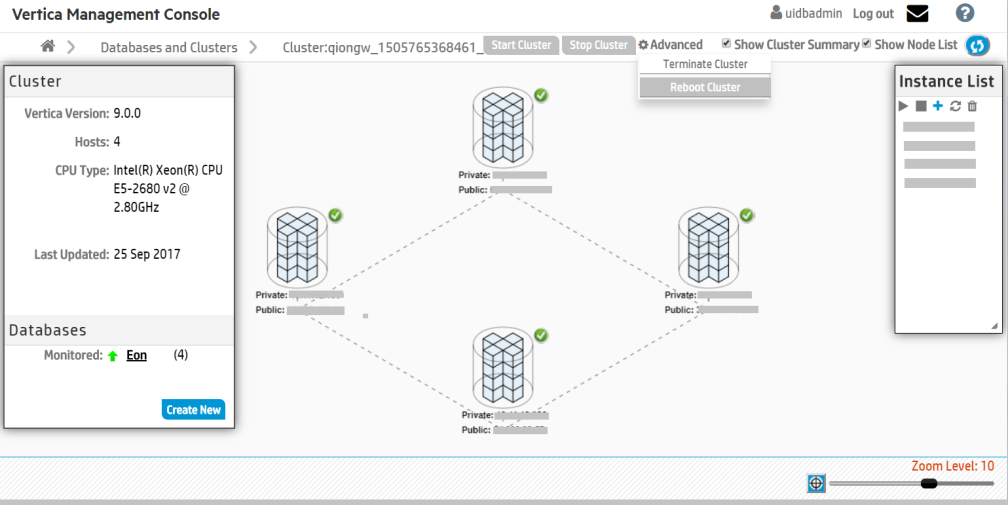
You can perform the following operations on your cluster through the cluster page:
- Start Cluster. Start all the instances in the cluster. Available at the top of the Cluster page.
- Stop Cluster. Stop all the instances in the cluster. You must first stop any running database on the cluster. Available at the top of the cluster page.
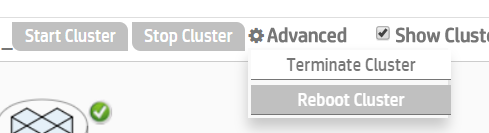
- Reboot Cluster. Restart all instances in the cluster. Available under the Advanced menu at the top of the page.
- Terminate Cluster. Terminate all instances in the cluster, the databases on it, and all AWS resources from the cluster. The Terminate Cluster operation is available under the Advanced menu at the top of the page.
- For Enterprise Mode databases, this operation permanently deletes any data you had on the cluster or its databases.
- For Eon Mode databases, the data is preserved in communal storage and you can later revive the database in a new cluster. When you choose to terminate the cluster, MC gives you the option to also stop the database before termination, which is recommended in order to safely revive later.
You can also manage individual instances in your cluster.
To do so, in the Instance List panel, select the IP address of any instance in your cluster that you want to perform the action on. Then click an icon from the menu at the top of the panel. Hover over an icon to read the action it performs.
- Start Instance. Start an individual instance in the cluster.
- Stop Instance. Stop an individual instance in the cluster.
- Add Instance. Add another instance to your cluster. When you select this action, Management Console opens the Add AWS Instance wizard, where you specify volume and storage information for the instance. You must supply your AWS key pair (and a Vertica Premium Edition license if you are adding more nodes to the cluster than a Community Edition license allows). You can add up to 10 instances at a time using the Add Instance action.
- Restart Instance. Restart an individual instance in the cluster.
- Terminate Instance. Permanently remove the instance from your cluster.

Configure TLS for a Vertica Database Already Monitored in Management Console
- In Management Console, on the Clusters > DatabaseName > Overview page, click Settings in the lower tabs.
- On the Settings page, click the Security tab.
- On the Security page, under Configure TLS Connection to Database, in the Use TLS Connection to Database drop-down, select Enabled.
- Management Console displays "Configure Management Console to use secured connection to query Vertica database or Modify existing configuration." Below it, click Configure TLS Connection. This launches the Certificates wizard which allows you to configure TLS for the database.
- See Configuring TLS for a Monitored Database in MC