


This enhancement to the Vertica AWS Auto Scaling open-source package makes it quite easy to create a working replica of your existing cloud-hosted or on-premises Vertica cluster in Amazon Web Services.
You may want to clone your Vertica cluster to:
- Create a disaster recovery cluster By replicating your database to a cluster in the cloud, you can establish a working backup database that you can use if disaster strikes your primary cluster. Once your backup cluster has been established, you can periodically (and incrementally) re-synchronize it with the primary cluster to keep it up to date.Save money by suspending the backup cluster when it is not in use, and then resume it again when needed. Use the suspend_cluster.sh and resume_cluster.sh utilities provided with the Vertica AWS Auto Scaling open-source package. While the cluster is suspended, your AWS usage charges will be significantly reduced.
- Create sandbox clusters You can easily create on-demand sandbox environments for development and/or testing by cloning your production database to the AWS cloud. You can create as many replica clusters as you need, and, when you are done, you can suspend or terminate them.This is a great way to try out design and tuning changes before committing them to the production cluster. By leveraging the auto scaling features of your new replica cluster, you can also experiment with the effects of scaling the cluster size up and down
- Establish regional database replicas You may want to load balance your application workload across duplicate clusters in multiple AWS regions. You can use the new clone_local_to_cluster.sh script to establish your regional replicas, and to periodically resynchronize them with your master database during scheduled maintenance windows.
- Migrate from your on-premises data center to the cloud You can set up experimental copies of your on-premises database in the AWS cloud and see how they work. When you are ready, you can clone the most recent data before going live with your new AWS-hosted Vertica cluster.
- Take advantage of auto scaling Copy data from your existing on-premises or cloud-based cluster to a new AWS Auto Scaling cluster, and take advantage of all the features offered by Auto Scaling and Elastic Load Balancing.
Task Overview
You can clone your database by performing two main tasks:
- Create a new target cluster using the Vertica AWS Auto Scaling open source package installed on one of the nodes of your existing cluster.
- Clone your database to the new target cluster. You can repeat this step periodically to incrementally resynchronize the clusters.
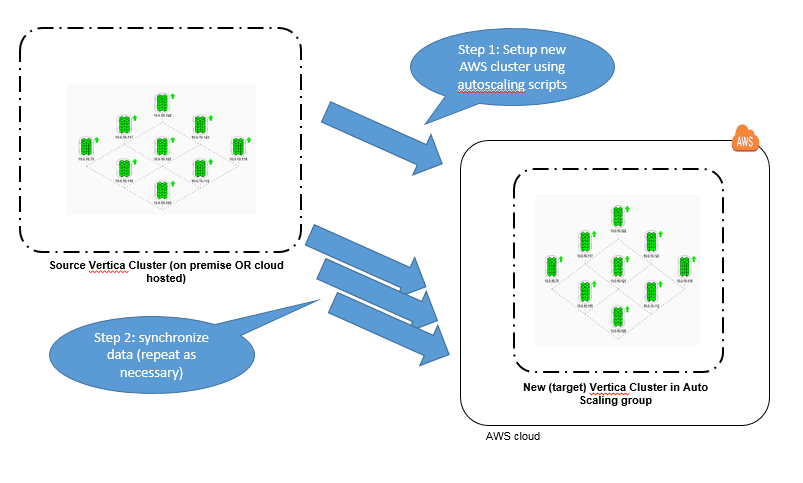
Task 1: Create a Target Cluster
To set up a new target cluster:
- Install the Vertica AWS Auto Scaling open source package on one of your existing cluster nodes.
- Set up the configuration file as instructed in the directions, to specify your credentials, region, subnet, license, etc. Choose EC2 instance types to provide sufficient CPU and memory resources for your projected workload on the target cluster, and sufficient disk space to hold your database.
- Be sure to:
- set autoscaling_group_name variable to specify a unique name for your new cluster
- set desired cluster size to match the node count of your existing cluster
- set database_name and password to match your source database
- ensure your subnet Network ACLs (if applicable), and your VPC and EC2 instance security groups are all set up to allow the following protocols between your source cluster and the new target cluster: SSH (TCP/22), vsql (TCP/5433), and rsync (TCP/50000).
- Once you have the configuration file set up the way you want it, you can create your new cluster by running the following commands as described in the README file:./setup_autoscaling.sh./bootstrap.sh./scale_cluster.sh
If you want to clone your cluster multiple times, make multiple copies of the autoscale directory, once for each target cluster. Specify unique values for autoscaling_group_name in each copy of the configuration file, and create your clusters by repeating the above commands in each directory.
- Use cluster_ip_addresses.sh to check that the cluster scaleup has completed, and that your new cluster has the required number of nodes.
The new cluster is automatically enabled with passwordless ssh access from your source cluster nodes, for the dbadmin user. This is not just a convenience, but a pre-requisite for the next task.
You are now ready to clone your local database to the new cluster.
Task 2: Clone the Database
To clone your database, run the clone_local_to_cluster.sh script from the autoscale directory where you configured the new target cluster. This script is now included with the Vertica AWS Auto Scaling open source package.
You can rerun the clone_local_to_cluster.sh script at any time to efficiently resynchronize your database – only the changed data files will be transferred. Be aware that the target database will be unavailable during the copy process, so if you are using it for production then you should schedule the copies during maintenance windows.
Under the Hood
The clone_local_to_cluster.sh script uses Vertica’s vbr.py copycluster tool to transfer Vertica database files from the source cluster nodes to the target cluster nodes, using the rsync protocol. These files are highly compressed, and each time the tool is run it will incrementally copy only files that have been created since the previous time it was run, so the process is very efficient.
Because the database catalog and data files are copied (unaltered) from the source to the target cluster, the target must align with the source in the following:
- Number of Nodes: The clone_local_to_cluster.sh script will check that the number of nodes in source and destination clusters match. If they do not, the script will report an error and abort. You can resize the target cluster to the correct number of nodes by running the scale_cluster.sh script.
- Node names: If the node names used by the two clusters do not match, then the target cluster will be reconfigured and a new target database created to use the same node names as the source.
- Database Name: If the database names for the active database on the two clusters do not match, the clone_local_to_cluster.sh script will stop the target database and create a new empty database with the name and dbadmin password used by the source database.
- File locations: If the data and catalog directory paths used on the source database do not exist on the target cluster nodes, they will be recreated as symbolic links to the /vertica/data directory (this is the default location used by the Vertica Amazon Machine Image). The target database will be automatically recreated to use the matching paths. The target nodes must have sufficient disk space for the copy to be successful – the clone_local_to_cluster.sh tool does not currently perform any disk space checks.
When the above items are aligned and verified, the target database is stopped, and the Vertica vbr.py copycluster tool is executed to copy all new data files from each source node to the corresponding target node.
The target cluster’s public IP addresses are used for the copycluster data transfer. Copies will work between AWS regions, between availability zone subnets, and from on-premises to AWS cloud based clusters, so long as the traffic protocols identified above are not blocked.
Once the copy has completed, the target database is automatically configured to make sure that the spread protocol uses point-to-point mode rather than broadcast mode (a requirement for AWS).
Finally, the target database is started and configured with the settings required for auto scaling. And that’s it! You now have a working copy of your database running (with auto scaling and node replacement features) in the AWS cloud.
The Vertica AWS Auto Scale package (including the new clone_local_to_cluster feature) is not a formally tested or supported Vertica product. Nevertheless, we hope you feel encouraged to experiment, see what works, and post your feedback and best practices back to the community.
About the Author
Bob_Strahan